Modern garages are not just about parking your car—they’re about convenience and security. One of the best additions to a garage system is a wireless keypad, giving you keyless entry and more control over your home’s access points. If you’re looking to increase the ease of use and improve security, learning how to install a keypad for garage door opener is a practical and manageable DIY task.
In this detailed guide, we’ll walk you through everything you need to know, from choosing the right keypad to mounting and programming it correctly. Whether you have a Chamberlain, LiftMaster, Genie, Craftsman, or another brand, this article covers the steps that apply across most models.
Read too: How To Replace Garage Door Roller Like a Pro? Step-by-Step Guide
How To Install A Keypad For Garage Door Opener – Getting Started
Installing a keypad for your garage door opener involves several steps, including selecting the correct device, mounting it in the right location, and syncing it with your existing opener system. Let’s dive into each step in detail.
Why Install a Garage Door Keypad?
Before we get into the “how,” let’s discuss the “why.”
- Convenience: Keyless entry allows easy access without a remote or key.
- Security: You can create temporary codes for guests or deliveries.
- Control: Manage who enters your garage and when.
- Backup Access: Useful if you lose your remote or power is out.
Types of Garage Door Keypads
Not all keypads are the same. There are two primary categories:
1. Wireless Garage Keypads
These are battery-powered and communicate with your garage door opener using radio frequencies. Most modern openers support wireless keypads.
2. Wired Keypads
These require wiring into your opener’s wall control system and are less common in residential homes today.
This guide focuses primarily on wireless keypads, as they are the most widely used and easiest to install.
Tools and Supplies You’ll Need
- Compatible wireless keypad (check brand and model)
- Screws (usually included)
- Screwdriver or drill
- Pencil or marker
- Step ladder
- User manual
- Fresh batteries (if not included)
Step-by-Step: How To Install A Keypad For Garage Door Opener
Let’s go through the complete process for installation, broken down into manageable steps.
Step 1: Choose the Right Keypad
Start by selecting a keypad compatible with your garage door opener brand. If you have a Chamberlain, LiftMaster, Genie, or Craftsman opener, there are often universal keypads available.
Check for compatibility in:
- Frequency (e.g., 315MHz or 390MHz)
- Security protocols (e.g., Security+ 2.0, Intellicode, Rolling Code)
Most brands also sell their own dedicated keypads for easier setup.
Step 2: Locate the Mounting Position
Pick a location to install the keypad outside your garage:
- On the side wall of the garage door frame
- Around 5 feet from the ground for accessibility
- Away from direct rain or sun exposure
- Near a flat, clean surface
Use a pencil or marker to mark the location for screws or mounting holes.
Step 3: Install Batteries
Open the back of the keypad and install fresh batteries (usually AA or 9V depending on the model). Check polarity to ensure correct placement.
Tip: Don’t skip this step—many errors during setup are caused by low or dead batteries.
Step 4: Mount the Keypad
Use the provided mounting screws and follow these steps:
- Drill pilot holes if you’re mounting on wood or drywall.
- Attach the mounting bracket (if included).
- Secure the keypad to the wall using the screws.
- Snap the cover into place.
Make sure it’s snug but not overly tight, which can crack the plastic.
Step 5: Program the Keypad
This is the most critical step when learning how to install a keypad for garage door opener. You must sync the keypad with the opener’s receiver.
A. Access the Learn Button
- Locate the “Learn” button on the back or side of your garage door opener (usually on the motor unit).
- It might be under a light cover. Colors vary: yellow, purple, red, or green depending on the brand.
B. Start Programming
Follow these general steps (specific steps vary by brand—refer to your manual):
- Press and release the Learn button on the opener.
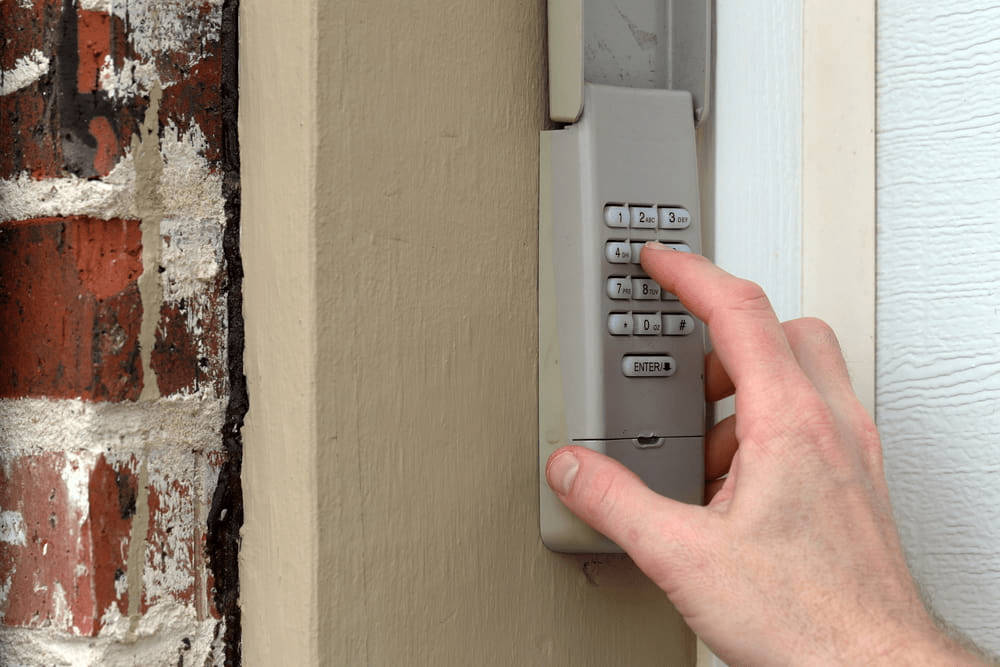
- Within 30 seconds, enter your chosen PIN (4-digit) on the keypad.
- Press the “Enter” key.
- Wait for the garage door to respond—you may hear a click or see lights flash.
Note: For some models, you may need to press a specific key combination (e.g., “Enter” + “0”) or repeat the PIN twice.
Step 6: Test the Keypad
- Wait a minute, then enter your new code.
- Press Enter.
- The door should open or close.
If not, repeat the programming process and ensure the Learn button wasn’t pressed too early or too late.
Step 7: Set Additional Features (Optional)
Depending on your keypad model, you may be able to:
- Add temporary guest codes
- Set one-time access codes
- Program multiple garage doors (for multi-door households)
Refer to the user manual for these advanced features.
Troubleshooting Tips
If your keypad isn’t working:
- Check battery power: Replace with fresh batteries.
- Repeat syncing process: Try re-entering the PIN and re-pressing the Learn button.
- Check signal range: Ensure keypad is within range of opener.
- Clear memory: Some openers require clearing old codes before programming new ones.
- Look for interference: LED lighting or metal obstructions can block wireless signals.
Maintaining Your Garage Door Keypad
Once installed, take care of the keypad to ensure it works long-term:
- Replace batteries every 12 months.
- Clean the keypad with a damp cloth (avoid water inside).
- Reprogram codes periodically for better security.
- Check the mounting screws annually.
Safety and Security Considerations
Installing a keypad improves security, but there are additional best practices:
- Choose a unique, non-obvious PIN (not 1234 or your address).
- Don’t share your PIN widely.
- Use temporary codes for guests or service professionals.
- Mount the keypad out of clear view from the street.
Compatible Brands and Models
Here’s a quick look at major brands and keypad compatibility:
| Brand | Compatible Keypad Models |
|---|---|
| Chamberlain | 940EV, 940ESTD, KLIK2U |
| LiftMaster | 878MAX, 387LM, 377LM |
| Genie | GK-R, GUK-BX, GWK |
| Craftsman | 139.53753, KLIK2U-BL |
Most keypads use rolling code technology for enhanced security.
Frequently Asked Questions (FAQs)
Q: Can I use a universal keypad for any opener?
A: Not always. Some universal keypads work with most brands, but check the compatibility list on the packaging.
Q: Can I use one keypad for multiple garage doors?
A: Yes, some models let you control up to 3 doors using different PIN combinations.
Q: What if I forget my PIN?
A: You’ll need to reset the keypad by following the factory reset instructions in your user manual.
Q: How long do garage door keypad batteries last?
A: Most last 1–2 years with normal use. Always use fresh alkaline batteries for best results.
Conclusion: Easy and Secure Entry with a Garage Keypad
Now that you know how to install a keypad for garage door opener, you’re equipped to boost the functionality and safety of your garage in under an hour. The process is simple, cost-effective, and requires minimal tools or electrical knowledge.
By following the step-by-step guide in this article, you can enjoy keyless entry, peace of mind, and the convenience of never fumbling for a remote again.


Leave a Reply