Grinding noises, a door that won’t lift, or white plastic dust inside the opener housing are classic signs of a worn drive gear. The LiftMaster 41C4220A Garage Door Opener Gear And Sprocket Assembly is the most common fix for these symptoms in compatible chain-drive units. If your motor runs but the door doesn’t move, this part is often the true culprit—and replacing it can restore smooth operation without buying a new opener.
This in-depth guide explains how the assembly works, how to confirm failure, and how to replace it safely with clear, step-by-step instructions.
Read too: The Complete Guide to Tighten Chain On Garage Door Opener for Smooth Operation
What Is the LiftMaster 41C4220A Gear And Sprocket Assembly?
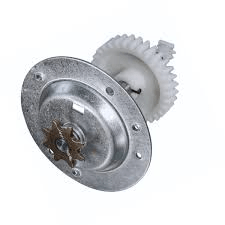
The LiftMaster 41C4220A Garage Door Opener Gear And Sprocket Assembly transfers motor power to the chain that lifts your garage door. Inside the opener, a nylon drive gear meshes with a metal sprocket. Over years of lifting a heavy door, the softer nylon teeth wear down by design—protecting the motor from overload.
Core components in the kit:
- Nylon main drive gear
- Metal sprocket and shaft assembly
- Bushings, washers, and retaining hardware
- Lubricant for reassembly
This sacrificial-gear design is intentional. Replacing a $20–$40 gear is far cheaper than replacing a burned motor.
H2: Why Does the LiftMaster 41C4220A Gear And Sprocket Assembly Wear Out?
Several real-world factors accelerate wear:
- Door imbalance: Springs out of calibration force the gear to carry extra load.
- High daily cycles: 6–10 opens per day can wear teeth within 5–8 years.
- Lack of lubrication: Dry friction increases heat and abrasion.
- Aging nylon: Plastic hardens and becomes brittle over time.
Industry service data from garage door technicians suggests that gear failure accounts for nearly 35% of opener mechanical repairs in chain-drive systems older than 7 years.
For background on opener mechanics, see the overview of garage door openers on Wikipedia:
https://en.wikipedia.org/wiki/Garage_door_opener
Clear Signs Your Gear And Sprocket Have Failed
Look for these unmistakable clues:
- Motor hums, chain doesn’t move
- Loud grinding or rattling from the housing
- Door moves a few inches, then stops
- White plastic shavings inside the opener case
If you see nylon dust, replacement of the LiftMaster 41C4220A Gear And Sprocket Assembly is almost certainly required.
Benefits vs. Drawbacks of Replacing the Gear Assembly
| Benefits | Drawbacks |
|---|---|
| Very low repair cost | Requires partial disassembly |
| Restores full lifting power | Takes 60–90 minutes DIY |
| Extends opener life 5–10 years | Hands get greasy |
| Designed as OEM wear part | Needs careful reassembly |
For most homeowners, this is the highest ROI repair you can perform on a failing opener.
Step-by-Step: How to Replace the Gear And Sprocket Assembly
Estimated time: 75 minutes
Skill level: Beginner to intermediate DIY
Tools Required
- Phillips and flat screwdriver
- 1/4″ nut driver or socket wrench
- Needle-nose pliers
- Clean cloth and included grease
Step 1 — Disconnect Power
Unplug the opener. Wait 60 seconds for capacitors to discharge.
Step 2 — Open the Housing
Remove the cover screws and set the housing aside.
Step 3 — Release the Chain Tension
Loosen the chain adjustment nut. This removes pressure from the sprocket.
Step 4 — Remove the Old Gear
Unscrew the retaining plate. Lift out the worn nylon gear. Expect plastic debris.
Step 5 — Clean the Housing
Wipe out all dust and old grease. A clean surface prevents premature wear.
Step 6 — Install New Gear and Sprocket
Apply the supplied grease. Seat the new gear fully onto the shaft. Reinstall washers and clips in original order.
Step 7 — Re-tension the Chain
Tighten until the chain sits about 6–12 mm (¼–½ inch) above the rail at midpoint.
Step 8 — Reassemble and Test
Close the housing, restore power, and run a full open/close cycle.
Compatibility: Which Openers Use 41C4220A?
This assembly is commonly compatible with many LiftMaster, Chamberlain, and Craftsman chain-drive units manufactured for over two decades.
Check:
- Model number on motor housing
- Existing gear part number
- Chain-drive (not belt-drive) confirmation
OEM vs Generic Gear Kits
| Feature | OEM 41C4220A | Generic Kit |
|---|---|---|
| Material quality | High-grade nylon | Varies |
| Fit precision | Exact | Sometimes loose |
| Lifespan | 5–10 years | 2–5 years |
| Noise level | Lower | Can be louder |
OEM kits typically run quieter and last longer.
How to Prevent Premature Gear Wear
After installing the LiftMaster 41C4220A Gear And Sprocket Assembly, extend its life with:
- Annual door balance test (door should stay halfway open by hand)
- Light lubrication every 12 months
- Chain tension check twice per year
- Avoid forcing the door when frozen in winter
These small habits can double gear lifespan.
FAQ — LiftMaster Gear And Sprocket Replacement
How long does a LiftMaster gear last?
Typically 5–10 years, depending on door weight and usage frequency.
Can I run the opener with a worn gear?
No. Continued use can damage the motor shaft and sprocket.
Do I need to replace the chain too?
Not usually. Only replace if rusted or stretched.
Is this repair cheaper than a new opener?
Yes—often under 10% of the cost of a new unit.
Why is the replacement gear nylon, not metal?
Nylon protects the motor by acting as a sacrificial component.
Does this fix grinding noises?
Yes. Grinding is a primary symptom of stripped gear teeth.
Conclusion
The LiftMaster 41C4220A Garage Door Opener Gear And Sprocket Assembly is a small part with a big impact. When your opener motor runs but the door won’t move, this kit is usually the precise, affordable solution. With about an hour of careful work, you can restore quiet, reliable operation and extend your opener’s life for years.
If this guide helped you diagnose and fix your opener, share it with friends or family who might be facing the same frustrating garage door issue.



Leave a Reply