If your garage door doesn’t fully close or open, or if it reverses before reaching the ground, you likely need to adjust its travel limits. Knowing how to set travel limits on a garage door opener ensures your door operates smoothly, prevents damage, and maintains safety for you and your family.
In this detailed guide, we’ll cover why travel limits matter, the tools you need, step-by-step instructions for different opener types, common mistakes to avoid, and long-term maintenance tips.
Why Travel Limits Matter
Travel limits determine how far your garage door moves up and down. If they are set incorrectly, you may encounter problems such as:
- Door not fully closing – Leaving your garage vulnerable.
- Door hitting the ground too hard – Causing strain on the motor and tracks.
- Door not opening fully – Making it difficult to enter or exit.
- Safety reversal activation – Triggering the opener to stop and reverse prematurely.
Properly setting the limits ensures your door stops exactly where it should.
Read too: How To Replace Garage Door Roller Like a Pro? Step-by-Step Guide
Understanding Travel Limits on a Garage Door Opener
Most modern openers have limit adjustment screws or electronic control buttons. These controls tell the motor how far to travel before stopping.
- Mechanical (screw adjustment) – Found on older models; uses physical screws to set limits.
- Digital/electronic (button adjustment) – Found on newer models; uses “Up” and “Down” buttons or similar indicators.
Tools You’ll Need
Before learning how to set travel limits on a garage door opener, gather these tools:
- Step ladder
- Flathead or Phillips screwdriver (for mechanical models)
- Safety gloves
- Flashlight (if working in a dim garage)
- Your opener’s user manual
How To Set Travel Limits On A Garage Door Opener – Step-by-Step Instructions
The exact process depends on whether your opener uses manual screws or electronic controls. Below are instructions for both.
1. For Screw Adjustment Models (Older Openers)
- Unplug the opener – Safety first.
- Locate the limit screws – Usually labeled “Up” and “Down” on the motor housing.
- Test the current setting – Run the door once to see where it stops.
- Adjust the “Down” limit – Turn the screw clockwise to move the door closer to the ground, counterclockwise to raise it.
- Adjust the “Up” limit – Turn the screw clockwise to raise the door higher, counterclockwise to lower it.
- Test the door again – Plug in the opener, run the door, and fine-tune if needed.
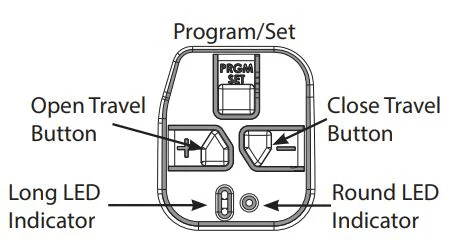
2. For Electronic/Digital Adjustment Models (Newer Openers)
- Press and hold the “Up” button – Move the door to your desired open position.
- Save the setting – Press “Set” or “Program” depending on your opener model.
- Press and hold the “Down” button – Move the door to the fully closed position.
- Save again – Confirm the setting by pressing “Set” or “Program.”
- Test the operation – Make sure both open and close positions are accurate.
Safety Tips When Adjusting Travel Limits
- Always work on a stable ladder.
- Keep hands and tools away from moving parts.
- Do not over-adjust – This can cause the motor to strain or the door to slam.
- After adjustments, test the safety reversal system by placing an object in the door’s path.
Common Problems After Adjusting Travel Limits
Even after learning how to set travel limits on a garage door opener, you might face issues:
- Door won’t move – Check that the opener is plugged in and powered.
- Door reverses unexpectedly – You may have set the limits too far, triggering the safety sensors.
- Door slams shut – Down limit may be set too high, causing excessive force.
- Motor keeps running – The limits are not stopping the opener correctly; recheck your settings.
How Travel Limits Affect Garage Door Safety
Improper travel limits can cause your garage door to fail safety tests, leading to potential hazards. For example, if the door doesn’t stop when hitting an object, it could damage your car or injure someone. Correct limits ensure the opener responds quickly to obstructions.
Maintenance Tips to Keep Travel Limits Accurate
Over time, vibration, temperature changes, and wear can affect your opener’s travel limits. Follow these tips:
- Test limits every 6 months – Small adjustments may be needed.
- Lubricate moving parts – Reduce strain on the motor.
- Inspect the tracks – Bent tracks can throw off door alignment.
- Replace worn rollers – This prevents jerky door movement.
When to Call a Professional
While setting travel limits is usually a DIY task, you should hire a pro if:
- The door is off-balance or too heavy to lift manually.
- The opener makes grinding noises even after adjustments.
- You suspect sensor misalignment or wiring issues.
Cost of Professional Adjustment
A technician typically charges $75 to $150 to adjust travel limits. This may include lubrication, safety checks, and opener inspection.
How This Process Differs for Chain, Belt, and Screw Drive Openers
The basic concept is the same for all drive types, but:
- Chain drive – Slightly more vibration; limits may drift over time.
- Belt drive – Quieter, with less frequent adjustment needs.
- Screw drive – Requires lubrication to keep limits accurate.
Final Thoughts
Learning how to set travel limits on a garage door opener is a valuable skill for any homeowner. By following the right steps for your opener type, you can ensure smooth operation, prevent damage, and keep your family safe.
If you maintain your opener regularly and check the limits twice a year, you’ll enjoy years of trouble-free performance without costly repairs.


Leave a Reply