If you notice your Liftmaster garage door opener up and down arrows flashing, it can be confusing and concerning. This flashing indicator usually signals that there is an error or issue with your garage door opener that needs your attention. Understanding what causes these lights to flash and how to fix the problem will save you time and frustration.
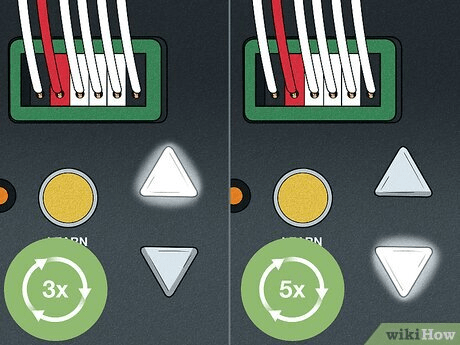
In this comprehensive article, we will explore everything related to the Liftmaster garage door opener up and down arrows flashing—what the flashing arrows mean, the common causes behind it, step-by-step troubleshooting methods, and tips to prevent future problems. Whether you are a new Liftmaster user or experienced homeowner, this guide will help you get your opener working smoothly again.
Read too: How To Replace Garage Door Roller Like a Pro? Step-by-Step Guide
What Do the Up and Down Arrows Flashing on a Liftmaster Garage Door Opener Mean?
When the up and down arrows on your Liftmaster garage door opener’s control panel or wall console begin flashing, it is typically a diagnostic signal indicating a problem. The flashing lights serve as an alert to inform you that the opener has detected an error related to:
- The safety sensors
- The door’s travel limits
- Motor or control board issues
- Wiring or power supply problems
The number and pattern of flashes can provide specific error codes, which you can often decode by referring to the user manual for your particular Liftmaster model. However, most commonly, the flashing arrows mean your opener’s system has a safety concern or is unable to complete a normal door cycle.
How to Fix Liftmaster Garage Door Opener Up And Down Arrows Flashing
If your Liftmaster garage door opener’s up and down arrows are flashing, follow these troubleshooting steps to identify and resolve the issue:
1. Check the Safety Sensors
One of the most common causes of flashing arrows is an issue with the safety sensors located near the bottom of your garage door tracks:
- Inspect Alignment: Make sure both sensors face each other directly. If they are misaligned, the opener won’t close the door and the arrows will flash.
- Clean the Sensors: Dust, spider webs, or debris on the lenses can block the infrared beam. Gently wipe the sensors with a clean cloth.
- Look for Indicator Lights: Each sensor has an LED light that shows status. Usually, a steady green light means the sensor is working correctly, and a red or no light signals a problem.
- Remove Obstructions: Ensure nothing blocks the path between the sensors.
2. Verify the Door Travel Limits
The flashing arrows can indicate that the opener’s travel limits need resetting:
- Reset the Limits: Follow your Liftmaster manual’s instructions to reset the up and down travel limits. This process tells the opener how far the door should move to fully open or close.
- Check for Obstructions: If the door hits an object or resistance during travel, it can cause the opener to stop and flash error lights.
- Inspect Door Balance: A door that is out of balance or has broken springs can strain the motor and trigger flashing arrows.
3. Inspect Wiring and Connections
Loose, damaged, or corroded wiring between the sensors, control board, and motor can lead to errors:
- Turn off Power: Before inspecting, turn off the power to the garage door opener for safety.
- Examine Sensor Wires: Look for breaks or frayed wires near the sensors.
- Check Control Board Wiring: Ensure all connectors are firmly seated and free from corrosion.
4. Perform a Power Cycle Reset
Sometimes the opener’s system needs a reset:
- Unplug the Opener: Disconnect the power for 30 seconds.
- Plug it Back In: Restore power and see if the flashing arrows stop.
- Test the Door Operation: Open and close the door with the remote or wall control.
5. Check for Motor or Control Board Issues
If the above steps don’t fix the flashing arrows:
- Look for Unusual Noises: Grinding or humming noises may signal motor trouble.
- Inspect for Overheating: Overheated motors can temporarily disable functionality.
- Consult a Professional: Circuit board failure or motor problems often require expert diagnosis and repair.
Common Causes of Liftmaster Garage Door Opener Up And Down Arrows Flashing
- Safety Sensor Problems: Misalignment, dirty lenses, or wiring faults.
- Incorrect Travel Limits: Limits not set or door obstructed.
- Electrical Issues: Power surges, loose wiring, or control board errors.
- Mechanical Failures: Door springs, cables, or rollers malfunctioning.
- Remote or Wall Control Faults: Buttons stuck or communication errors.
Preventing Future Flashing Arrow Problems on Your Liftmaster Garage Door Opener
To keep your Liftmaster opener working flawlessly and avoid flashing arrow issues:
- Regularly clean and inspect your safety sensors.
- Perform periodic checks on door balance and springs.
- Test your remote and wall controls for consistent performance.
- Use surge protectors to guard against electrical damage.
- Schedule professional maintenance annually.
When to Call a Professional for Liftmaster Garage Door Opener Issues
If you’ve tried all basic troubleshooting and your Liftmaster garage door opener up and down arrows flashing persists, professional help is advised. Licensed garage door technicians have the tools and expertise to diagnose electronic control board problems, motor failures, and complex wiring issues safely.
Attempting advanced repairs without experience can be hazardous and may void warranties.
Summary
The Liftmaster garage door opener up and down arrows flashing is a helpful diagnostic signal alerting you to sensor misalignment, travel limit issues, wiring faults, or motor troubles. By methodically inspecting sensors, resetting limits, checking wiring, and performing power resets, many common problems can be resolved quickly.
Routine maintenance and timely professional service will keep your Liftmaster garage door opener operating smoothly for years to come, ensuring safety and convenience.



Leave a Reply