If your Chamberlain garage door doesn’t open all the way, stops too soon, or closes too hard against the floor, it’s probably time to adjust the travel limits. Understanding how to set travel limits on Chamberlain garage door opener will help you ensure the door operates smoothly, protects the motor from strain, and keeps your home secure.
This guide will walk you through everything from why travel limits matter to step-by-step instructions, common mistakes to avoid, and tips for keeping your Chamberlain garage door opener in peak condition.
Why Travel Limits Are Important for Your Chamberlain Garage Door Opener
Travel limits determine how far your garage door moves when opening and closing. If they are set incorrectly, you might experience:
- Door not closing completely – Leaving gaps for weather, pests, or intruders.
- Door slamming on the ground – Putting stress on the opener and damaging the door.
- Door not opening fully – Preventing your vehicle from entering or exiting smoothly.
- Premature reversal – Causing the door to reverse unexpectedly due to safety system activation.
Read too: How To Replace Garage Door Roller Like a Pro? Step-by-Step Guide
By learning how to set travel limits on Chamberlain garage door opener, you ensure your system functions as designed.
Understanding Travel Limit Adjustments on Chamberlain Models
Chamberlain openers use electronic adjustment screws or digital buttons to set travel limits. These adjustments tell the motor when to stop in both the open and closed positions.
- Mechanical screw adjustment – Found on older Chamberlain models, with physical screws labeled “Up” and “Down.”
- Electronic button adjustment – Found on newer models with “Up” and “Down” arrow buttons, often located on the motor housing.
Tools You’ll Need
Before starting the adjustment process, prepare these items:
- Step ladder
- Flathead screwdriver (for mechanical models)
- Clean cloth for wiping dust from controls
- User manual for your Chamberlain opener
- Safety gloves
How To Set Travel Limits On Chamberlain Garage Door Opener – Detailed Instructions
The method will depend on whether your opener uses manual screws or digital buttons. Follow the process for your specific model.
A. For Chamberlain Openers with Manual Limit Screws
- Disconnect Power – Always unplug the opener before making any adjustments.
- Locate the Limit Screws – Usually found on the motor housing, labeled “Up” and “Down.”
- Test the Door’s Current Travel – Plug in the opener, operate the door, and note where it stops.
- Adjust the Down Limit – Turn the screw clockwise to move the door closer to the ground, counterclockwise to raise it.
- Adjust the Up Limit – Turn the screw clockwise to raise the door higher, counterclockwise to lower the open position.
- Reconnect Power and Test – Run the opener to ensure both positions are correct. Repeat if needed.
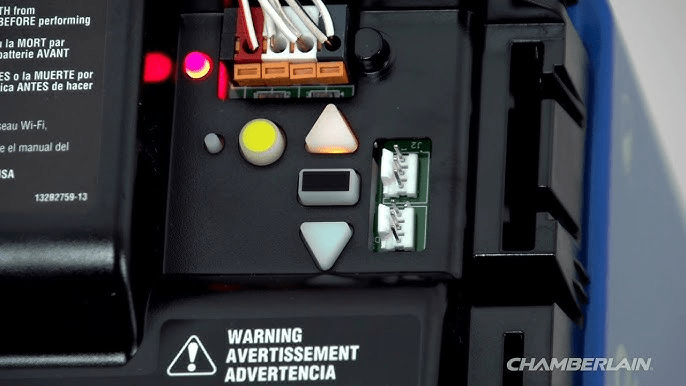
B. For Chamberlain Openers with Electronic Button Controls
- Press and Hold the Adjustment Button – Usually labeled “Up” or “Down.”
- Set the Open Position – Hold the “Up” button until the door reaches the desired height, then release and press “Set.”
- Set the Closed Position – Hold the “Down” button until the door stops just above the floor, then press “Set.”
- Test the Operation – Ensure the door stops at the correct positions both ways.
- Fine-Tune if Necessary – Small adjustments may be needed for perfect operation.
Safety Precautions During Adjustment
When adjusting travel limits on your Chamberlain garage door opener, keep these safety tips in mind:
- Always use a stable ladder.
- Keep children and pets away from the garage while making adjustments.
- Do not force the door manually unless the opener is in manual release mode.
- Test the safety reversal system after adjustments to ensure it still works.
Troubleshooting After Adjusting Travel Limits
Even after correctly learning how to set travel limits on Chamberlain garage door opener, you might encounter issues:
- Door reverses before closing – Down limit might be set too far, triggering safety sensors.
- Door doesn’t close completely – Increase the down limit slightly.
- Motor keeps running after the door stops – Limits need recalibration.
- Door opens too far – Reduce the up limit to prevent hitting stops or overextending the opener arm.
Maintenance Tips for Long-Term Accuracy
To keep your travel limits accurate over time:
- Check settings every 6 months – Vibrations and temperature changes can cause shifts.
- Lubricate moving parts – Reduces strain on the opener.
- Inspect the tracks and rollers – Misalignment can cause improper travel.
- Keep sensors clean and aligned – Prevents false safety reversals.
When to Call a Professional
While most homeowners can adjust travel limits themselves, you should consider calling a technician if:
- The door is off-balance or heavy to lift manually.
- The opener makes loud grinding or squealing noises.
- The door appears misaligned or gets stuck mid-travel.
A garage door technician can check for deeper issues like worn springs, damaged tracks, or motor problems.
Cost of Professional Adjustment for Chamberlain Garage Door Openers
Hiring a pro to adjust your Chamberlain opener’s travel limits typically costs between $75 and $150. This price often includes additional maintenance such as lubrication, safety testing, and inspection.
How Chamberlain’s Travel Limit System Compares to Other Brands
While the process is similar for LiftMaster and Craftsman openers, Chamberlain’s systems often feature easier-to-use digital controls and clearer labeling. This makes learning how to set travel limits on Chamberlain garage door opener more beginner-friendly than some competitors.
Final Thoughts
Adjusting your Chamberlain garage door opener’s travel limits is a quick yet essential maintenance task. With proper settings, your door will open and close smoothly, avoid unnecessary strain, and keep your garage secure.
By following the correct steps for your model—whether it uses manual screws or electronic buttons—you can handle the adjustment yourself in under 30 minutes. Remember to recheck the limits twice a year and keep your opener clean and lubricated for the best results.


Leave a Reply