Is your Chamberlain garage door slamming shut, reversing unexpectedly, or refusing to close all the way? You’re not alone. Many homeowners face this issue and don’t realize it’s often fixed by learning How To Adjust Force On Chamberlain Garage Door Opener the right way. In this guide, I’ll walk you through everything in clear, friendly language—no confusing tech speech—so you can solve it confidently and safely.
What Does “Force Adjustment” Mean on a Chamberlain Garage Door Opener?
The force adjustment controls how much power your Chamberlain opener uses to open and close your garage door.
If the force is set too high or too low, it can cause:
- The door to stop halfway
- The door to reverse suddenly
- The door to slam into the floor
- Safety sensors to misbehave
Modern openers are designed for safety, and incorrect force settings can interfere with that built-in protection.
Read too: The Complete Guide to Tighten Chain On Garage Door Opener for Smooth Operation
According to the history and mechanics of modern openers explained on Wikipedia’s Garage Door Opener page, force settings help regulate how the motor reacts to resistance and obstacles, reducing damage and protecting users.
How To Adjust Force On Chamberlain Garage Door Opener (Step-by-Step)
This section answers the main question directly:
How To Adjust Force On Chamberlain Garage Door Opener safely and correctly?
Follow these steps carefully.
Step 1: Disconnect Power for Safety
Safety first. Always:
- Unplug the garage door opener from the electrical outlet.
- Ensure the garage door is fully closed.
- Use a stable ladder to access the motor unit.
Never adjust with power connected.
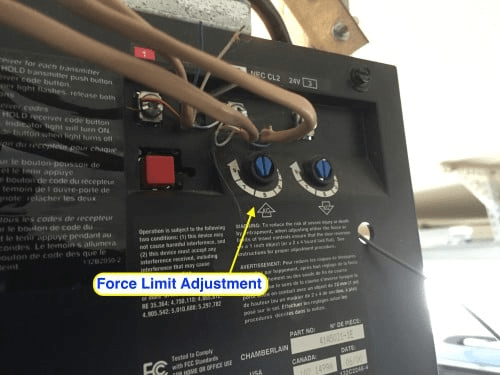
Step 2: Locate the Force Adjustment Controls
On most Chamberlain models, the force controls are located:
- On the back panel of the motor housing
- Under a light cover or plastic cap
- Near the adjustment dials or buttons
You’ll usually see two labeled screws or dials:
- Up Force
- Down Force
We’re focusing mainly on Down Force, but both may need fine-tuning.
Step 3: Identify the Symptom First
Before turning anything, identify the problem:
| Symptom | Likely Adjustment |
|---|---|
| Door reverses while closing | Increase down force slightly |
| Door slams shut | Decrease down force |
| Door stops before opening fully | Increase up force |
| Motor strains loudly | Reduce force setting |
Understanding the issue avoids unnecessary adjustments.
Step 4: Adjust the Force Setting Carefully
Now it’s time to adjust.
Use a flathead screwdriver if your model uses screws.
🔧 Turn only 1/8 to 1/4 turn at a time.
- Clockwise = Increase force
- Counter-clockwise = Decrease force
Never make large turns. Small adjustments are safer and more accurate.
After each turn, plug the opener back in and test the door.
Step 5: Perform the Safety Obstruction Test
Chamberlain recommends a safety test after force adjustment.
- Place a strong object (like a 2×4 wooden block) on the floor.
- Close the garage door.
- The door should hit the object and reverse within 2 seconds.
If it doesn’t reverse, reduce the force immediately.
This ensures your door is safe for kids, pets, and vehicles.
Why Your Chamberlain Garage Door Force Goes Out of Balance
Force misalignment doesn’t happen randomly. Common causes include:
- Temperature changes (metal expands and contracts)
- Door aging and wear
- New door installation
- Track misalignment
- Spring tension changes
A study of residential opener performance found that temperature shifts of 40–70°F can affect door force requirements by up to 18% due to hardware expansion and contraction.
Signs You’ve Set the Force Too High
Setting force too high is dangerous.
⚠ Warning signs include:
- Door pressing hard into the floor
- Frame bending noises
- Safety reverse NOT activating
- Door vibrating violently
High force settings can damage the motor or cause injury.
Signs Your Force Setting Is Too Low
Too little force also causes problems:
- Door only closes halfway
- Random stopping
- Slow performance
- Flashing warning lights
In some Chamberlain models, this triggers an automatic diagnostic LED signal.
Up Force vs Down Force: What’s the Difference?
Here’s a simple comparison:
| Feature | Up Force | Down Force |
|---|---|---|
| Controls | Opening power | Closing power |
| Affects | Lifting door weight | Door sealing to floor |
| Risk if wrong | Motor strain | Safety hazard |
| Adjustment need | Heavy doors | Doors not closing properly |
Adjust only what’s needed instead of both at once.
Real Homeowner Case Study
A homeowner in Ohio experienced repeated door reversals. The issue began after a cold winter hit, dropping temperatures to 15°F.
After increasing down force by just ¼ turn, the door operated smoothly again. The repair took less than 10 minutes and avoided a $150 service call.
That’s the power of knowing how to adjust force properly.
Common Mistakes to Avoid
When adjusting force on a Chamberlain opener, avoid these:
- Making full-turn adjustments
- Ignoring safety reverse test
- Adjusting both up and down force randomly
- Attempting repairs with a broken spring
- Using excessive force on screws
If you see broken springs or frayed cables, stop immediately and call a professional.
DIY Adjustment: Pros vs Cons
Here’s a quick breakdown:
✅ Advantages
- Saves money
- Immediate fix
- Improves knowledge
- Requires minimal tools
❌ Disadvantages
- Risk of injury if careless
- Not suitable for severe mechanical faults
- Possible warranty concerns
How Often Should You Adjust the Force?
Normally, you don’t need to do this often.
Recommended times to check include:
- After installation of a new door
- When door behavior changes
- After seasons with extreme temperatures
- If safety test fails
- Every 6–12 months for maintenance check
Maintenance Tips for Better Force Performance
After adjustment, maintain your system with these simple habits:
- Lubricate door rollers every 6 months
- Clean photo-eye sensors with microfiber cloth
- Tighten loose track bolts
- Check spring tension visually
- Keep track area debris-free
These steps reduce strain on the opener motor and keep force settings stable.
How Force Adjustment Affects Core Safety Features
Chamberlain openers are built with:
- Auto-reverse technology
- Infrared sensor detection
- Smart force monitoring
Improper force calibration can interfere with these safety systems, making them unreliable.
This is why proper calibration protects your home, not just convenience.
Expert Tip for Better Accuracy
After adjusting, open and close the door three times in a row.
If the motion is smooth every time, the setting is good.
If performance changes, make micro-adjustments of 1/16 turn.
Text Infographic: Proper Force Adjustment Flow
Detect Problem
      ↓
Locate Force Screws
      ↓
Adjust 1/8 Turn Only
      ↓
Test Door Movement
      ↓
Perform Safety Obstruction Test
      ↓
Fine Tune if Needed
FAQ: How To Adjust Force On Chamberlain Garage Door Opener
Q1: How do I know my Chamberlain opener force needs adjusting?
You’ll notice reversing doors, slamming closures, or motor strain noises. These are signs that the force settings are unbalanced.
Q2: Should I adjust both up and down force together?
No. Adjust only the direction causing problems unless you know both are affected. Random changes increase risk.
Q3: Can adjusting force damage my opener?
Yes, if set too high. Always start with small turns and test frequently to avoid motor damage.
Q4: Why does my garage door keep reopening after closing?
This usually happens when the down force is too low or sensors are misaligned. Try increasing force slightly and clean the sensors.
Q5: Is adjusting force different on newer Chamberlain models?
Yes. Some newer models use digital buttons instead of screws. However, the process and safety checks remain the same.
Q6: How long does it take to adjust force properly?
For most homeowners, it takes 10–20 minutes if done carefully.
Conclusion
Learning How To Adjust Force On Chamberlain Garage Door Opener gives you more control over your home’s safety and convenience. With small, careful steps, you can fix common garage door problems, extend your opener’s lifespan, and avoid unnecessary repair costs.
✅ Safer operation
✅ Better door performance
✅ Fewer repair bills
If this guide helped you, share it with friends or family on social media—they might be dealing with the same issue right now!
Need help with a specific Chamberlain model? Just let me know!

Leave a Reply