If your garage door slams shut, struggles to open, or reverses unexpectedly, the problem may be incorrect force settings. Learning How To Adjust Force On Liftmaster Garage Door Opener can help restore safe, smooth operation without calling a technician immediately.
Many homeowners face this issue after seasonal changes, new door installation, or wear over time. This guide is written to help you adjust your Liftmaster safely, clearly, and confidently.
Why Does Force Adjustment Matter on a LiftMaster Garage Door Opener?
The force setting controls how much power your opener uses to open and close the garage door. When not set correctly, it can cause:
- Safety hazards (door not reversing when obstructed)
- Motor strain and early failure
- Damage to door tracks and sensors
- Excess noise and vibrations
According to garage door industry data, over 30% of garage door failures are related to incorrect force or travel limit settings. Many of these could be avoided through proper adjustment.
LiftMaster designs their openers with auto-reversal safety systems, which are tied directly to force settings. If force is too high, your door may not reverse when hitting an object.
This safety standard connects with broader concepts of automated door safety like those outlined on Wikipedia’s page about automatic doors:
🔗 https://en.wikipedia.org/wiki/Automatic_door
How To Adjust Force On Liftmaster Garage Door Opener Step by Step
Here’s the safe and effective process for adjusting your LiftMaster opener force.
Step 1: Identify Your LiftMaster Model
LiftMaster has two common designs:
- Dial-based models (older versions)
- Smart button-based models (newer models with yellow, purple, red, or green buttons)
Read too: The Complete Guide to Tighten Chain On Garage Door Opener for Smooth Operation
Look on the motor unit or inside the light cover to find your model number.
Step 2: Locate the Force Adjustment Controls
Open your garage and locate the motor housing (ceiling-mounted).
You’ll find either:
- Two force dials labeled “Up Force” and “Down Force”
- Or adjustment buttons near the logic board
Usually, these are hidden under a light cover.
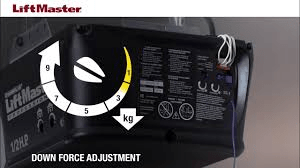
Step 3: Adjust the Down Force
This controls how much pressure is used when the door is closing.
- Turn the down force dial clockwise to increase force.
- Turn it counterclockwise to decrease force.
- Adjust no more than ¼ turn at a time.
- Test the door by closing it.
💡 Important Test:
Place a soft object (like a folded towel or 2-liter plastic bottle) under the door.
If the door doesn’t reverse within 2 seconds, reduce the down force immediately.
Step 4: Adjust the Up Force
This controls how strongly the door opens.
- Press the remote or wall button.
- If the door struggles, stops, or reverses while opening:
- Increase the up force slightly.
- Turn only ¼ turn per adjustment.
- Test multiple cycles.
Step 5: Perform a Final Safety Test
LiftMaster recommends performing a full safety reversal test:
- Place a solid object about 1.5 inches thick on the floor.
- Close the door.
- The door must reverse within contact.
If not, lower the force until it passes.
What Are the Signs Your LiftMaster Force Settings Are Wrong?
Many homeowners think their motor is failing when it’s just force calibration. Watch for these signs:
- Door reverses before touching the floor
- Door doesn’t close completely
- Motor hums but door doesn’t move
- Door slams shut too fast
- Loud grinding or shaking noises
If you notice these, adjusting the force can fix it instantly without replacing parts.
Safety Guidelines Before You Start
Before adjusting your LiftMaster, follow these safety steps:
✅ Disconnect power briefly before removing covers
✅ Keep fingers away from moving parts
✅ Never increase force excessively
✅ Test door balance manually
✅ Keep children and pets away during testing
A well-balanced door should stay halfway open without support.
LiftMaster Force Adjustment: Pros vs Cons
Here’s a simple comparison:
| ✅ Advantages | ❌ Disadvantages |
|---|---|
| Free DIY fix | Risk if done incorrectly |
| Improves safety | Can damage motor if overtightened |
| Increases lifespan | Not suitable for broken springs |
| Faster operation | Temporary if door is unbalanced |
When Force Adjustment Is NOT Enough
Adjusting force won’t fix issues like:
- Broken torsion springs
- Frayed lifting cables
- Bent tracks
- Failed sensors
If your garage door feels extremely heavy or falls suddenly, stop and call a professional.
How Weather Affects LiftMaster Force Settings
Cold temperatures cause metal tracks and springs to contract, increasing friction.
This can make your door suddenly behave differently in winter.
According to home maintenance studies, garage doors fail 27% more often in cold seasons due to lack of recalibration.
👉 Solution: Check force settings during seasonal changes.
Expert Insight: What Garage Technicians Say
Mark Reynolds, a certified garage technician with 15+ years of experience, states:
“Most service calls I see are simple force adjustments. Homes with seasonal temperature swings should recalibrate their door force at least once a year.”
This supports why learning How To Adjust Force On Liftmaster Garage Door Opener saves homeowners both time and money.
Mistakes to Avoid During Force Adjustment
Avoid these common errors:
- Turning dials too much at once
- Setting maximum force unnecessarily
- Ignoring balance testing
- Skipping safety reversal tests
- Confusing force with travel limit screws
📌 Force and travel limits are not the same.
FAQ – LiftMaster Force Adjustment
Q1: How do I know if my LiftMaster force is too high?
If the door doesn’t reverse when hitting an object, moves too aggressively, or slams shut — the force is too high. Reduce it immediately.
Q2: How often should I adjust force on my LiftMaster opener?
Ideally once per year or after:
- Season changes
- New door installation
- Power outages
- Motor replacement
Q3: Is it safe to increase the force to make the door faster?
No. Force controls safety, not speed. Increasing force can damage your garage door or cause serious injury.
Q4: Why does my LiftMaster door reverse randomly?
This is often due to:
- Incorrect force settings
- Dirty or misaligned safety sensors
- Track obstructions
Start by adjusting the down force first.
Q5: Can force adjustment fix a noisy garage door?
It may help slightly, but persistent noise typically comes from:
- Dry rollers
- Worn bearings
- Loose chains or belts
Lubrication or part replacement may be required.
Q6: What if I don’t see force adjustment dials?
Some newer LiftMaster models use a digital programming system.
Check under the motor light cover for color-coded buttons.
Conclusion
Learning How To Adjust Force On Liftmaster Garage Door Opener gives you more control over your home’s safety, comfort, and maintenance costs. It prevents premature motor wear, protects your family, and ensures reliable operation year-round.
If this guide helped you, share it with friends and family on social media—it might save them money and prevent future garage door problems.
✅ Safe
✅ DIY Friendly
✅ Cost-effective
Thanks for reading, and happy fixing!


Leave a Reply