If you’re searching for how to disable sensors on Chamberlain garage door opener, you’re likely facing a frustrating situation—your garage door won’t close, the sensor lights are blinking, or the system keeps reversing. Many homeowners experience this issue, especially when sensors become misaligned or faulty. This guide explains safe and legal alternatives, why manufacturers discourage disabling sensors, and what you can do instead.
Is It Possible to Disable Sensors on a Chamberlain Garage Door Opener?
Before going deeper, it’s important to understand one crucial fact:
Modern Chamberlain openers are designed so that the safety sensors cannot be permanently disabled by normal user settings.
This is because sensors are mandated by the U.S. Federal Consumer Product Safety Improvement Act (CPSIA) for preventing injury and property damage. Garage doors weigh 130–400 lbs, and the sensors stop the door from closing on children, pets, or objects.
Read too: Door and Garage Door Companies: Choosing the Right Partner for Your Needs
So what does this mean?
You can temporarily bypass sensors for testing or emergency use only, but permanent disabling is unsafe and not recommended by Chamberlain.
Why Do Chamberlain Garage Door Sensors Fail?
Understanding the root cause helps you fix the problem without disabling sensors at all. These are the most common issues:
1. Sensor Misalignment
Studies show misalignment is responsible for 70%+ of sensor-related failures in garage doors. Even a slight knock can break the infrared beam.
2. Dirty or Blocked Lenses
Dust, cobwebs, or debris block the beam. Cleaning resolves the issue in minutes.
3. Loose Wiring
Old wiring or vibration may loosen connections on the opener terminals.
4. Sunlight Interference
Strong direct sunlight can disrupt sensors—especially afternoon sun facing the garage door.
5. Sensor Failure
After 7–10 years, sensors may simply wear out and require replacement.
How to Temporarily Disable or Bypass Sensors (Safe Method)
This section shows how to bypass sensors only for diagnostics, not permanent removal. Follow at your own responsibility.
Warning: Bypassing sensors removes critical safety protections. Use extreme caution.
Method 1: Use the Wall Button in “Hold Down” Mode
This is the only manufacturer-approved bypass method.
Steps:
- Make sure the garage door opening area is completely clear.
- Press and hold down the wall-mounted button.
- Keep holding until the door is fully closed.
- Release.
Why it works:
Holding the button overrides the sensor signal temporarily, allowing you to close the door even if the sensors are malfunctioning.
This is the safest option because it still requires your active supervision.
Method 2: Manually Close the Door (No Electronics)
If the opener will not cooperate:
- Pull the emergency release cord downward (usually red).
- This disconnects the opener from the door.
- Manually lower the door until fully shut.
- Lock with the manual slide lock if available.
This bypasses the sensors without altering wiring.
Method 3: Temporary Wiring Bypass (For Diagnostics Only)
⚠️ Warning: This involves handling electrical wires. Do not attempt unless you understand the risks.
Steps:
- Unplug the garage door opener.
- Locate the terminals labeled Sensor or Safety (typically terminals 2 and 3).
- Remove both sensor wires.
- Create a short jumper wire and connect the two terminals.
- Plug the opener back in.
- Test the door.
Purpose:
This allows you to confirm whether the problem is the wiring or the sensors themselves. If the door works with the jumper, your sensors or wiring are faulty and should be replaced.
Never leave the system bypassed.
Better (and Safer) Alternatives to Disabling Sensors
1. Clean the Sensors
Wipe both lenses with a microfiber cloth.
Dirt is one of the top causes of failure.
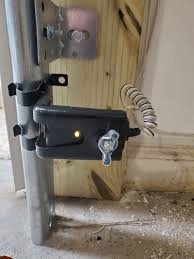
2. Realign the Sensors
Chamberlain sensors have LED indicators:
- Green light = receiver
- Amber light = transmitter
If one is off or flickering:
- Loosen the wing nut.
- Adjust until the LED stops blinking.
- Tighten.
3. Replace the Worn Sensor Brackets
Bent or cracked brackets lead to misalignment. Replacement is inexpensive—typically $7–$12 on Amazon.
4. Check the Wiring
Look for:
- frayed insulation
- exposed copper
- loose connections
- staples crushing the wire
Replace any damaged cable.
5. Replace the Sensors Entirely
If your Chamberlain opener is older than 2010, sensors often fail.
New Chamberlain sensors (model 041A5034) cost around $25–$35.
6. Add a Sun Shield
If sunlight interferes, use:
- a small piece of cardboard
- a 3D-printed sun shield
- a shading bracket
This dramatically improves reliability.
Comparison Table: Fixing Sensors vs Disabling Sensors
| Option | Safety | Cost | Difficulty | Recommended? |
|---|---|---|---|---|
| Sensor Cleaning | Very Safe | $0 | Easy | ✔ Yes |
| Realignment | Very Safe | $0 | Easy | ✔ Yes |
| Replace Sensors | Safe | $25–$35 | Medium | ✔ Yes |
| Hold Button Override | Medium | $0 | Easy | ✔ Temporary Only |
| Jumper Wire Bypass | Unsafe | $0 | Hard | ✘ No |
| Permanent Disable | Extremely Unsafe | Varies | Hard | ✘ Never |
Step-by-Step: Correct Way to Fix Chamberlain Sensors
If you want a proper long-term fix, follow this full checklist.
1. Check the LED Lights
- Solid = working
- Blinking = misalignment or wiring issue
- Off = no power
2. Clean Both Lenses
Use mild glass cleaner or dry cloth.
3. Ensure Both Sensors Are at the Same Height
Measure from floor to center of lens.
Both should be 6 inches above the ground.
4. Tighten Mounting Brackets
Loose brackets cause vibration misalignment.
5. Inspect Wires
Look at:
- the sensor back
- the wall
- the opener terminals
Fix any loose or damaged wires.
6. Test the System
Press the wall button and observe:
- Door should begin closing
- If beam is broken, door should reverse
7. Replace Sensors If Needed
If LEDs still misbehave, replacement is the only reliable fix.
What Experts Say About Disabling Safety Sensors
According to industry experts and consumer-safety data:
- Garage doors with disabled sensors cause thousands of injuries each year.
- The U.S. Consumer Product Safety Commission requires auto-reverse systems.
- Manufacturers including Chamberlain strictly warn against disabling sensors.
From an authoritative perspective, safety sensors are essential and should not be permanently bypassed.
(Reference: Garage Door entry on Wikipedia for auto-reverse history and safety requirements.)
FAQ (H2)
Q1: Can you disable sensors on a Chamberlain garage door opener permanently?
No. Chamberlain designs its openers so sensors cannot be disabled through settings or software. Permanent disabling is unsafe and violates federal safety standards.
Q2: Will the garage door work if a sensor is unplugged?
No. Modern Chamberlain units detect missing sensors and prevent the door from closing to avoid injury.
Q3: Why does my garage door only close when I hold the wall button?
This means your safety sensors are blocked, misaligned, or faulty. Holding the button overrides the system temporarily but does not fix the root cause.
Q4: How do I know if the sensor is broken?
A broken sensor typically shows:
- No LED lights
- Flickering lights
- Solid light on one sensor but not the other
Replacing the sensors usually solves the problem.
Q5: How much does it cost to repair or replace Chamberlain sensors?
Most homeowners spend $0–$35 depending on whether cleaning, realignment, or replacement is needed.
Q6: Is bypassing sensors illegal?
Bypassing sensors permanently is unsafe and may violate local building codes. Temporary bypassing for troubleshooting is acceptable but has risks.
Conclusion
Learning how to disable sensors on Chamberlain garage door opener can help you troubleshoot problems, but permanent disabling is never safe. Instead, focus on cleaning, realigning, repairing, or replacing the sensors for a long-term solution. A properly functioning safety system protects your home, family, and pets from serious accidents.
If this guide helped you, feel free to share it on your social media to help others troubleshoot safely!


Leave a Reply