If your garage wall control has stopped working or you’re upgrading to a multi-door setup, learning How To Wire A 3 Button Garage Door Opener can save time and money. Many homeowners feel unsure about wiring, but the good news is that garage door wall buttons use low-voltage wiring, making them much safer than standard household electrical work. This guide explains everything clearly, step by step, so even beginners can follow with confidence.
What Is a 3 Button Garage Door Opener?
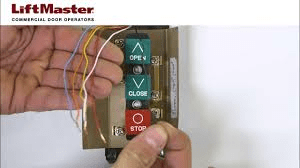
A 3 button garage door opener is a wall-mounted control panel designed to operate up to three separate garage doors from one location. Each button sends a signal to a specific opener motor.
Read too: Door and Garage Door Companies: Choosing the Right Partner for Your Needs
Why Homeowners Use 3 Button Controls
- One wall panel for multiple garage doors
- Cleaner installation in shared garages
- Easier access than carrying multiple remotes
- Ideal for homes with 2–3 car garages
Most systems use low-voltage (12–24V) wiring, which reduces electrical risk while remaining reliable.
How Does a 3 Button Garage Door Opener Work?
Each button completes a low-voltage circuit between the wall control and the garage door opener’s logic board.
Basic concept:
- Pressing a button closes a circuit
- The opener receives the signal
- The motor activates (open/close cycle)
This is similar to how a doorbell works, just with more than one control channel.
For general background on garage opener systems, you can review the basic explanation on Wikipedia:
https://en.wikipedia.org/wiki/Garage_door_opener
What You Need Before Wiring a 3 Button Garage Door Opener
Tools and Materials Checklist
- 3-button garage door wall control
- Low-voltage garage door wire (typically 22-gauge)
- Wire stripper
- Small flathead screwdriver
- Mounting screws
- Ladder (if needed)
Safety Preparation
- Disconnect power to the garage door opener
- Ensure the garage door is fully closed
- Work in a dry area, temperature ideally 22–28°C
According to residential safety data, low-voltage garage wiring accounts for less than 5% of DIY electrical accidents, making it one of the safest home wiring tasks when basic precautions are followed.
How To Identify the Correct Terminals on Your Garage Opener
Before wiring, you must locate the terminal screws on each garage door opener motor.
Common Terminal Labels
- PB / PUSH / BTN – Wall button input
- COM – Common terminal
- WHT / RED – Color-coded terminals
Some openers use symbols instead of text. Check the label on the opener housing or manual.
How To Wire A 3 Button Garage Door Opener (Step-by-Step)
Step 1: Turn Off Power Completely
Unplug the garage opener or turn off the circuit breaker. Even though the wiring is low-voltage, this prevents accidental motor activation.
Step 2: Mount the 3 Button Wall Control
- Install at 48–60 inches from the floor
- Keep it visible and away from moving parts
- Secure it firmly to the wall
Step 3: Run the Low-Voltage Wires
You will typically need:
- One pair of wires per garage door opener
For three doors:
- Total = 6 wires (3 pairs)
Run each pair neatly along the wall or ceiling using clips.
Step 4: Strip the Wire Ends
- Strip 8–10 mm of insulation
- Do not nick or damage copper strands
Step 5: Connect Wires to the Wall Control
On the back of the 3 button panel:
- Button 1 → Door 1 terminals
- Button 2 → Door 2 terminals
- Button 3 → Door 3 terminals
Tighten screws firmly but do not overtighten.
Step 6: Connect Wires to Each Garage Opener
For each opener:
- Insert one wire into COM
- Insert the second wire into PB / PUSH
- Tighten screws securely
Repeat for all three doors.
Step 7: Restore Power and Test
- Reconnect power
- Press each button individually
- Confirm the correct door opens
If a wrong door activates, simply swap wire pairs at the wall control.
Common Wiring Diagram (Text Overview)
Infographic-style explanation:
- Button 1 → Opener A (COM + PB)
- Button 2 → Opener B (COM + PB)
- Button 3 → Opener C (COM + PB)
Each opener remains electrically isolated, preventing cross-activation.
Common Mistakes When Wiring a 3 Button Garage Door Opener
❌ Mixing Wire Pairs
Each button must have its own dedicated pair.
❌ Using High-Voltage Wire
Always use low-voltage garage door wire, not household electrical cable.
❌ Loose Terminal Screws
Loose connections cause intermittent operation.
❌ Skipping Labeling
Label wires during installation to avoid confusion later.
Troubleshooting: When the 3 Button Garage Opener Doesn’t Work
Problem: One Button Doesn’t Respond
Check:
- Wire continuity
- Terminal tightness
- Correct button-to-door pairing
Problem: All Doors Open at Once
Cause: Shared common wire
Fix: Use separate wire pairs for each opener.
Problem: Opener Clicks but Door Doesn’t Move
Check:
- Safety sensors alignment
- Door not locked manually
- No mechanical obstruction
Advantages vs Disadvantages of a 3 Button Garage Door Opener
| Feature | Advantage | Disadvantage |
|---|---|---|
| One wall control | Clean installation | More wiring |
| Multi-door access | Convenient | Slightly longer setup |
| Low-voltage system | Safer DIY | Needs careful labeling |
| Fixed wall location | Always accessible | Not portable |
Is Wiring a 3 Button Garage Door Opener Safe for DIY?
Yes—if you follow instructions carefully.
Why It’s Considered DIY-Friendly
- Low-voltage wiring
- No direct mains electricity
- Simple terminal connections
However, if your opener uses proprietary digital wall controls, consult the manufacturer before proceeding.
Maintenance Tips After Installation
- Check terminal screws every 6–12 months
- Keep wires away from moving tracks
- Clean wall control buttons gently
- Test all doors monthly
These habits extend the life of your system.
FAQ: How To Wire A 3 Button Garage Door Opener
❓ Can one wall button control three garage doors?
Yes. A 3 button wall control is designed specifically for that purpose.
❓ What wire gauge should I use?
Most manufacturers recommend 22-gauge low-voltage wire.
❓ Does wire color matter?
No, as long as each button uses a consistent pair from wall control to opener.
❓ Can I connect multiple openers to one button?
No. Each opener must have its own dedicated button for safety and control.
❓ Do I need an electrician?
Usually not. This is a low-voltage task suitable for careful DIY homeowners.
Conclusion
Learning How To Wire A 3 Button Garage Door Opener gives you full control over multiple garage doors from a single, convenient wall panel. With proper preparation, clear labeling, and careful wiring, this project is both safe and rewarding. You’ll enjoy a cleaner setup, better organization, and reliable daily operation.
If this guide helped you, share it on social media with fellow homeowners or DIY enthusiasts—it might save them time, money, and frustration on their next garage project. 🚪🔧


Leave a Reply