When your garage door opener starts failing, making noise, or stops responding, a common question quickly comes up: Is It Hard To Replace A Garage Door Opener? The idea of working overhead with electrical and mechanical parts can feel intimidating. The good news is that for many homeowners, replacing a garage door opener is manageable with basic tools and patience. This guide explains the real difficulty level, what makes the job easier or harder, and how to decide whether DIY or professional installation is the right choice.
Is It Hard to Replace a Garage Door Opener?
Let’s answer the main question clearly.
Replacing a garage door opener is not extremely hard, but it is not effortless either.
It falls into the moderate DIY difficulty category.
Most homeowners who are comfortable with basic home projects—like installing light fixtures or shelving—can replace a standard ceiling-mounted garage door opener in a single day.
Read too: Door and Garage Door Companies: Choosing the Right Partner for Your Needs
What makes it “hard” or “easy” depends on:
- Your experience level
- The type of opener
- The condition of your existing garage setup
What Makes Replacing a Garage Door Opener Easier Today?
A common People Also Ask question is: Why do people say it’s easier now than before?
Modern garage door openers are designed with homeowners in mind.
Reasons it’s easier today
- Pre-assembled or modular rails
- Clear, step-by-step manuals
- Universal mounting brackets
- Lighter motors (DC motors vs older AC motors)
- Plug-in power instead of hardwiring
Manufacturers expect DIY installation, which has simplified the entire process.
What Makes It Harder Than Expected?
Despite improvements, some parts of the job still challenge beginners.
Common difficulty points
- Working on a ladder for long periods
- Aligning the rail perfectly with the door
- Setting travel limits and force correctly
- Wiring and aligning safety sensors
These steps require precision rather than strength, which is why rushing leads to problems.
Skill Level Required: Honest Assessment
Another common question: Do I need to be very handy?
You can DIY if you:
- Can use a drill and basic hand tools
- Can follow instructions carefully
- Are comfortable measuring and leveling
- Have patience for adjustments
It may feel hard if you:
- Avoid ladder work
- Struggle with mechanical alignment
- Expect a quick, 1-hour job
Replacing a garage door opener is more about attention to detail than advanced skills.
Tools You’ll Need
Not having the right tools makes the job feel much harder.
Basic tools checklist
- Ladder (6–8 feet)
- Drill with bits
- Socket set or wrench
- Screwdrivers (Phillips and flathead)
- Level
- Tape measure
These are standard homeowner tools—no specialty equipment required.
How Long Does It Take to Replace a Garage Door Opener?
Time commitment plays a big role in perceived difficulty.
Typical timeframes
- First-time DIYer: 4–6 hours
- Experienced DIYer: 2–4 hours
- Professional installer: 1–2 hours
Most of the time is spent assembling, mounting, and fine-tuning—not removing the old unit.
Step-by-Step: What Replacing a Garage Door Opener Involves
Understanding the steps makes the task feel less overwhelming.
Step 1: Remove the Old Opener
- Unplug the opener
- Disconnect it from the garage door
- Remove ceiling mounting brackets
- Lower and remove the motor unit
⏱ Time: 30–45 minutes
This step is usually straightforward.
Step 2: Assemble the New Opener
Most openers come partially assembled.
- Assemble the rail
- Install the trolley
- Attach the motor
⏱ Time: 30–60 minutes
This is where reading the manual matters.
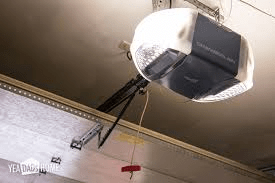
Step 3: Mount the Rail and Motor Unit
This is the most physically demanding step.
- Attach header bracket above the door
- Secure rail to the header
- Lift and hang the motor from ceiling supports
- Ensure everything is level
Accuracy here prevents noise and premature wear.
Step 4: Attach the Opener Arm to the Door
- Connect the opener arm
- Adjust angle and length
- Tighten all fasteners
A misaligned arm can cause jerky movement.
Step 5: Install Safety Sensors
Safety sensors are mandatory on modern systems.
- Mount sensors 4–6 inches above the floor
- Align them until indicator lights are solid
- Secure wiring neatly
Misaligned sensors are the most common cause of installation frustration.
Step 6: Install Wall Control and Power
- Mount wall button
- Connect low-voltage wiring
- Plug in the opener
This step is usually easy and beginner-friendly.
Step 7: Set Travel Limits and Force
This step determines how the door opens and closes.
- Set open limit
- Set close limit
- Adjust force so the door reverses when obstructed
Incorrect settings make the opener feel “broken,” even when it’s not.
Step 8: Test and Fine-Tune
Run multiple test cycles:
- Open and close fully
- Test auto-reverse
- Listen for unusual noises
Fine-tuning is normal and expected.
Safety Considerations (Very Important)
A frequent concern is safety.
What NOT to touch
- Garage door springs (extreme tension)
- Cables or drums
Replacing an opener does not involve spring work. If you encounter spring issues, stop and call a professional.
DIY vs Professional Installation: Which Is Easier?
A key decision point.
DIY replacement is easier if:
- Your garage is standard height
- The existing opener was ceiling-mounted
- No structural changes are needed
Professional installation is easier if:
- Ceiling is very high
- Garage layout is unusual
- You want zero trial-and-error
Professionals reduce time and risk but add cost.
Cost Comparison: DIY vs Professional
Cost often influences perceived difficulty.
Typical US costs
- New garage door opener: $200–$500
- DIY labor: $0
- Professional installation: $200–$400
DIY saves money—but only if done correctly.
Does the Type of Opener Affect Difficulty?
Yes, significantly.
Chain-drive openers
- Most common
- Moderate noise
- Moderate difficulty
Belt-drive openers
- Quieter
- Similar installation difficulty
Screw-drive openers
- Fewer parts
- Requires precise alignment
Wall-mounted (jackshaft) openers
- Most complex
- Often best for professionals
Standard ceiling-mounted openers are the easiest to replace.
Common Mistakes That Make Replacement Feel Hard
Avoid these to keep the job manageable.
❌ Skipping the manual
❌ Misaligning the rail
❌ Ignoring sensor alignment
❌ Incorrect force settings
❌ Rushing adjustments
Most “hard” experiences come from these mistakes.
When Replacing the Opener Isn’t Enough
Sometimes the opener isn’t the problem.
Warning signs
- Door feels very heavy
- Door doesn’t stay open manually
- Uneven movement
In these cases, door balance or spring issues must be fixed first.
Reliability and Brand Support Matter
Choosing a reliable brand reduces frustration.
The Genie and other major manufacturers design modern openers with DIY replacement in mind and provide long-term parts support.
Is Replacing a Garage Door Opener Worth It?
Another People Also Ask question is whether replacement is worthwhile.
Benefits of replacement
- Quieter operation
- Improved safety features
- Smartphone control options
- Battery backup
Many homeowners find replacement easier than repeated repairs.
Garage Door Opener Basics (Background)
A garage door opener is a motorized device that opens and closes garage doors using a trolley and rail system. Modern openers include safety sensors and automatic reverse mechanisms to prevent injury or damage. A general overview is available on Wikipedia.org:
https://en.wikipedia.org/wiki/Garage_door_opener
FAQ: Is It Hard To Replace A Garage Door Opener?
Is replacing a garage door opener hard for beginners?
Not usually. It’s a moderate DIY project with clear instructions.
What part is hardest?
Aligning the rail and adjusting travel limits.
Do I need electrical skills?
No. Most openers plug into a standard outlet.
Can I reuse parts from the old opener?
Sometimes, but using new parts is recommended.
Should I replace the opener or repair it?
Replacement is often easier and more reliable for older units.
Conclusion
So, Is It Hard To Replace A Garage Door Opener?
For most homeowners, it’s not hard—but it does require time, care, and attention to detail. Replacing a garage door opener sits comfortably in the middle of the DIY difficulty scale. With modern designs, clear instructions, and basic tools, many people successfully complete the job in a single afternoon.
If you value saving money and don’t mind hands-on work, DIY replacement is very achievable. If convenience and speed matter more, hiring a professional is still a reasonable choice.
If this guide helped you understand what to expect, share it on social media so other homeowners can approach garage door opener replacement with confidence.


Leave a Reply