Introduction
Is your garage door remote acting up, but you can’t find the dreaded “Learn” button on your motor unit? You are not alone. Many homeowners with older systems face this exact frustration when trying to sync a new remote or regain access after a power outage. Knowing how to program garage door opener without learn button is essential for maintaining security and convenience in older homes. In this guide, we will walk you through the proven methods to get your door working again, safely and efficiently.
Understanding Why Your Opener Lacks a Learn Button
Before diving into the solution, it is crucial to understand why your system is different. Modern garage door openers (post-1993) typically use rolling code technology and feature a prominent “Learn” or “Smart” button, usually colored yellow, purple, red, or green.
However, if your opener was manufactured before the mid-1990s, it likely uses fixed-code technology. These older units do not have a digital memory bank that accepts a new code via a button press. Instead, they rely on physical hardware configurations to match the remote to the motor.
According to historical data from the Consumer Product Safety Commission, older fixed-code systems are less secure than modern rolling codes because the signal does not change with every use. This makes understanding your specific model vital for both functionality and home security.
Method 1: The Dip Switch Technique (Most Common)
If your garage door opener does not have a learn button, it almost certainly uses Dip Switches. These are tiny mechanical switches located inside both the motor unit and the remote control.
Step-by-Step Guide to Matching Dip Switches
Follow these precise steps to synchronize your remote:
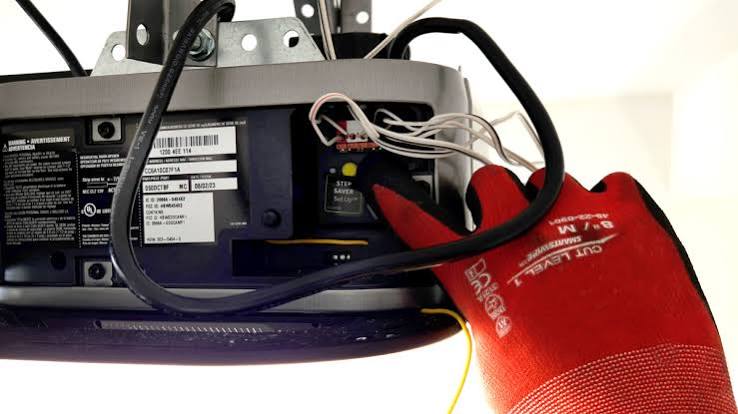
- Locate the Motor Unit Panel: Use a sturdy ladder to reach the motor unit hanging from your garage ceiling. Look for a small plastic cover on the back or side of the unit. It may be labeled “Code Switches” or simply have a series of small slots.
- Open the Remote Control: Remove the battery cover of your handheld remote. You should see a similar set of tiny switches, usually numbered 1 through 8 or 1 through 12.
- Inspect the Current Configuration: Look at the position of the switches in the motor unit. They will be either pushed UP (On) or DOWN (Off). Note this pattern carefully. For example: Up, Down, Up, Up, Down, Down, Up, Down.
- Match the Remote: Using a small screwdriver or a pen tip, adjust the switches on your remote control to exactly match the pattern found in the motor unit.
- Note: Precision is key. If switch #3 is UP in the motor, it must be UP in the remote.
- Test the Connection: Press the button on your remote. The garage door should activate immediately. If it does not, double-check each switch position. Even one mismatched switch will prevent the signal from being recognized.
Troubleshooting Dip Switch Issues
- Stuck Switches: Over time, dust and grime can cause switches to stick. Gently wiggle them to ensure they click firmly into place.
- Worn Contacts: If the remote is very old, the internal contacts may be corroded. Cleaning them with a cotton swab dipped in rubbing alcohol can restore connectivity.
Method 2: Frequency Matching for Universal Remotes
If you have lost your original remote and are trying to use a universal replacement, you cannot just copy dip switches because you don’t have the original remote to read. In this case, you must match the frequency.
Older openers typically operate on specific radio frequencies, most commonly 315 MHz or 390 MHz.
How to Identify and Set Frequency
- Check the Motor Label: Look for a sticker on the motor unit casing. It will list the model number and often the frequency (e.g., “Freq: 315 MHz”).
- Consult the Manual: If the label is faded, search for your opener’s brand and model number online to find the factory specifications.
- Set the Universal Remote: Most universal remotes for older systems come with a set of jumpers or dip switches specifically for frequency selection. Refer to the universal remote’s manual to set it to the correct MHz band.
- Set the Code: Once the frequency is matched, you will still need to set a code. Since there is no “Learn” button to auto-sync, you must manually set the dip switches on the universal remote to a random pattern. Then, you must go to the motor unit and manually change its dip switches to match that same pattern.
Pro Tip: Write down your new dip switch pattern on a piece of tape and stick it inside the battery compartment of the remote. This saves you hours of troubleshooting if you lose the remote again.
Comparison: Fixed Code vs. Rolling Code Systems
To help you understand the limitations and benefits of your current setup, here is a quick comparison.
| Feature | Fixed Code (No Learn Button) | Rolling Code (With Learn Button) |
|---|---|---|
| Security Level | Low (Signal is static) | High (Signal changes every use) |
| Programming Method | Manual Dip Switches | Push-button Sync |
| Ease of Setup | Difficult (Requires ladder/tools) | Easy (Push and hold) |
| Interference Risk | Higher (Neighbors may share codes) | Lower (Unique encryption) |
| Remote Compatibility | Limited to specific frequencies | Broad universal compatibility |
As shown above, while fixed-code systems are harder to program, they are still functional. However, if you experience frequent interference from neighbors, it might be time to consider upgrading the entire unit.
Method 3: The Keypad Workaround
Some older openers support external wireless keypads even if they lack a learn button. These keypads often have their own internal dip switches.
- Install the keypad near your garage entrance.
- Open the keypad’s control box.
- Match the dip switches inside the keypad to the dip switches in the main motor unit.
- Set your desired PIN code on the keypad.
This method is excellent for families who want to avoid carrying remotes but still have an older system.
When to Call a Professional
While DIY programming is cost-effective, there are scenarios where professional help is recommended:
- Broken Springs: If the door moves slightly but doesn’t open fully, the issue may be mechanical, not electronic.
- Fried Circuit Board: If adjusting switches yields no response, the receiver board in the motor may be damaged.
- Safety Sensor Misalignment: Older sensors can become misaligned, preventing the door from closing regardless of the remote code.
If you attempt the dip switch method three times without success, it is advisable to contact a certified garage door technician. Attempting to force mechanical parts can lead to injury or further damage.
FAQ Section
Q1: Can I convert my old opener to have a learn button?
A: No, you cannot add a learn button to a fixed-code system. The technology is fundamentally different. To use rolling code remotes with a learn button, you must replace the entire motor unit or install a separate receiver kit that bypasses the old system (though this is rarely cost-effective).
Q2: What if my dip switches are broken or missing?
A: If the plastic switches are snapped off, you may be able to bridge the contacts with a small piece of conductive wire or foil, but this is risky. It is safer to replace the remote control or the logic board of the opener.
Q3: Is it safe to keep using an opener without a learn button?
A: It is functional, but less secure. Because the code never changes, a thief with a code-grabbing device could potentially record your signal and replay it. Consider adding a manual lock bar to your garage door for added physical security.
Q4: Why does my remote work intermittently?
A: Intermittent issues are usually caused by weak batteries, dirty dip switch contacts, or radio frequency interference from nearby LED lights or routers. Try replacing the batteries first, then clean the switches.
Q5: Can I use a smartphone app to control my old opener?
A: Not directly. However, you can purchase a smart garage hub (like MyQ or similar brands) that connects to your existing wall button. These hubs simulate a button press, allowing you to control even ancient openers via WiFi.
Q6: How many remotes can I program to one old opener?
A: With dip switch systems, you can have as many remotes as you like, provided they all have the exact same switch configuration. There is no digital limit like there is with modern rolling code systems.
Conclusion
Learning how to program garage door opener without learn button is a valuable skill for any homeowner with an older property. While it requires a bit more patience and precision than modern push-button systems, the dip switch method is reliable and straightforward once you understand the mechanics.
By carefully matching the switches and ensuring your frequency is correct, you can restore convenience to your daily routine. Remember, if your system feels outdated or insecure, it might be worth exploring modern upgrades. But for now, grab that screwdriver, check those switches, and get your garage door moving again!
Did this guide help you fix your garage door? Share this article with friends and family who might be struggling with their old remotes!



Leave a Reply