Installing a new garage door can significantly enhance the curb appeal and functionality of your home. However, ensuring a perfect fit requires meticulous attention to detail, particularly when it comes to the rough opening dimensions. In this comprehensive guide, we’ll delve into the intricacies of installing a 9X7 garage door, focusing on understanding and optimizing the rough opening dimensions for a seamless installation process.

Understanding the Importance of 9X7 Garage Door Rough Opening
Exploring the Dimensions
The term “9X7” refers to the standard size of the garage door, with the width being 9 feet and the height 7 feet. However, achieving a perfect fit involves more than just selecting the right size; it also requires careful consideration of the rough opening dimensions.
Read too: Mastering Quantum Garage Door Opener Programming: A Comprehensive Guide
Determining the Rough Opening Dimensions
Measuring for Accuracy
Before proceeding with the installation, it’s crucial to accurately measure the rough opening dimensions. Follow these steps to ensure precision:
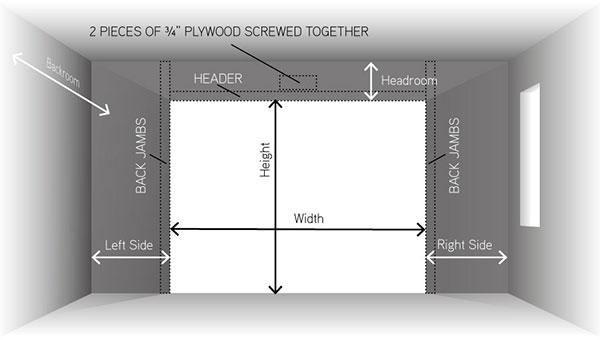
- Width Measurement: Measure the width of the rough opening from the inside of the garage, taking into account the space between the framing members. Ensure that the measurement is taken at multiple points to account for any variations.
- Height Measurement: Similarly, measure the height of the rough opening from the floor to the underside of the header. Again, take measurements at multiple points to account for any discrepancies.
Factoring in Clearance Requirements
In addition to the actual dimensions of the garage door, it’s essential to consider clearance requirements for proper operation. Allow sufficient clearance space around the door for smooth opening and closing, as well as clearance for any hardware or tracks.
Installing a 9X7 Garage Door: Step-by-Step Guide
Preparing the Opening
Once you have determined the precise rough opening dimensions, follow these steps to prepare for the installation:
- Clearing the Area: Remove any obstructions or debris from the rough opening area, ensuring a clean and clear workspace.
- Adjusting Framing: If necessary, adjust the framing of the rough opening to accommodate the dimensions of the new garage door. Use shims or additional framing members as needed to achieve a level and square opening.
Mounting the Garage Door
With the rough opening prepared, proceed with mounting the garage door according to the manufacturer’s instructions. Ensure proper alignment and secure installation to prevent issues down the line.
Common Challenges and Solutions
Addressing Potential Issues
While installing a 9X7 garage door, you may encounter certain challenges, such as uneven framing or structural inconsistencies. Here are some common issues and solutions:
- Uneven Floor: If the garage floor is uneven, use shims or self-leveling compound to create a level surface for the door tracks.
- Limited Headroom: In cases where headroom is limited, consider installing low-headroom tracks or opting for a different type of garage door opener.
Conclusion
Achieving a flawless installation of a 9X7 garage door hinges on understanding and optimizing the rough opening dimensions. By meticulously measuring and preparing the rough opening, you can ensure a perfect fit and seamless operation for years to come. Follow the steps outlined in this guide, and unlock the potential of your garage with a professionally installed door that enhances both form and function.


Leave a Reply