Are you experiencing issues with your Chamberlain garage door’s travel and seeking solutions? Dive into our comprehensive guide on Chamberlain garage door travel adjustment to learn how to fine-tune your door’s operation for optimal performance. Explore step-by-step instructions, expert tips, and troubleshooting techniques to ensure smooth and reliable operation of your Chamberlain garage door.
Understanding Chamberlain Garage Door Travel Adjustment
Chamberlain garage door travel adjustment refers to the process of adjusting the travel limits of the garage door opener to ensure that the door opens and closes fully and smoothly. Proper adjustment of the travel limits is essential for the safety and functionality of the garage door system.
Chamberlain Garage Door Travel Adjustment Process
Preparatory Steps
- Safety Check: Before adjusting the travel limits, ensure that the area around the garage door is clear of obstructions and that all safety features, such as sensors and reversal mechanisms, are in working order.
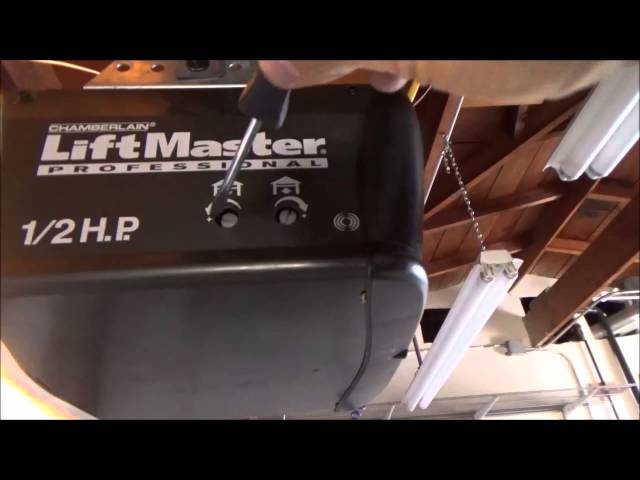
- Access Controls: Locate the travel limit adjustment controls on the Chamberlain garage door opener. These controls are typically located on the motor unit or near the opener’s light bulb.
Read too: No Power to Genie Garage Door Opener – Resolving the Issue with Ease: Troubleshooting Guide
Adjusting the Travel Limits
- Opening Limit Adjustment: To adjust the opening limit, locate the “Up” or “Open” adjustment control and turn it clockwise to increase the travel distance or counterclockwise to decrease it. Test the adjustment by operating the garage door opener and observe if the door opens fully without hitting the floor or ceiling.
- Closing Limit Adjustment: Similarly, adjust the closing limit by locating the “Down” or “Close” adjustment control and turning it clockwise to increase the travel distance or counterclockwise to decrease it. Test the adjustment by closing the garage door and ensure that it closes fully and seals properly without exerting excessive force.
Fine-Tuning and Testing
- Incremental Adjustments: Make small adjustments to the travel limits as needed, testing the door’s operation after each adjustment to achieve the desired travel distance.
- Testing Safety Features: After adjusting the travel limits, test the garage door’s safety features, including auto-reversal mechanisms and sensor functionality, to ensure proper operation and compliance with safety standards.
Expert Tips for Chamberlain Garage Door Travel Adjustment
- Use caution when adjusting the travel limits to avoid overtravel or undertravel, which can cause damage to the door or opener.
- Consult the Chamberlain garage door opener manual for specific instructions and recommendations regarding travel adjustments.
- If you encounter any difficulties or uncertainties during the adjustment process, consider seeking assistance from a professional garage door technician.
Conclusion
By mastering the Chamberlain garage door travel adjustments process, you can ensure smooth and reliable operation of your garage door for years to come. Follow the steps outlined in this guide, exercise caution, and test the door’s operation thoroughly to achieve optimal results.
Now that you’re equipped with the knowledge and techniques for Chamberlain garage door travel adjustments, you can maintain the performance and safety of your garage door with confidence.


Leave a Reply