Installing a garage door opener can seem like a daunting task, but with the right instructions and tools, homeowners can successfully complete a Craftsman 1/2 Hp Chain Drive Garage Door Opener Installation. This guide will walk you through every step, from preparation to testing the installed opener, while offering safety tips and maintenance advice to ensure long-lasting performance.
Read too: The Complete Guide to Tighten Chain On Garage Door Opener for Smooth Operation
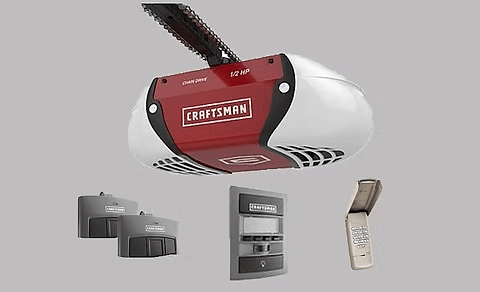
Understanding the Craftsman 1/2 Hp Chain Drive Garage Door Opener
The Craftsman 1/2 Hp chain drive garage door opener is known for its reliability, strength, and durability. Chain drive systems use a metal chain to move the garage door along a track, providing dependable operation for most residential doors. Key features include:
- 1/2 horsepower motor: Strong enough for standard single or double garage doors.
- Durable chain drive mechanism: Designed for longevity and consistent performance.
- Safety sensors: Prevents the door from closing if an obstruction is detected.
- Remote and wall control: Provides convenience and secure access.
Understanding the features of your opener helps ensure a smooth installation process and proper operation after setup.
Tools and Materials Needed
Before beginning a Craftsman 1/2 Hp Chain Drive Garage Door Opener Installation, gather all necessary tools and materials:
- Ladder or step stool
- Screwdrivers (Phillips and flathead)
- Socket wrench set
- Tape measure
- Drill with appropriate bits
- Level
- Safety goggles and gloves
- Power supply for testing
- Mounting hardware (usually included in the kit)
Having all tools ready ahead of time ensures a safe, efficient installation process.
Safety Precautions
Working with garage door openers involves electrical and mechanical components. Follow these safety tips:
- Disconnect Power: Ensure no electricity is connected until you are ready to test.
- Secure the Garage Door: Clamp or lock the door in the closed position to prevent accidents.
- Wear Protective Gear: Gloves and safety goggles protect against injury.
- Use a Stable Ladder: Prevent falls by ensuring the ladder is properly positioned.
Following these precautions reduces the risk of injury and ensures a smooth installation process.
Craftsman 1/2 Hp Chain Drive Garage Door Opener Installation
Installing your Craftsman chain drive opener requires careful attention to each step to ensure safe and reliable operation.
Step 1: Prepare the Garage
- Measure the garage space and mark the ceiling center above the door.
- Ensure there is sufficient clearance between the ceiling and the door track for the opener.
- Verify the power supply is within reach of the opener’s motor unit.
Step 2: Assemble the Opener Rail
- Unpack the rail sections and assemble according to the manufacturer’s instructions.
- Attach the chain to the rail and connect it to the trolley.
- Ensure all connections are secure, and the rail is aligned for smooth movement.
Step 3: Mount the Motor Unit
- Position the motor unit at the marked ceiling center.
- Securely attach the motor using the mounting brackets included in the kit.
- Use a level to ensure the motor unit is perfectly horizontal.
Step 4: Install the Door Bracket
- Attach the garage door bracket to the center of the door.
- Ensure the bracket is aligned with the trolley on the rail.
- Double-check the door bracket for secure mounting, as it will bear the weight of the door during operation.
Step 5: Connect the Rail to the Motor Unit
- Slide the rail into the motor unit and secure it with screws or pins as instructed.
- Check that the chain moves smoothly along the rail without binding.
- Tighten all fasteners and confirm proper alignment.
Step 6: Install Safety Sensors
- Place the safety sensors on either side of the garage door, approximately 6 inches above the floor.
- Connect the sensor wires to the motor unit according to the instruction manual.
- Ensure the sensors are aligned and test for obstruction detection once powered.
Step 7: Program the Remote and Wall Control
- Follow the manufacturer’s instructions to pair the remote and wall control with the opener.
- Test each remote to ensure consistent operation.
- Set the travel limits and force settings to ensure safe door operation.
Step 8: Test the Garage Door Opener
- Reconnect power and run the garage door through several open and close cycles.
- Listen for smooth, quiet operation and watch for proper trolley movement.
- Test the safety sensors by placing an object in the door’s path to ensure the door reverses automatically.
Step 9: Final Adjustments and Maintenance
- Check all bolts and fasteners for tightness.
- Lubricate the chain and rollers with garage door lubricant.
- Verify that the door opens and closes smoothly without wobbling or sticking.
- Conduct monthly inspections to maintain optimal performance.
Tips for a Successful Installation
- Read the full instruction manual before starting the installation.
- Have a helper to assist with lifting and alignment.
- Mark all mounting points carefully for precise installation.
- Avoid overtightening fasteners, which can strain the motor and components.
- Keep the remote controls and safety features tested regularly for reliability.
Common Mistakes to Avoid
- Skipping the alignment of the rail and trolley
- Forgetting to secure the door before installation
- Miswiring the safety sensors or skipping testing
- Over-tightening chain or motor mounting bolts
- Neglecting to lubricate moving parts
Avoiding these mistakes ensures your Craftsman 1/2 Hp Chain Drive Garage Door Opener Installation is safe and long-lasting.
Benefits of a Proper Installation
Proper installation of a Craftsman 1/2 Hp chain drive garage door opener offers multiple benefits:
- Smooth and Quiet Operation: Correct alignment reduces noise and wear.
- Enhanced Security: Safety sensors prevent accidents and unauthorized access.
- Durability: Proper installation ensures long-lasting motor and chain performance.
- Convenience: Remote and wall controls make daily access easier.
- Peace of Mind: Confidence in safe, reliable garage door operation.
A well-installed opener improves both the functionality and safety of your garage door system.
Frequently Asked Questions
Q: Can I install this opener myself?
A: Yes, homeowners with basic mechanical skills and tools can complete the installation by following the instruction manual.
Q: How long does installation take?
A: Typically, 2-4 hours depending on experience and if the garage door is properly aligned.
Q: Do I need a helper for installation?
A: Yes, having a second person helps with lifting the motor and aligning the rail.
Q: How often should I maintain the opener?
A: Monthly inspection and lubrication keep your opener performing optimally.
Conclusion
A Craftsman 1/2 Hp Chain Drive Garage Door Opener Installation may seem complex, but with proper planning, the right tools, and careful attention to detail, it is a manageable DIY project. Following step-by-step instructions ensures smooth, quiet, and reliable garage door operation while maintaining safety and durability.
Regular maintenance and inspection will extend the lifespan of your opener, keep the garage door operating efficiently, and provide convenience and security for your home. By carefully performing each step and avoiding common mistakes, homeowners can enjoy years of reliable garage door performance.


Leave a Reply