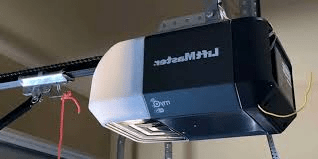
A garage door opener is one of those home essentials we often take for granted—until it stops working. For homeowners using Craftsman openers, one of the most common problems is worn or broken gears inside the motor unit. If your garage door opener hums but doesn’t move, or you notice plastic shavings falling from the housing, chances are you need a Craftsman 1 2 Hp Garage Door Opener Gear Kit.
This gear kit is designed specifically to replace the internal gears in your Craftsman opener, restoring smooth functionality without replacing the entire unit. In this article, we’ll cover what the kit includes, signs of wear, step-by-step replacement instructions, costs, and maintenance tips. By the end, you’ll know everything you need to keep your garage door running reliably.
Read too: Door and Garage Door Companies: Choosing the Right Partner for Your Needs
What Is the Craftsman 1 2 Hp Garage Door Opener Gear Kit?
The Craftsman 1 2 Hp Garage Door Opener Gear Kit is a set of replacement parts used to repair worn or broken drive gears inside the garage door opener motor assembly. Over time, the gears—usually made of nylon—wear down due to constant friction and strain. Instead of replacing the entire opener, you can simply swap out the gear kit to extend its life.
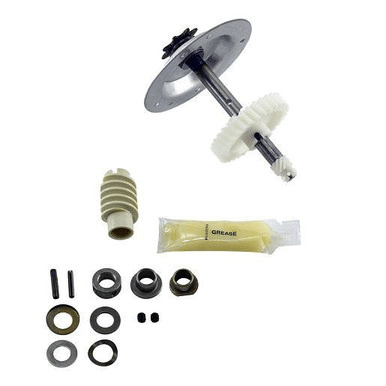
Most kits typically include:
- Main drive gear (nylon gear with a steel shaft)
- Worm gear (mounted on the motor shaft)
- Bearings and bushings
- Thrust washers
- Lubricant
- Installation hardware (pins, screws, and retaining clips)
Signs You Need a Gear Kit Replacement
How do you know when it’s time to replace the gears in your Craftsman opener? Look out for these symptoms:
- Motor runs but door doesn’t move – You hear the opener humming, but the chain or belt won’t engage.
- Plastic shavings – White or yellow flakes near the cover are worn gear material.
- Grinding noises – Gears slipping or stripped produce loud, irregular sounds.
- Door stuck halfway – The opener starts to move the door but can’t complete the cycle.
- Loose chain/belt – Excess slack can indicate gear damage.
If you spot any of these issues, a Craftsman 1 2 Hp Garage Door Opener Gear Kit is the solution.
Causes of Gear Wear and Failure
Several factors contribute to worn-out gears:
- Normal wear and tear: Constant friction wears down nylon gears over years of use.
- Lack of lubrication: Dry gears produce more friction, accelerating wear.
- Unbalanced garage door: If springs are worn or improperly adjusted, the opener bears too much weight.
- Extreme temperatures: Cold or heat can weaken materials over time.
- Overuse: High-frequency use shortens gear lifespan.
Step-by-Step: How to Replace the Craftsman 1 2 Hp Garage Door Opener Gear Kit
Replacing the gear kit is a moderately easy DIY project if you’re comfortable with tools. Follow these steps carefully.
Tools You’ll Need:
- Screwdrivers (flathead and Phillips)
- Socket wrench set
- Hammer and punch
- Pliers
- Cleaning rag
- Safety gloves
Instructions:
- Disconnect power
Safety first—unplug the opener from the outlet. - Remove the opener housing
Take off the light cover and unscrew the motor housing. - Detach the chain or belt
Release tension and remove it from the sprocket. - Access the gear assembly
Locate the main gear and worm gear inside the unit. - Remove old gears
Take out the worn nylon gear and worm gear. Look for plastic shavings and clean thoroughly. - Install new worm gear
Slide the replacement onto the motor shaft and secure it with the included hardware. - Install the new drive gear
Fit the nylon gear with its shaft into the correct position, ensuring bearings and washers are aligned. - Lubricate gears
Use the supplied grease to coat gears lightly, ensuring smooth movement. - Reassemble the opener
Replace the cover, sprocket, and chain/belt. Adjust chain tension if needed. - Reconnect power and test
Plug the opener back in and test the door cycle. The opener should now operate smoothly.
Cost of a Craftsman 1 2 Hp Garage Door Opener Gear Kit
- Gear kit price: Typically $15–$35 depending on brand and supplier.
- Professional installation: Labor costs range from $75–$150.
- DIY savings: By installing the kit yourself, you can save up to $100.
Tips to Extend Gear Life
Once you’ve replaced your Craftsman 1 2 Hp Garage Door Opener Gear Kit, follow these tips to prevent premature wear:
- Lubricate annually: Apply garage door lubricant to gears, chain, and sprocket.
- Check door balance: Lift the garage door manually—if it’s too heavy, adjust springs.
- Tighten chain/belt: Keep the chain or belt snug but not overly tight.
- Keep the opener clean: Remove dust and debris from inside the housing.
- Avoid overuse: Don’t repeatedly open and close the door unnecessarily.
Alternatives to Gear Replacement
If your opener has multiple issues beyond the gears, you may want to consider alternatives:
- Buy a new opener: If your unit is over 15 years old, replacement may be more cost-effective.
- Refurbished gear kit: Some suppliers offer lower-cost refurbished kits.
- Professional repair service: Ideal for homeowners not comfortable with DIY.
Craftsman 1 2 Hp Garage Door Opener Gear Kit and Safety
It’s important to remember that a failing gear system not only stops your door from working but can also affect safety. An opener struggling to move the door may cause sudden stops or imbalance, creating hazards. Prompt replacement ensures both functionality and safety.
FAQs About Craftsman Gear Kits
Q: How long does a gear kit last?
A: Typically 8–12 years with proper lubrication and balanced doors.
Q: Can I use a generic gear kit?
A: Many universal kits fit Craftsman openers, but check compatibility first.
Q: Is replacing the gear kit difficult?
A: It’s considered a moderate DIY repair. With basic tools and careful steps, most homeowners can do it.
Q: Why does my new gear wear quickly?
A: Likely due to an unbalanced garage door or lack of lubrication.
Final Thoughts
The Craftsman 1 2 Hp Garage Door Opener Gear Kit is a cost-effective solution to one of the most common opener problems. Instead of replacing the entire opener, you can swap out worn gears for a fraction of the cost. With a bit of patience, basic tools, and proper instructions, this DIY repair can extend the life of your opener by years.
By understanding the signs of gear wear, learning how to replace them, and taking steps to maintain your opener, you’ll ensure smooth, reliable garage door operation for your home.

Leave a Reply