A malfunctioning garage door can disrupt your daily routine and compromise your home’s security. If your garage door opener starts making unusual noises or struggles to lift your door, the problem might be the gear system. Specifically, the Craftsman 1 2 Hp Garage Door Opener Replacement Gear is a common solution for homeowners looking to restore smooth and reliable operation to their garage doors.
Read too: Door and Garage Door Companies: Choosing the Right Partner for Your Needs
In this article, we will provide a comprehensive guide on the Craftsman 1 2 Hp Garage Door Opener Replacement Gear, its benefits, installation steps, and maintenance tips. Whether you are a DIY enthusiast or a homeowner seeking to understand more about your garage system, this guide has you covered.
Understanding the Craftsman 1 2 Hp Garage Door Opener Replacement Gear
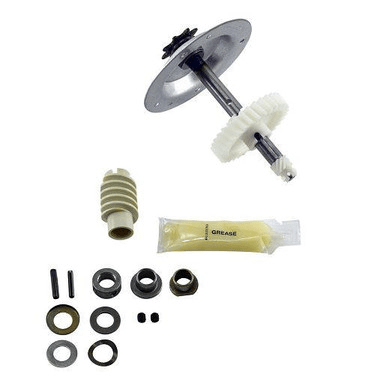
The Craftsman 1 2 Hp Garage Door Opener Replacement Gear is an essential component of your garage door system. It is designed to replace worn-out gears in Craftsman garage door openers, ensuring smooth operation and prolonging the life of your opener.
What Is the Function of the Gear?
Garage door opener gears are crucial because they transmit the motor’s power to lift and lower the garage door. Over time, the plastic gears in Craftsman openers can wear out or break, especially in units rated at 1/2 horsepower. A faulty gear can cause:
- Loud grinding noises during operation
- Intermittent movement or jerking of the door
- Complete failure of the door to open or close
Replacing the gear restores normal function and prevents further damage to your opener.
Benefits of the Craftsman 1 2 Hp Garage Door Opener Replacement Gear
Investing in a Craftsman 1 2 Hp Garage Door Opener Replacement Gear comes with several advantages:
- Enhanced Reliability: A new gear ensures consistent and smooth operation of your garage door, reducing stress on the motor.
- Cost-Effective Solution: Instead of replacing the entire garage door opener, replacing the gear is an affordable repair.
- Extended Lifespan: Regular maintenance with replacement gears prolongs the life of your Craftsman opener.
- Reduced Noise: Worn gears often produce grinding sounds; replacing them restores quieter operation.
- DIY-Friendly Installation: Many homeowners can replace the gear themselves with basic tools and instructions.
Signs You Need a Craftsman 1 2 Hp Garage Door Opener Replacement Gear
Knowing when to replace your gear is crucial. Look for these signs:
- Grinding or clicking noises when operating the door
- The door moves slowly or inconsistently
- Opener motor runs, but the door does not move
- Visible wear on the old gear teeth
Ignoring these warning signs can lead to more severe damage and expensive repairs.
How to Replace the Craftsman 1 2 Hp Garage Door Opener Replacement Gear
Replacing the gear may seem intimidating, but with the right tools and step-by-step instructions, it’s manageable.
Tools You Will Need:
- Socket wrench set
- Screwdriver
- Pliers
- Replacement Craftsman 1 2 Hp Garage Door Opener Replacement Gear
Step-by-Step Installation:
- Disconnect Power: Always unplug the garage door opener before starting any repair.
- Remove the Opener Cover: Use a screwdriver to remove screws and access the internal gear assembly.
- Inspect the Gear Assembly: Check the main drive gear and the sprocket for wear.
- Remove the Old Gear: Unscrew the gear from its shaft and remove it carefully.
- Install the Replacement Gear: Place the new Craftsman 1 2 Hp Garage Door Opener Replacement Gear in the same position as the old one, ensuring proper alignment.
- Lubricate the Gear: Apply a suitable garage door lubricant to reduce friction and noise.
- Reassemble the Opener: Replace the cover and secure it with screws.
- Test the Opener: Reconnect power and operate the door to ensure smooth movement.
Maintenance Tips for Long-Lasting Performance
To extend the life of your Craftsman 1 2 Hp Garage Door Opener Replacement Gear:
- Lubricate Regularly: Apply a high-quality lubricant to moving parts every 6–12 months.
- Inspect Frequently: Check gears and chains for wear to prevent unexpected failures.
- Avoid Overloading: Do not operate the garage door manually with the motor engaged.
- Clean the Track: Keep the garage door tracks free of debris to reduce strain on the opener.
By following these maintenance steps, your opener will operate efficiently for years.
Common Issues and Troubleshooting
Even after replacing the gear, you may encounter minor issues. Here’s how to handle them:
- Door Moves Slowly: Check the alignment of the gear and lubricate the chain or screw drive.
- Opener Stalls: Ensure the gear is properly seated on the shaft and screws are tight.
- Unusual Noise Persists: Inspect other components like the sprocket or drive belt for wear.
Understanding these troubleshooting tips can save time and prevent unnecessary service calls.
Why Choose the Craftsman 1 2 Hp Garage Door Opener Replacement Gear
The Craftsman brand is known for durability and reliability. Choosing the Craftsman 1 2 Hp Garage Door Opener Replacement Gear ensures compatibility with your existing opener, maintains optimal performance, and avoids the headaches of using generic parts that may fail prematurely.
Conclusion
The Craftsman 1 2 Hp Garage Door Opener Replacement Gear is an essential part of maintaining a smooth, reliable, and safe garage door system. By recognizing signs of wear, performing timely replacements, and following proper maintenance, homeowners can avoid costly repairs and ensure their garage door operates quietly and efficiently.
Replacing the gear is a cost-effective and manageable DIY project that significantly improves the performance of your Craftsman garage door opener. Don’t ignore the signs—upgrade your gear today and enjoy seamless garage door operation for years to come.


Leave a Reply