A garage door opener is a key component of many homes, offering convenience, security, and ease of access to your garage. Among the many manufacturers of garage door openers, Liftmaster is one of the most popular brands, known for its reliable and durable models. However, like all electronic devices, Liftmaster garage door openers can occasionally experience glitches or issues that may require a reset. Many users wonder: Does a Liftmaster garage door opener have a reset button?
In this article, we’ll explore everything you need to know about resetting your Liftmaster garage door opener, from whether it has a reset button to the steps you can take to resolve common problems. By the end, you’ll be equipped with the knowledge to handle issues with your opener and restore its functionality.
Does A Liftmaster Garage Door Opener Have A Reset Button?
The simple answer is: no, Liftmaster garage door openers do not come with a dedicated reset button. However, that doesn’t mean that you can’t reset or troubleshoot your opener when it encounters problems. In fact, most Liftmaster models have built-in reset procedures that are designed to help users resolve issues quickly, but they typically don’t involve a single “reset button.”
Instead, you’ll usually need to perform a manual reset by following a sequence of steps or using the existing controls on your opener. These steps often involve reprogramming your remote, adjusting the settings on the opener’s wall control, or performing a power cycle.
Read too: The Complete Guide to Tighten Chain On Garage Door Opener for Smooth Operation
Now, let’s go over the most common situations where you may need to reset your Liftmaster garage door opener and how to do so effectively.
Common Scenarios That Require a Liftmaster Garage Door Opener Reset
1. Remote Control Not Working
One of the most frequent reasons why users reset their Liftmaster garage door openers is because their remote control isn’t working properly. If your opener is not responding to commands from your remote, it may be due to a programming issue or a signal interruption.
2. Error Codes or Malfunctions
Liftmaster garage door openers often display error codes or flashing lights when something is wrong. This can range from issues with the safety sensors, the motor, or even a misaligned door. A reset may be required to clear error codes and reset the system.
3. Programming Issues
If you’ve recently changed the battery in your remote or have installed a new garage door opener, you may need to reprogram your opener to sync with your remote control or keypad. In such cases, performing a reset can help.
4. Security Code Changes
If your remote control or keypads are not responding to the opener, it may be necessary to reset the system to reprogram the security codes. This can occur when you suspect someone has tampered with your opener’s settings, or if you’ve recently moved into a new home and want to ensure the security of your system.
How to Reset Your Liftmaster Garage Door Opener
Even though Liftmaster garage door openers don’t have a designated reset button, there are several ways to perform a reset or reprogram the system, depending on the issue. Below, we’ll guide you through the steps to reset your opener in various situations:
Resetting Your Liftmaster Garage Door Opener After Power Loss
If your Liftmaster opener stops working after a power outage, or if you simply want to reset it after unplugging, you can follow these steps:
- Disconnect Power
First, unplug your garage door opener from the power outlet. Wait for at least 30 seconds to a minute to allow the system to fully reset. - Plug It Back In
After waiting, plug the opener back into the power source. - Reprogram the Remote
After resetting the power, you may need to reprogram your remote control or keypad. You can do this by pressing the “Learn” button on the opener motor unit (located near the antenna). Once the indicator light is blinking, press a button on the remote to sync it with the opener. - Test the Opener
Press the remote or wall control to test if the opener is working. If the door opens and closes as expected, the reset was successful.
Resetting the Liftmaster Opener to Clear Error Codes
If your Liftmaster garage door opener displays an error code, follow these steps to reset it:
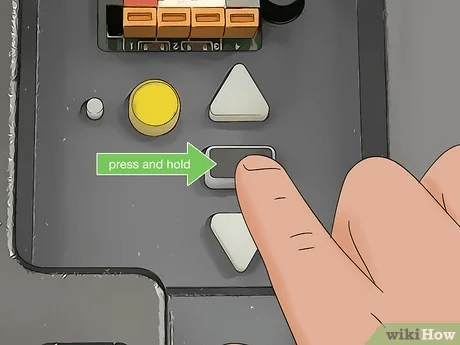
- Locate the Learn Button
On the back of your Liftmaster opener, there will be a small button labeled “Learn” (or “Program”). This button is typically near the antenna wire. - Press and Hold the Learn Button
Press and hold the “Learn” button for about 6 seconds. This will clear any error codes and reset the opener’s memory. - Test the Opener
After clearing the error codes, test the garage door opener by pressing the remote or wall control. If the opener works without any error codes, the reset was successful.
Resetting the Security Code on Your Liftmaster Opener
If you need to change the security code for your remote or keypad, you can follow these steps:
- Press the Learn Button
Press the “Learn” button on the garage door opener until the indicator light begins to blink. This indicates that the system is in programming mode. - Reprogram Your Remote
Within 30 seconds of pressing the Learn button, press the button on your remote control that you want to sync with the opener. The indicator light will stop blinking and remain solid once the remote is successfully programmed. - Test the Remote
Press the remote to ensure that it’s working correctly. If the door opens and closes, your security code reset was successful.
Troubleshooting Common Issue
If resetting your Liftmaster garage door opener doesn’t resolve the issue, here are a few troubleshooting steps you can take:
1. Check the Safety Sensors
The safety sensors located at the bottom of the garage door track may be misaligned or obstructed. If the sensors are not aligned properly, the door may not open or close as expected. Ensure there is no debris blocking the sensor’s path, and adjust the alignment if necessary.
2. Check the Garage Door Tracks and Springs
Ensure that the tracks are free of debris and that the garage door springs are intact. If the springs are broken or damaged, you may need to replace them.
3. Examine the Wall Control
If your wall control is not functioning, it may need to be reset or replaced. Ensure that the wall control wiring is intact and properly connected to the opener.
4. Replace the Battery in Your Remote
If your remote is not working, it could be a sign that the battery is dead. Replace the battery and test the remote again.
Conclusion
In conclusion, Liftmaster garage door openers do not have a dedicated reset button, but there are various methods you can use to reset the opener in different scenarios. Whether it’s clearing error codes, reprogramming the remote, or resetting the security codes, following the steps outlined in this guide will help you troubleshoot and resolve any issues with your Liftmaster opener.
While the process of resetting may differ depending on the problem, performing regular maintenance and understanding how to reset your Liftmaster garage door opener can prolong its life and ensure reliable performance.
By taking the time to understand how the reset process works, you can avoid costly repairs and keep your garage door opener functioning optimally.

Leave a Reply