Garage doors are vital components of our homes, providing security and convenience. However, like any mechanical system, they can experience wear and tear over time. One common issue that homeowners face is a damaged or broken garage door cable. In this comprehensive guide, we will discuss the importance of garage door cable replacement, how to identify the need for replacement, the steps involved in the process, and maintenance tips to prolong the life of your cables.
Understanding Garage Door Cables
Garage door cables play a crucial role in the operation of your garage door. They work in tandem with the springs to lift and lower the door smoothly and safely. When you press the button on your remote or wall switch, the opener activates, causing the springs to pull the cables, which then lift the garage door.
Read too: Mastering the Art of Adjusting a Chamberlain Garage Door Opener for Smooth Operation and Safety
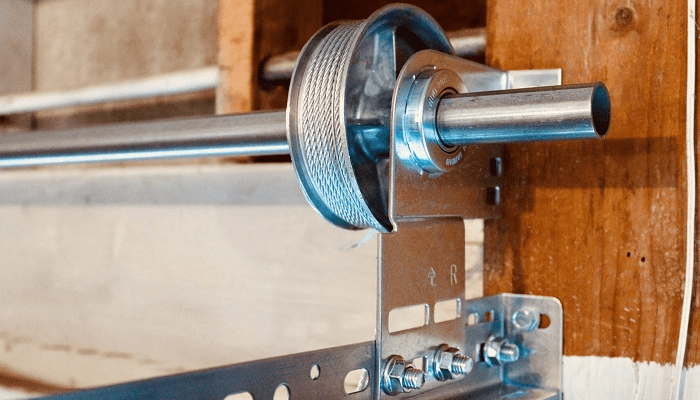
Types of Garage Door Cables
Before delving into the details of garage door cable replacement, it’s important to understand the different types of cables used in garage door systems:
- Lift Cables: These cables are responsible for lifting the garage door. They are attached to the bottom of the door and connect to the springs.
- Safety Cables: Safety cables are usually used with extension spring systems. They run through the center of each spring to prevent the spring from flying if it breaks, which can cause significant damage or injury.
- Torsion Cables: Found in torsion spring systems, these cables are used in conjunction with the torsion spring to lift the door.
Signs You Need Garage Door Cable Replacement
Recognizing the signs that your garage door cables need to be replaced is crucial for ensuring your door operates safely and efficiently. Here are some indicators:
- Visible Damage: Look for frays, cuts, or severe wear on the cables. If you notice any physical damage, it’s time for a replacement.
- Uneven Door Movement: If your garage door is not opening or closing evenly, it may be a sign that one of the cables is worn or broken.
- Difficulty Opening or Closing: If you experience resistance when opening or closing the door, it might indicate that the cables are no longer functioning properly.
- Popping or Grinding Noises: Strange noises while operating the garage door can signify problems with the cables or the opener.
- Sagging Door: A sagging garage door can be a sign of a broken cable, which may lead to further complications if not addressed promptly.
The Importance of Timely Garage Door Cable Replacement
Neglecting to replace damaged garage door cables can lead to more significant issues, including:
- Safety Hazards: A broken cable can cause the door to fall unexpectedly, posing a risk to you and your family.
- Increased Repair Costs: Delaying replacement may result in additional damage to the garage door mechanism, leading to costlier repairs.
- Reduced Efficiency: Worn cables can make your garage door opener work harder, reducing its lifespan and efficiency.
How to Replace Garage Door Cables: A Step-by-Step Guide
Replacing garage door cables is a task that requires caution and precision. While some homeowners may choose to hire a professional, it is possible to perform the replacement yourself with the right tools and knowledge. Here’s a detailed guide on how to replace your garage door cables safely:
Tools and Materials Needed
Before starting the garage door cable replacement, gather the following tools and materials:
- New garage door cables (specific to your garage door type)
- Safety glasses
- Work gloves
- Adjustable wrench
- Screwdriver
- Pliers
- Ladder
- Torque wrench
- A friend (for safety)
1: Safety First
Before you begin, safety is paramount. Wear safety glasses and gloves, and ensure that your garage door opener is unplugged. If you have a torsion spring system, it’s crucial to be aware that these springs are under a lot of tension, and mishandling can result in injury.
2: Open the Garage Door
Using your garage door opener, lift the garage door to its fully open position. This will help relieve tension from the cables and make the replacement process easier.
3: Secure the Door
Place vice grips or a similar tool on the track just below the bottom roller of the garage door. This will prevent the door from accidentally closing while you are working on it.
4: Remove the Old Cables
- Detach the Bottom Bracket: Using a screwdriver, remove the screws from the bottom bracket of the garage door. This is where the lift cable is attached.
- Remove the Cable: Carefully pull the old cable out of the drum and detach it from the bottom bracket.
- Remove from the Drum: You may need to release tension from the spring system to remove the cable from the drum fully. Be cautious during this step.
5: Install the New Cables
- Thread the New Cable: Start by threading the new cable through the bottom bracket and then through the drum.
- Attach the Bottom Bracket: Once the new cable is in place, secure the bottom bracket by tightening the screws you removed earlier.
- Wind the Cable: Carefully wind the cable onto the drum, ensuring that it is taut and correctly aligned.
6: Test the System
- Remove the Vice Grips: After ensuring that the new cables are correctly attached and wound, you can remove the vice grips from the track.
- Close the Garage Door: Plug in the garage door opener and test the door. Observe the operation and listen for any unusual noises.
- Adjust if Necessary: If the door does not operate smoothly, you may need to readjust the cables or the tension on the springs.
Maintenance Tips for Garage Door Cables
To prolong the life of your garage door cables, regular maintenance is essential. Here are some tips to keep in mind:
- Inspect Regularly: Perform visual inspections of the cables every few months. Look for signs of wear, fraying, or damage.
- Lubricate Moving Parts: Apply a silicone-based lubricant to the pulleys and rollers to ensure smooth operation.
- Check Tension: Regularly check the tension in the cables and springs. Proper tension is crucial for the safe operation of the garage door.
- Limit Heavy Loads: Avoid overloading the garage door with heavy items, as this can strain the cables and lead to premature wear.
When to Call a Professional
While many homeowners can successfully replace garage door cables themselves, some situations may warrant the assistance of a professional:
- Torsion Spring Systems: If you have a torsion spring system and are unsure about handling the tension, it’s best to hire a professional.
- Complex Systems: If your garage door system is particularly complex or has multiple issues, a professional will have the expertise to address them safely.
- Lack of Confidence: If you’re uncomfortable working on your garage door, don’t hesitate to call in an expert. Your safety is paramount.
Conclusion
Garage door cable replacement is an essential aspect of garage door maintenance that can help ensure the safe and efficient operation of your garage door. By recognizing the signs of wear, understanding the replacement process, and performing regular maintenance, you can keep your garage door functioning smoothly for years to come. Whether you choose to tackle the replacement yourself or enlist the help of a professional, knowing the ins and outs of garage door cables will empower you to make informed decisions regarding your home.


Leave a Reply