Are you experiencing issues with your garage door opener, such as it not closing properly or reversing unexpectedly? It may be time to adjust the force settings. In this comprehensive guide, we’ll explore everything you need to know about garage door opener force adjustment, including why it’s important, how to do it correctly, and expert tips for troubleshooting common problems.

Understanding Garage Door Opener Force Adjustment
The force adjustment feature on your garage door opener controls the amount of force exerted when opening and closing the door. This setting is crucial for ensuring that the door operates smoothly and safely. If the force is set too high, it can cause damage to the door or opener. Conversely, if it’s set too low, the door may not close properly or may reverse unexpectedly.
How to Adjust Garage Door Opener Force Settings
Adjusting the force settings on your garage door opener is a relatively simple process that can be done in just a few steps. Here’s a guide to help you get started:
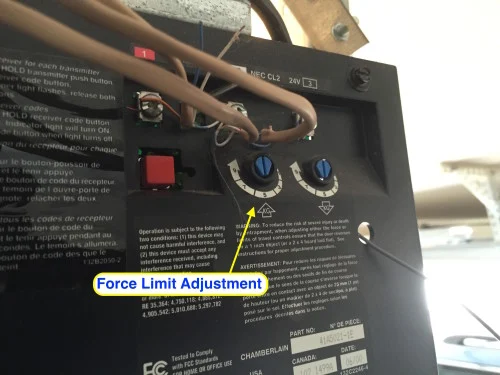
- Locate the Adjustment Screws: Most garage door openers have two adjustment screws located on the opener unit itself. These screws are typically labeled “force” or “adjustment.”
- Test the Door: Before making any adjustments, test the door to see how it’s currently operating. Pay attention to any issues such as it not closing completely or reversing unexpectedly.
- Adjust the Force Settings: Using a flathead screwdriver, turn the adjustment screws clockwise to increase the force or counterclockwise to decrease it. Make small adjustments and test the door after each one until you achieve the desired results.
- Test Again: Once you’ve adjusted the force settings, test the door again to ensure that it’s operating smoothly and safely. Make any additional adjustments as needed.
Expert Tips for Garage Door Opener Force Adjustment
- Start with Small Adjustments: When adjusting the force settings, it’s best to start with small increments to avoid overcorrection. This will help you achieve the optimal balance between safety and functionality.
- Test Regularly: Even after you’ve adjusted the force settings, it’s important to test the door regularly to ensure that it’s operating correctly. This will help you catch any issues early on and prevent potential damage.
- Consult the Owner’s Manual: If you’re unsure about how to adjust the force settings on your specific garage door opener, consult the owner’s manual for guidance. It should provide detailed instructions and safety precautions to follow.
Common Problems and Solutions
Even with proper force adjustment, issues may still arise with your garage door opener. Here are some common problems and solutions:
- Door Reverses When Closing: If the door reverses when closing, it may be due to obstructions in the door’s path or misaligned safety sensors. Remove any obstacles and check the alignment of the sensors.
- Door Doesn’t Close Completely: If the door doesn’t close completely, adjust the force settings slightly to increase the closing force. You may also need to lubricate the door tracks and hinges to ensure smooth operation.
- Excessive Noise: If the opener is making excessive noise during operation, it may be due to worn or damaged parts. Inspect the door springs, rollers, and hinges for signs of wear and replace any damaged components.
Conclusion
Garage door opener force adjustment is an essential maintenance task that can help ensure the safe and smooth operation of your garage door. By following the tips and techniques outlined in this guide, you can keep your opener in optimal condition and avoid costly repairs down the line.
Read too: Mastering the Art of How to Open a Garage Door Safely and Efficiently


Leave a Reply