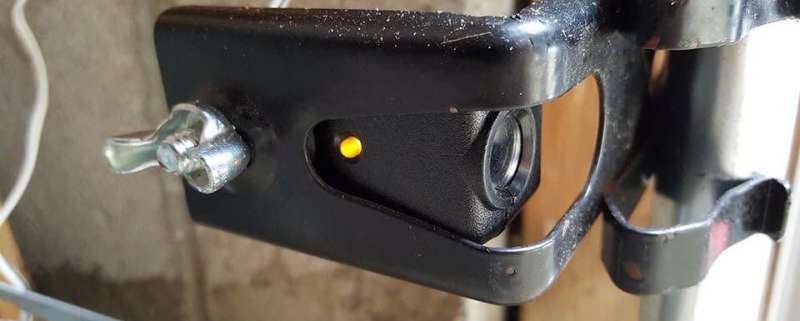
The yellow light on your Liftmaster opener’s garage door sensor signals various issues needing attention. Understanding its meaning and troubleshooting steps is crucial for safety and functionality. This guide explores common reasons for the light and offers practical solutions.

Understanding the Garage Door Sensor Yellow Light on Liftmaster
The garage door sensor yellow light on a Liftmaster opener serves as a visual indicator of potential problems with the safety sensors. These sensors are designed to detect obstructions in the path of the closing garage door and prevent accidents or damage. When the yellow light is on, it typically indicates an issue that requires attention to ensure the proper operation of the garage door system.
Common Causes of the Garage Door Sensor Yellow Light
Several factors can cause the garage door sensor yellow light to illuminate on a Liftmaster opener. Some of the most common reasons include:
- Misalignment: If the safety sensors are not properly aligned, the yellow light may turn on to indicate a misalignment issue. This can occur due to accidental bumping or shifting of the sensors.
- Obstruction: The presence of debris, dirt, or other objects blocking the path between the safety sensors can trigger the yellow light. It’s essential to keep the sensor area clear to prevent false detections.
- Wiring Issues: Faulty wiring or loose connections can interfere with the communication between the safety sensors and the opener, leading to the illumination of the yellow light.
- Sensor Damage: Physical damage to the safety sensors, such as cracks or breaks, can impair their functionality and cause the yellow light to come on.
Troubleshooting Steps
If you see yellow lights on your Liftmaster opener’s garage door sensor, follow these troubleshooting steps to resolve the issue:
- Check Alignment: Ensure that the safety sensors are aligned properly and facing each other. Adjust the positioning if necessary to establish a clear line of sight between the sensors.
- Remove Obstructions: Inspect the area around the safety sensors and remove any debris, dirt, or objects that may be blocking their view. Clean the sensor lenses with a soft, dry cloth to ensure optimal performance.
- Inspect Wiring: Examine the wiring connections between the safety sensors and the opener unit. Tighten any loose connections and replace any damaged or frayed wires.
- Test Sensor Functionality: Activate the garage door opener and observe the behavior of the safety sensors. Verify that the yellow light turns off when the sensors are properly aligned and there are no obstructions in the path of the closing door.
Read too: Why Your Liftmaster Garage Door Won’t Stay Closed and How to Fix It? Troubleshooting Tips
Conclusion
The yellow lights on a Liftmaster opener’s garage door sensor are vital safety indicators, signaling potential issues requiring attention. Understanding common causes of this indicator light and following troubleshooting steps in this guide can help diagnose and resolve problems with your garage door sensor system effectively. Remember to perform regular maintenance checks to ensure the continued safety and functionality of your garage door opener.


Leave a Reply