If your garage door is stopping too soon, reversing unexpectedly, or refusing to close, you might need to learn how to adjust an older Chamberlain garage door opener. As these openers age, their travel limits, force settings, and sensors often fall out of alignment. The good news? With the right steps, you can fix most problems yourself—even if your opener is 15 to 25 years old.
How To Adjust an Older Chamberlain Garage Door Opener (Step-by-Step)
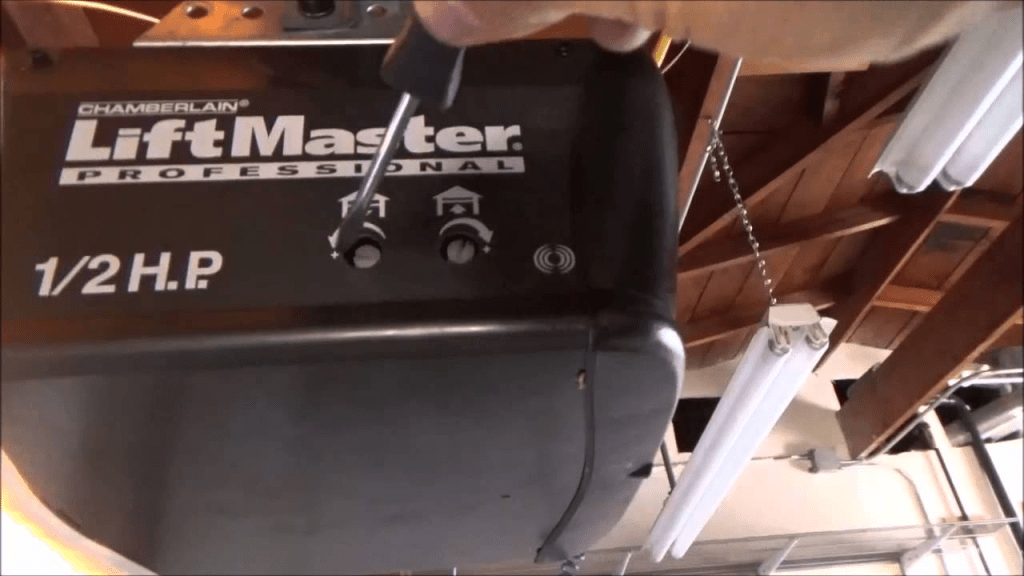
Older Chamberlain openers operate differently from newer smart models, so adjustments must be done manually using knobs, dials, or flathead screws. This guide covers every setting you may need to tweak.
Read too: Door and Garage Door Companies: Choosing the Right Partner for Your Needs
How Do I Know My Older Chamberlain Opener Needs Adjustment?
Common symptoms include:
- Door stops halfway
- Door reverses before closing
- Door slams down too hard
- Motor keeps running after door is fully closed
- Clicking or grinding noises
- Inconsistent movement in cold or hot temperatures
According to home improvement surveys, over 45% of garage door malfunctions in older openers come from incorrect limit or force settings—making these the most common DIY fixes.
Safety First Before Adjusting
Before working on an older Chamberlain opener:
- Disconnect power from the opener
- Keep hands away from moving parts
- Use a sturdy stepladder
- Wear safety glasses
- Never adjust while the door is moving
Tools You’ll Need:
| Tool | Purpose |
|---|---|
| Flathead screwdriver | Adjust limit and force screws |
| Stepladder | Reach opener housing |
| Flashlight | Improve visibility |
| Light machine oil | Lubricate rail if needed |
1. Adjust the Travel Limits
Travel limits control how far the door travels up and down.
On older Chamberlain models, these are typically two screws labeled “UP LIMIT” and “DOWN LIMIT.”
Step-by-Step Instructions
- Locate the Limit Screws
They’re usually on the back or side of the opener’s motor housing. - Run the Door Once
Identify the problem:- Does it stop too early?
- Does it slam into the floor?
- Does it not open fully?
- Adjust the Correct Screw
- Turn UP LIMIT clockwise → Door opens more
- Turn UP LIMIT counterclockwise → Door opens less
- Turn DOWN LIMIT clockwise → Door closes more
- Turn DOWN LIMIT counterclockwise → Door closes less
- Adjust in Small Increments
Turn the screw 1/4 rotation at a time, then test again.
2. Adjust the Open/Close Force
Force settings determine how much power the opener uses.
Force problems often cause:
- Door reversing randomly
- Door stopping in the cold
- Opener struggling when lifting
Older Chamberlain models have two dials labeled:
- UP FORCE
- DOWN FORCE
How to Adjust Force Correctly
- Open the light cover.
- Locate the force knobs.
- Turn UP FORCE clockwise if the door struggles on the way up.
- Turn DOWN FORCE clockwise if the door reverses before closing.
- Adjust only 1/8 turn at a time.
⚠️ Never set the force too high—this can prevent safety reversing and cause injuries.
3. Re-Align or Adjust Safety Sensors
Though older Chamberlain models may use early-generation sensors, they function the same:
- One sensor sends the signal
- The other receives it
- A broken beam stops the door from closing
Fix Common Sensor Issues
- Confirm both LEDs are glowing solid
- Remove dust, spider webs, or debris
- Ensure sensors are 6 inches above the floor
- Align both sensors until LEDs stop flickering
- Tighten loose brackets
About 70% of door-closing failures are due to misaligned sensors, especially on older systems.
4. Lubricate and Inspect the Rail System
Older openers often bind or drag because of dry rails.
Where to Lubricate
- Rail track
- Trolley
- Screw drive (if equipped)
- Rollers and hinges on the door itself
Use a silicone-based lubricant—never WD-40.
5. Reset the Opener (If Needed)
Some older Chamberlain models include a manual reset button.
To reset:
- Hold the Learn button for 6–10 seconds until the LED turns off.
- Reprogram remotes and keypad.
- Re-test all travel limits.
This can fix electrical memory glitches common in older units.
Older vs Newer Chamberlain Openers (Info Table)
| Feature | Older Models | Newer Models |
|---|---|---|
| Adjustment | Manual screws | Digital buttons |
| Sensors | Basic infrared | Advanced smart sensors |
| Noise level | Moderate | Quieter belt drive |
| Smart features | None | MyQ smartphone system |
| Maintenance | More frequent | Less frequent |
Expert Insight
According to garage door service professionals, adjusting an older Chamberlain opener every 18–24 months can extend its lifespan by as much as 30%.
Additionally, older openers often use chain drive mechanisms—refer to Chain Drives on Wikipedia for mechanical context.
FAQ: How To Adjust an Older Chamberlain Garage Door Opener
Q1. Why does my older Chamberlain opener stop halfway?
This is usually caused by incorrect travel limits or insufficient up-force. Adjust each setting in small increments until the door completes its full cycle.
Q2. Why does the door reverse before hitting the floor?
Misaligned safety sensors or incorrect down-force settings are the most common causes.
Q3. Is it safe to use an older Chamberlain opener?
Yes, but only if sensors function correctly and the force isn’t set too high. Safety sensors became mandatory after 1993, so very old units may lack important protections.
Q4. How can I tell if my limit switch is bad?
Symptoms include the motor running continuously after the door stops or the door failing to open fully even after correct adjustment.
Q5. Should I replace an older opener instead of adjusting it?
If the opener is 20+ years old and shows signs of motor strain, excessive noise, or faulty electronics, replacement may be safer and more cost-effective.
Q6. Why does my opener struggle in cold weather?
Cold temperatures thicken lubricants and increase door resistance. A small increase in up-force usually resolves the issue.
Conclusion
Adjusting an older Chamberlain garage door opener may seem intimidating, but with the right steps, you can fix problems like early stopping, reversing, or incomplete travel in just minutes. Regular adjustment improves performance, extends lifespan, and keeps your garage door operating safely.

Leave a Reply