If your garage door opener is making noise or moving unevenly, adjusting the chain tension on your garage door opener can solve the problem. Many homeowners overlook this simple maintenance task, which can extend the life of your opener and improve its performance. This guide walks you through the process safely and effectively.
Why Proper Chain Tension Matters
- Smooth Operation: A properly tensioned chain reduces jerky movements and prevents uneven door travel.
- Noise Reduction: Loose chains can rattle and create excessive noise during operation.
- Prevent Damage: Overly tight chains strain the motor and gears, leading to premature wear.
- Safety: Correct tension ensures the door opens and closes reliably, reducing the risk of accidents.
According to garage door experts, regular chain tension checks should be done every 6–12 months to maintain optimal performance.
Read too: The Complete Guide to Tighten Chain On Garage Door Opener for Smooth Operation
Tools You’ll Need
- Adjustable wrench
- Socket set
- Screwdriver
- Ladder (if needed)
- Safety gloves
- Lubricant (optional, for chain maintenance)
Step-by-Step Guide To Adjust Chain Tension
Step 1: Disconnect Power
- Safety first: unplug the garage door opener or turn off the circuit breaker.
- Ensure the door is in a stable position (usually closed) before working on the chain.
Step 2: Inspect the Chain
- Check for slack, rust, or wear along the entire length.
- Make sure the chain is seated correctly on the sprocket.
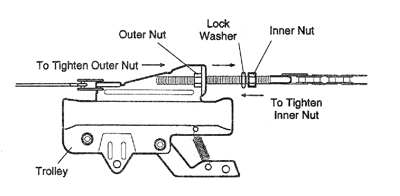
Step 3: Locate the Tension Bolt
- Most garage door openers have a tension adjustment bolt near the motor or on the rail.
- Consult your opener’s manual for exact location.
Step 4: Adjust the Chain
- Loosen the lock nut using an adjustable wrench.
- Turn the tension bolt clockwise to tighten or counterclockwise to loosen.
- Aim for about 1/2 inch of slack between the chain and the rail.
Step 5: Check Alignment
- Ensure the chain is parallel to the rail and the door operates smoothly.
- Manually lift the door slightly to verify even movement.
Step 6: Tighten and Test
- Retighten the lock nut to secure the chain.
- Reconnect power and operate the door using the remote or wall control.
- Listen for unusual noises and observe the door’s movement.
Tips For Maintaining Chain Tension
- Lubricate: Apply a light garage door lubricant to the chain periodically.
- Inspect: Check tension and chain condition every 6 months.
- Avoid Over-tightening: A too-tight chain can damage the opener and door components.
- Professional Help: If the door is still noisy or jerky, consult a professional.
Common Problems and Solutions
| Problem | Cause | Solution |
|---|---|---|
| Garage door jerks | Loose chain | Tighten chain as described above |
| Rattling noise | Worn chain or loose bolts | Inspect and lubricate, tighten bolts |
| Door moves slowly | Chain too tight | Loosen slightly to reduce strain on motor |
| Uneven movement | Misaligned chain | Adjust rail and chain alignment |
FAQ – How To Adjust Chain Tension On Garage Door Opener
1. How often should I check chain tension?
Every 6–12 months is recommended, especially in homes with frequent door use.
2. Can I adjust the chain myself?
Yes, with proper tools and safety precautions, most homeowners can adjust the chain.
3. What happens if the chain is too tight?
It can strain the motor, cause excessive wear on gears, and increase noise.
4. How do I know if the chain is too loose?
You’ll notice rattling, uneven door movement, or skipping of the chain on the sprocket.
5. Do all garage door openers have adjustable chains?
Most chain-drive openers do, but belt-drive models have a different tension system.
6. Where can I learn more about garage door openers?
Check Wikipedia: Garage Door Opener for technical details and history.
Conclusion
Proper chain tension on your garage door opener is essential for smooth operation, safety, and longevity of your system. Following this step-by-step guide helps you maintain your garage door opener efficiently, reducing noise and preventing damage.
Share this article to help friends and family keep their garage doors running smoothly and safely!
Leave a Reply