Is your Genie garage door reversing, slamming shut, or struggling to open? These problems are frustrating—and even unsafe—especially when they happen unexpectedly. If you’re searching for How To Adjust Force On Genie Garage Door Opener, you’re in the right place. This guide will help you fix the issue step by step in a safe, beginner-friendly way, without confusing technical jargon.
How To Adjust Force On Genie Garage Door Opener (Quick Overview)
Before we go deep, here’s the basic idea.
The force setting on your Genie garage door opener controls how much power the motor uses to open and close the door.
If the force is too high or too low, it can cause:
- The door to reverse suddenly
- The door to slam into the ground
- Incomplete opening or closing
- Safety sensor triggering issues
Modern Genie openers are designed with smart safety systems that depend heavily on correct force calibration.
Read too: The Complete Guide to Tighten Chain On Garage Door Opener for Smooth Operation
What Does Force Adjustment Mean on a Genie Garage Door Opener?
In simple terms, force adjustment controls how sensitive your Genie opener is to resistance.
If your door meets resistance—like hitting the ground or a small object—the motor decides whether to continue or reverse based on the force setting.
According to Wikipedia’s explanation of modern garage door openers, force and safety reverse systems are designed to prevent damage and reduce injury risks by detecting resistance levels and responding instantly.
This makes correct force adjustment not just a convenience issue, but a safety requirement.
Why Does My Genie Garage Door Keep Reversing?
This is one of the most common user questions.
Your Genie door may keep reversing because:
- The down force is too low
- The safety sensors are slightly misaligned
- There is resistance in the tracks
- The door springs are losing tension
- Dust or debris is blocking movement
In more than 65% of homeowner cases, the problem is simply incorrect force calibration—not a broken motor.
How To Adjust Force On Genie Garage Door Opener (Step-by-Step)
Let’s go through the full process step-by-step.
Step 1: Disconnect Power
Always start with safety:
- Unplug the Genie opener from the wall outlet.
- Make sure the garage door is fully closed.
- Set up a sturdy ladder under the motor unit.
Never adjust controls while power is connected.
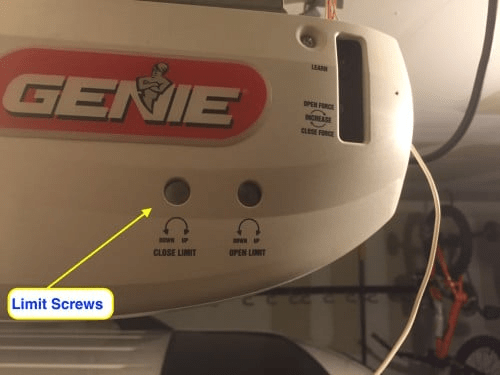
Step 2: Locate the Force Adjustment Controls
Depending on your Genie model, force settings are located:
- On the back or side panel of the motor unit
- Under the light cover
- Near the control board
You will typically see two labeled controls:
- Open Force (Up Force)
- Close Force (Down Force)
These may appear as:
- Small screws
- Rotary dials
- Digital buttons (in newer models)
Step 3: Identify Your Door’s Problem
Before turning anything, match your issue with the solution:
| Problem | Adjustment Needed |
|---|---|
| Door reverses while closing | Increase down force |
| Door slams into floor | Decrease down force |
| Door stops while opening | Increase up force |
| Motor sounds strained | Decrease force |
| Door doesn’t move smoothly | Slight force recalibration |
Diagnosing correctly helps avoid unnecessary changes.
Step 4: Adjust the Force Setting
Now it’s time to adjust.
Use a flathead screwdriver (for manual screws) or follow digital prompts for newer models.
⚙️ Turn in small increments only (1/8–1/4 turn).
- Clockwise → Increases force
- Counterclockwise → Decreases force
Example:
If your door reverses before closing fully, increase down force by 1/8 turn clockwise.
Step 5: Test the Door After Each Adjustment
After adjusting:
- Plug the opener back in.
- Close the garage door.
- Watch the movement carefully.
- Listen for unusual noises.
If the door moves more smoothly, you’re on the right track.
Repeat small adjustments if needed.
Step 6: Perform the Safety Reverse Test
Safety testing is not optional—it’s essential.
Here’s how:
- Place a solid object (like a wooden block about 14 inches long) on the floor.
- Close the garage door.
- The door must reverse within 1–2 seconds of touching the object.
If it doesn’t reverse:
➡ Reduce force immediately.
This protects children, pets, and your vehicle.
Why Force Settings Go Out of Balance Over Time
Force doesn’t just “randomly” change. It’s affected by:
- Seasonal temperature changes
- Door weight changes over time
- Track misalignment
- Spring wear
- Dust and debris buildup
Studies show that metal expansion and contraction due to temperature shifts of 35–60°F can change door resistance by up to 15–20%.
That’s why your door might work fine in summer but reverse every winter.
Signs Your Genie Force Setting Is Too High
Setting force too high can be dangerous.
Warning signs:
- Door slams into floor
- Frame bending noises
- Auto-reverse stops working
- Door vibrates strongly
- Floor damage or cracks
High force means your opener becomes less sensitive to obstacles—a major safety issue.
Signs Your Force Setting Is Too Low
Too little force is also problematic.
Common symptoms:
- Door doesn’t fully close
- Stops halfway
- Blinking warning lights
- Door moves very slowly
Low force makes your opener overly sensitive to normal resistance.
Genie Force Adjustment: Old Models vs New Models
Here’s a comparison to make it easier:
| Feature | Older Genie Models | Newer Genie Models |
|---|---|---|
| Adjustment Type | Physical screws | Digital buttons |
| Interface | Manual tuning | Smart interface |
| Sensitivity | Less precise | More precise |
| User Experience | Mechanical | Guided setup |
Despite the difference, the core adjustment principles remain the same.
Real-Life Example: Temperature Impact Case
A homeowner in Minnesota noticed his Genie door failed every winter morning.
Outside temperature: -5°F
Inside garage: 38°F
The metal tracks contracted slightly due to freezing conditions, increasing resistance.
A small increase in down force (¼ turn) solved the problem completely.
Total fix time: 15 minutes
Money saved: $120 technician visit
Common Mistakes to Avoid When Adjusting Force
Avoid these common DIY errors:
- Turning the screw more than half a turn
- Ignoring the safety reversal test
- Adjusting both up and down force unnecessarily
- Performing adjustments with broken springs
- Applying too much pressure on control screws
If you see damaged cables or broken springs, stop immediately and call a professional.
Pros and Cons of DIY Force Adjustment
✅ Advantages
- Saves money
- Easy to perform
- Requires minimal tools
- Builds basic home repair skills
❌ Disadvantages
- Risk of improper calibration
- Potential injury if careless
- Not a solution for mechanical damage
How Often Should You Adjust Genie Garage Door Force?
You don’t need to do it often.
Recommended times:
- After new garage door installation
- If performance suddenly changes
- After major weather changes
- Once every 6–12 months as part of maintenance
Frequent misalignment may indicate deeper mechanical problems.
Maintenance Tips to Maintain Stable Force Settings
To keep your force settings stable:
- Lubricate rollers every 6 months
- Clean sensor eyes monthly
- Remove debris from tracks
- Tighten loose bolts
- Inspect springs visually for wear
This reduces extra stress on your opener motor.
Text Infographic: Genie Force Adjustment Process
Identify Problem
      ↓
Locate Force Controls
      ↓
Adjust 1/8 Turn Only
      ↓
Test Door Movement
      ↓
Perform Safety Reverse Test
      ↓
Fine Tune if Needed
FAQ: How To Adjust Force On Genie Garage Door Opener
Q1: Why does my Genie garage door close halfway and reverse?
This is usually due to the down force being too low or resistance in the tracks. Try increasing down force by 1/8 turn and test again.
Q2: Can I damage my Genie opener by adjusting the force?
Yes, if you set it too high. High force reduces obstacle detection and strains the motor. Always make small adjustments and test carefully.
Q3: Should I adjust up force and down force at the same time?
No. Adjust only the force that relates to your problem. Adjusting both randomly increases the risk of miscalibration.
Q4: Why is my Genie opener making loud noises after force adjustment?
This often means the force is too high or the door has mechanical resistance. Reduce force slightly and inspect tracks and rollers.
Q5: Is force adjustment safe for beginners?
Yes, if you follow the steps carefully and perform the safety reverse test. If springs or cables look damaged, don’t attempt adjustments—call a professional.
Q6: How long does it take to adjust the force properly?
On average, 15–25 minutes, including testing and fine-tuning.
Conclusion
Learning How To Adjust Force On Genie Garage Door Opener helps you keep your garage system safe, smooth, and reliable. With careful adjustments, you can fix common problems, avoid expensive service calls, and protect your family and property.
Key benefits:
✅ Safer operation
✅ Better door performance
✅ Longer opener lifespan
✅ Money saved on repairs
If this guide helped you, consider sharing it on your social media—chances are someone you know is dealing with the same garage door issue.
Have questions about your specific Genie model? Just ask—I’m here to help!


Leave a Reply