Many homeowners encounter issues with their garage door stopping too high or too low, leading to misalignment or operational problems. If you’re wondering how to adjust height on Chamberlain garage door opener, this guide will walk you through the process safely and efficiently. Proper adjustment ensures smooth operation, prevents damage, and extends the life of your opener.
Why Adjusting Garage Door Height is Important
- Ensures smooth and safe operation
- Prevents wear on the opener and door components
- Reduces risk of pinched fingers or trapped pets
- Optimizes garage security by allowing the door to fully close
Read too: The Complete Guide to Tighten Chain On Garage Door Opener for Smooth Operation
Step-by-Step Guide to Adjust Height
Tools Needed
- Screwdriver (flathead or Phillips, depending on model)
- Ladder
- Safety gloves
- Level
1. Disconnect Power
For safety, unplug the Chamberlain opener or turn off the breaker before adjusting any settings.
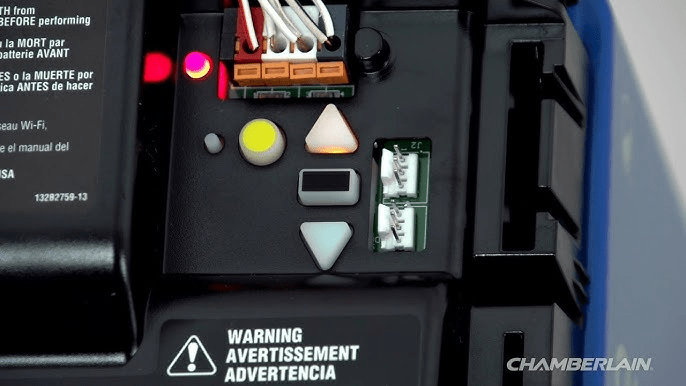
2. Locate the Travel Adjustment Screws
- Most Chamberlain models have UP and DOWN travel limit screws near the motor unit.
- These screws control how far the door moves in each direction.
3. Adjust the DOWN Limit
- Turn the DOWN screw clockwise to move the door up.
- Turn counterclockwise to lower the door.
- Make small adjustments—1/4 turn at a time—and test operation.
4. Adjust the UP Limit
- Similarly, use the UP screw to control how high the door opens.
- Adjust gradually to prevent hitting the ceiling or garage frame.
5. Test the Door
- Press the open/close button on the wall control.
- Observe the door movement: it should stop just above the floor without resistance.
- Ensure the door reverses correctly if it encounters an obstruction.
6. Fine-Tune the Force Settings
- Some Chamberlain models have force adjustment screws for upward/downward force.
- Increase or decrease to ensure smooth operation without straining the motor.
Tips for Proper Alignment
- Use a level to confirm the door is even on both sides.
- Lubricate rollers and hinges with garage-safe lubricant for smoother travel.
- Avoid over-tightening screws—small incremental adjustments prevent damage.
Common Problems and Solutions
| Problem | Possible Cause | Solution |
|---|---|---|
| Door won’t close completely | DOWN limit too high | Turn DOWN screw counterclockwise |
| Door won’t open fully | UP limit too low | Turn UP screw clockwise |
| Motor struggles | Force setting too low | Increase upward/downward force |
| Door reverses too soon | Safety sensors misaligned | Adjust sensors to be level and clear |
Expert Tip: Always consult the Chamberlain user manual for model-specific guidance.
FAQ Section
Q1: Can I adjust the height myself safely?
A1: Yes, by disconnecting power and following the steps carefully, you can safely adjust the door height.
Q2: How often should I check garage door alignment?
A2: Inspect your garage door at least once a year or after extreme weather events.
Q3: Why does my Chamberlain door stop before reaching the floor?
A3: The DOWN limit may be set too high or force settings are insufficient; adjust accordingly.
Q4: Can improper height damage the opener?
A4: Yes, misalignment can strain the motor, rollers, and tracks, shortening lifespan.
Q5: What if the door still reverses after adjustment?
A5: Check that safety sensors are aligned and unobstructed; also inspect tracks and rollers.
Conclusion
Knowing how to adjust height on Chamberlain garage door opener ensures safe, efficient, and long-lasting operation. Regular inspections, careful adjustments, and proper maintenance keep your garage door functioning smoothly and protect your home.
Share this guide with friends or family to help them maintain their garage doors safely and efficiently.


Leave a Reply