When it comes to maintaining your home, one crucial aspect that often gets overlooked is the garage door. A properly functioning garage door not only enhances the aesthetic appeal of your home but also ensures the security of your vehicle and belongings. One key element in the smooth operation of a garage door is the adjustment of spring tension. In this guide, we will walk you through the essential steps on “How To Adjust Spring Tension on Garage Door” and provide you with valuable insights to make this task a breeze.
Understanding: How To Adjust Spring Tension on Garage Door
Before delving into the adjustment process, it’s essential to comprehend why spring tension is a critical factor in your garage door’s functionality. The springs in your garage door system act as a counterbalance, making it easier to open and close the door. Over time, these springs can lose tension due to various factors such as weather conditions and regular wear and tear. Adjusting the spring tension becomes necessary to maintain the door’s balance and prevent potential issues.
How To Adjust Spring Tension On Garage Door: A Step-by-Step Guide
Step 1: Gather the Necessary Tools
The first step in adjusting spring tension is to gather the required tools. You’ll need a ladder, winding bars, a socket wrench set, and a tape measure. Safety should always be a priority, so make sure to wear safety glasses and gloves.
Step 2: Identify the Type of Springs
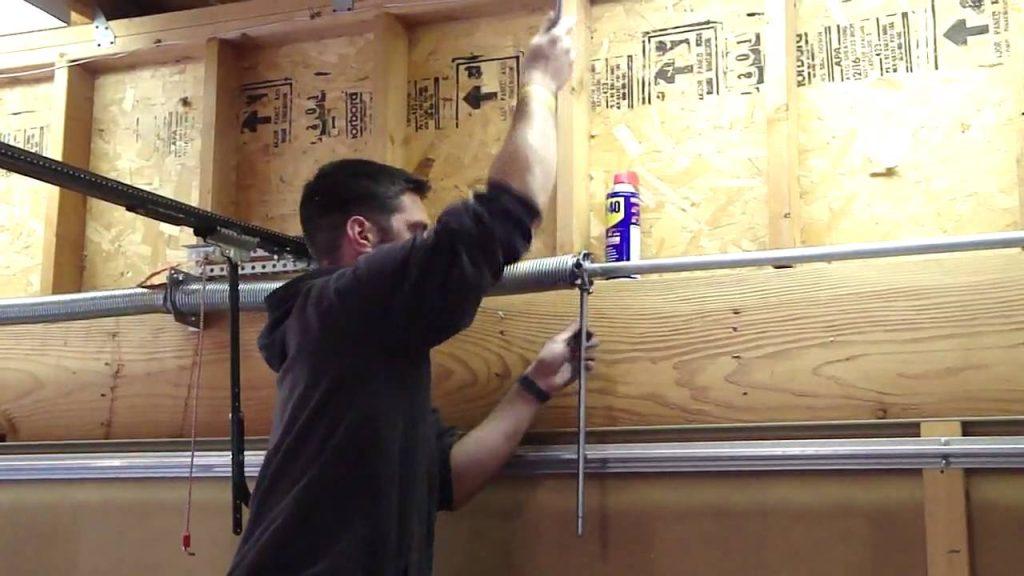
Garage doors typically have either torsion or extension springs. It’s crucial to identify the type of springs your door uses, as the adjustment process differs for each. Torsion springs are usually located above the door, while extension springs are on either side.
Step 3: Release the Tension
Before attempting any adjustments, release the existing tension in the springs. Use the winding bars to slowly unwind the tension in a controlled manner. This step is critical for safety reasons, as attempting to adjust tightly wound springs can be dangerous.
Step 4: Measure and Adjust
Measure the current length of the spring to ensure an accurate adjustment. Use the socket wrench set to tighten or loosen the springs based on your measurement. Remember that adjusting the tension too much in one direction can lead to imbalances, so proceed with caution.
Tips for Safe and Effective Adjustment
- Balance is Key: Maintaining balance between the two springs is crucial for the smooth operation of your garage door. Ensure that both springs are adjusted evenly.
- Regular Inspection: Schedule regular inspections to check the condition of your garage door springs. Early detection of issues can prevent major problems down the line.
- Seek Professional Help if Needed: If you are unsure about the adjustment process or encounter difficulties, it’s best to seek the assistance of a professional garage door technician.
Common Issues and Troubleshooting Tips
- Uneven Closing: If your garage door closes unevenly, it may indicate an imbalance in spring tension. Recheck the tension on both sides and make adjustments accordingly.
- Noisy Operation: Excessive noise during operation can be a sign of misaligned or worn-out springs. Lubricate the springs and inspect for any visible damage.
Conclusion: Mastering the Art of Spring Tension Adjustment
In conclusion, knowing “How To Adjust Spring Tension On Garage Door” is a valuable skill for any homeowner. Regular maintenance and adjustments can extend the life of your garage door and prevent costly repairs. By following the step-by-step guide provided, you can confidently tackle this task and ensure the optimal performance of your garage door. Remember, safety is paramount, so exercise caution and, when in doubt, consult with a professional for assistance. With these insights, you’re well on your way to becoming a garage door maintenance expert.


Leave a Reply