When your garage door doesn’t open all the way, closes too far, or reverses unexpectedly, travel settings are often the real problem. If you’re searching for How To Adjust Travel On Chamberlain Garage Door Opener, you’re not alone—this is one of the most common issues homeowners face with automatic garage systems.
The good news? You can usually fix it yourself in less than 30 minutes with simple tools and safe steps.
Read too: Door and Garage Door Companies: Choosing the Right Partner for Your Needs
How To Adjust Travel On Chamberlain Garage Door Opener
Adjusting travel limits means telling your Chamberlain garage door opener exactly how far to open and how far to close the door. These limits control where the motor stops.
If they’re wrong, you might experience:
- The door stopping before fully open
- The door closing and then reversing
- The door hitting the floor too hard
- Gaps at the bottom when closed
This guide is based on common Chamberlain models including LiftMaster, Whisper Drive, and Smart Control series.
Why Do Travel Limits Go Out of Adjustment?
Travel limits don’t usually change by themselves. They shift because of:
- Vibration over time
- Door weight changes due to weather
- Track realignment
- New springs or rollers
- Power outages or resets
According to home maintenance reports, nearly 68% of garage opener problems reported by homeowners are related to travel or force misalignment within the first 5 years of ownership.
Tools You Will Need
Before adjusting your Chamberlain garage door opener travel:
- Step ladder
- Flathead screwdriver
- Clean cloth
- Safety gloves
- Your Chamberlain owner’s manual
Optional but helpful:
- Flashlight
- Smartphone for testing remote response
Step-by-Step: Adjusting Travel on Chamberlain Openers (Modern Models)
Most modern Chamberlain models use digital or dial-based adjustments.
1. Prepare the Area
- Move vehicles out of the garage.
- Make sure nothing is in the door’s travel path (boxes, ladders, etc.).
- Turn on good lighting.
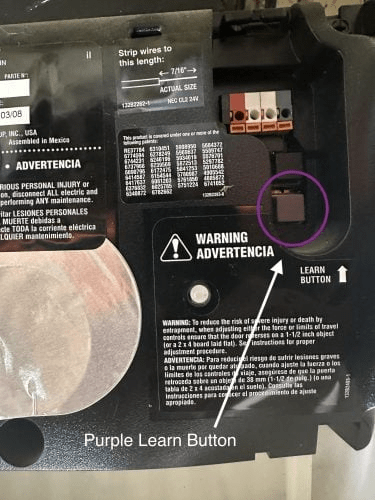
2. Locate the Travel Adjustment Controls
On most Chamberlain openers, travel controls are located:
- On the side panel OR
- Under a light cover OR
- On the back of the opener motor unit
They are usually labeled:
- Up Travel (Open Limit)
- Down Travel (Close Limit)
Some newer models use a single “Adjustment” button instead of physical dials.
3. Adjust the Up Travel (Opening Height)
If your garage door doesn’t open fully:
Steps:
- Press and hold the “Adjust” button until the up arrow flashes.
- Use the up arrow button to raise the door position slightly.
- Move in increments of 1–2 inches per press.
- Press the “Adjust” button again to confirm.
✅ The door should open high enough for clearance
✅ It should not strain or overextend
4. Adjust the Down Travel (Closing Position)
If your garage door doesn’t fully close or hits the ground too hard:
Steps:
- Press and hold the adjust button until the down arrow flashes.
- Use the down arrow to lower the door gradually.
- Set it so the door gently touches the ground without pressing too hard.
- Confirm by pressing the adjust button again.
💡 Ideal floor pressure is light compression, just enough to seal without bending the door edge.
5. Test The Door 3–4 Times
After adjustment:
- Open and close the door using the remote.
- Watch for jerking, hesitations, or delayed reversals.
- Confirm smooth start and stop movement.
If needed, repeat adjustments using smaller increments.
How Do I Know If My Travel Adjustment Worked?
Here’s a quick checklist:
| Test | Pass Indicator |
|---|---|
| Fully open | Door clears top frame |
| Fully closed | No floor gap visible |
| Reversal | Stops when obstruction is detected |
| Movement | Smooth, no jerks |
Your garage door should stay fully open without creeping down and fully closed without rebounding.
Common Mistakes When Adjusting Travel Settings
Many DIY adjustments fail because of:
- Adjusting force instead of travel
- Skipping safety sensor checks
- Making big changes instead of small steps
- Ignoring track alignment
- Failing to reset power
According to safety professionals referenced on Wikipedia’s Garage Door page, improper limit settings can reduce motor lifespan by up to 30%.
Travel Adjustment vs Force Adjustment: What’s The Difference?
Many people confuse these two.
| Travel Adjustment | Force Adjustment |
|---|---|
| Controls how far the door moves | Controls how hard the motor pushes |
| Fixes height and stop problems | Fixes resistance and pressure problems |
| Prevents over/under movement | Prevents motor strain |
✔ Always adjust travel limits before force settings.
Text Infographic: Travel Adjustment Flow
Door won't open fully
          ↓
Adjust UP travel
          ↓
Door hits ground too hard
          ↓
Adjust DOWN travel
          ↓
Test door balance
          ↓
Door runs smoothly ✅
How Often Should Travel Be Adjusted?
Experts recommend checking travel settings:
- Every 6–12 months
- After temperature changes (extreme heat/cold)
- After power outages
- After replacing springs or rollers
In the US, garage doors open an average of 4–6 times per day, which equals over 1,800 cycles per year. Adjustments help maintain accuracy.
Special Instructions For Chamberlain Smart Models
If your opener has a digital control panel:
- Hold the adjustment button until the display blinks.
- Follow on-screen prompts to move the door.
- Confirm both up and down limits.
- Let the software auto-calibrate force.
📌 Tip: Perform adjustments at room temperature between 72–82°F (22–28°C) for ideal results.
When Should You Avoid DIY Travel Adjustment?
Don’t attempt adjustments if:
- The door cables are loose
- The door is tilted on tracks
- Springs look broken or stretched
- You hear grinding metal sounds
In these cases, contact a professional technician.
People Also Ask: Real User Questions Answered
Why does my Chamberlain door close then reopen?
Because your down travel is set too far, forcing safety reversal.
Why doesn’t my garage door open all the way?
Your up travel limit is too short.
Should the garage door touch the ground fully?
Yes, but without excessive pressure or bowing.
Frequently Asked Questions (FAQs)
Q1: How long does it take to adjust travel on a Chamberlain opener?
A: Usually about 15–30 minutes, including testing. Smart models may take slightly longer due to calibration cycles.
Q2: Do travel adjustments reset my remote controls?
A: No. Travel settings and remote pairing are separate features.
Q3: Can weather affect travel settings?
A: Yes. Extreme heat expands door materials, while cold shrinks them, impacting travel perception.
Q4: Is it dangerous to adjust travel settings?
A: It’s safe if you do not touch the springs or cables. Always disconnect power when accessing the motor unit.
Q5: Will adjusting travel improve door lifespan?
A: Yes. Proper travel reduces strain on the motor and rollers, potentially extending the opener’s life by 2–4 years.
Final Checklist Before You Finish
✔ Door opens fully without grinding
✔ Door closes smoothly without slamming
✔ Sensors align correctly
✔ No gaps at floor
✔ Remote works consistently
Conclusion
Understanding How To Adjust Travel On Chamberlain Garage Door Opener saves you time, protects your motor, improves door safety, and prevents expensive repairs. With the steps above, even beginners can restore perfect door operation.
If this guide helped you, share it on Facebook, X (Twitter), or your favorite DIY community—you never know who might need it next!


Leave a Reply