Is your garage door in need of maintenance or repairs? Before you dive into fixing it, it’s crucial to disconnect the garage door opener for safety reasons. In this step-by-step guide, we will walk you through the process of disconnecting your garage door opener, ensuring a safe environment for your maintenance tasks.

Understanding Garage Door Openers
Garage door openers come in different types, such as chain drive, belt drive, and screw drive. Regardless of the type, they consist of several components that work together to operate the door smoothly. However, when it comes to performing maintenance or repairs, disconnecting the opener is necessary to prevent any accidental door movements that could cause injury or damage.
To address common questions, here are a couple of FAQs:
FAQs:
- What is the purpose of disconnecting a garage door opener?
- Is it necessary to disconnect the opener before performing maintenance on the garage door?
Preparing for Disconnecting
Before you begin the disconnection process, make sure you have the necessary tools and equipment readily available. This includes a ladder, pliers, and possibly a socket wrench, depending on your specific opener. By having everything prepared, you can ensure a smooth disconnection process.
Now, let’s address some frequently asked questions:
FAQs:
- Do I need any specialized tools to disconnect a garage door opener?
- Can I disconnect the opener without professional assistance?
Disconnecting the Garage Door Opener
To safely disconnect the garage door opener, follow these steps:
- Ensure the garage door is in the closed position: This prevents any unexpected movement while you’re working on the opener.
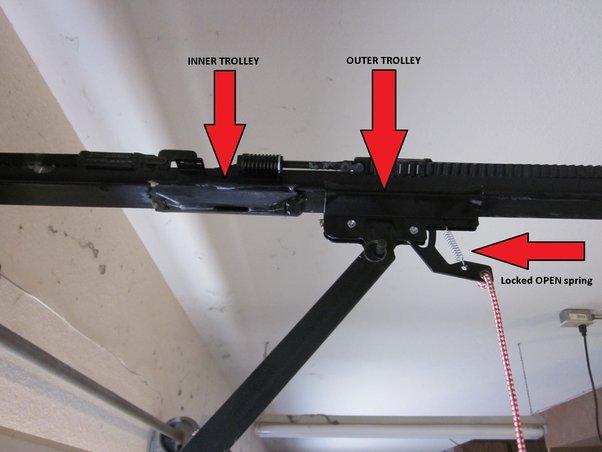
- Locate the emergency release cord or lever: The emergency release mechanism is usually red and located near the opener motor or on the door’s track.
- Pull the emergency release cord/lever: This action disengages the opener from the door, allowing you to manually operate it.
- Manually test the garage door’s functionality: Carefully lift the door a few inches off the ground and release it. It should stay in place and not slide down. Also, check if the door opens and closes smoothly.
Addressing common concerns, here are a couple of FAQs:
FAQs:
- Will disconnecting the garage door opener reset its programming?
- How can I manually open and close the garage door after disconnecting the opener?
Performing Maintenance or Repairs
Now that your garage door is disconnected from the opener, you can proceed with maintenance or repairs. Here are the steps to follow:
- Assess the condition of the garage door and opener: Look for any signs of wear, damage, or misalignment.
- Lubricate moving parts if necessary: Apply a silicone-based lubricant to the hinges, rollers, and tracks to ensure smooth operation.
- Inspect and tighten any loose hardware: Check for loose screws, bolts, or brackets and tighten them as needed.
- Test the garage door’s balance and alignment: Close the door halfway and let go. It should remain in place without rising or falling.
- Replace worn-out parts or seek professional help if needed: If you notice any significant issues or damaged components, it may be best to consult a professional for assistance.
Addressing common questions, here are a couple of FAQs:
FAQs:
- What maintenance tasks can I perform on my own without professional assistance?
- When should I call a professional for garage door maintenance or repairs?
Reconnecting the Garage Door Opener
After completing the necessary maintenance or repairs, it’s time to reconnect the garage door opener. Follow these steps:
- Ensure the garage door is in the closed position: Similar to the disconnection process, make sure the door is fully closed before reconnecting the opener.
- Engage the emergency release mechanism: Locate the emergency release cord or lever and return it to its original position, engaging the opener.
- Reconnect the garage door opener to the door: Carefully guide the opener’s arm or carriage back into its original position on the garage door.
- Test the garage door’s functionality using the opener: Press the opener remote or wall button to verify that the door opens and closes smoothly.
Here are a couple of frequently asked questions:
FAQs:
- Is there a specific sequence to follow when reconnecting a garage door opener?
- Can I reconnect the opener if the door is not perfectly balanced?
Safety Tips and Precautions
Throughout the entire process, it’s essential to prioritize safety. Here are some additional safety tips and precautions to keep in mind:
- Always unplug the opener from the power source before disconnecting or reconnecting.
- Be cautious of the garage door’s weight and avoid placing hands or fingers near moving parts.
- Use a sturdy ladder when working at heights and ensure it is properly positioned and stable.
- If you encounter any issues or difficulties, consult a professional for assistance.
To address potential concerns, here are a couple of FAQs:
FAQs:
- What safety precautions should I take when working with garage doors?
- Are there any specific risks associated with reconnecting a garage door opener?
Conclusion
By following this step-by-step guide, you can safely disconnect and reconnect your garage door opener when performing maintenance or repairs. Remember to prioritize safety and seek professional help if needed. Regular maintenance will keep your garage door in optimal condition, ensuring smooth and reliable operation.
If you need further guidance or assistance, don’t hesitate to consult your local garage door professional or refer to the manufacturer’s instructions for your specific opener model. Happy disconnecting and maintaining your garage door!


Leave a Reply