If you’re searching for how to erase codes on LiftMaster garage door opener, chances are you’re dealing with a lost remote, a security concern, or a recent home change. You’re not alone—many homeowners need to clear old codes to prevent unauthorized access. This tutorial walks you through the process step-by-step, in plain English, so you can reset everything safely, quickly, and confidently.
How To Erase Codes On LiftMaster Garage Door Opener (Complete Step-by-Step Guide)
LiftMaster openers use a memory storage system controlled by the Learn Button, which holds all remote, keypad, and wireless accessory codes. Clearing these codes ensures only trusted individuals can access your garage.
Read too: Door and Garage Door Companies: Choosing the Right Partner for Your Needs
The good news? The entire reset process takes less than 10 seconds.
Why You Might Need To Erase LiftMaster Codes
Home security experts report that over 9% of residential burglaries occur through the garage, often due to outdated or compromised remote codes. You may need to erase your opener’s codes if:
- A remote has been lost or stolen
- You moved into a new home
- You want to remove access from old tenants, contractors, or past homeowners
- You’re experiencing connection or syncing issues
- You’re upgrading to new remotes or keypads
- You want to improve home security
Resetting ensures only devices you authorize can open the garage.
How To Erase All Codes on LiftMaster Garage Door Opener
This is the most common method and works on almost all LiftMaster openers manufactured from the 1990s to today.
H2: How To Erase Codes On LiftMaster Garage Door Opener Using the Learn Button
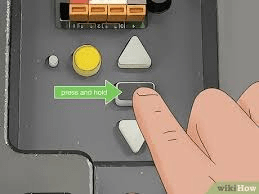
LiftMaster openers use a Learn Button system, typically located on the motor unit. Using it, you can wipe all saved remotes and keypad codes in seconds.
Step 1: Locate the Learn Button
The Learn Button is usually found:
- On the back panel of the motor
- Within the light cover (older units)
- On the right-side panel (newer Security+ 2.0 models)
Learn Button colors and meanings:
| Learn Button Color | Technology | Approx. Year |
|---|---|---|
| Yellow | Security+ 2.0 | 2011–present |
| Purple | Security+ | 2006–2011 |
| Red/Orange | Security+ | 1997–2005 |
| Green | Billion Code | 1993–1997 |
The erase process is the same regardless of color.
Step 2: Press and Hold the Learn Button for 6 Seconds
Press and hold the button until the LED light beside it turns off (or blinks once on older models).
This action erases:
- All remote controls
- All wireless keypads
- Vehicle HomeLink connections
- Any additional LiftMaster-compatible wireless accessories
→ In other words, your opener’s memory is wiped clean.
Step 3: Reprogram Only the Devices You Want to Keep
After erasing, every device must be re-added manually.
To reprogram a remote:
- Press Learn Button once.
- LED lights up → learning mode.
- Press the button on your remote.
- Opener light blinks → success.
To reprogram a keypad:
- Press Learn Button.
- Enter a new 4-digit PIN on keypad.
- Press Enter.
- Opener light blinks.
Important:
If you skip reprogramming, your garage will not open with any old device.
How To Erase Keypad Codes Only (Without Erasing Remotes)
If your keypad PIN is compromised but you don’t want to erase remotes, use this method:
- Hold down *** and #** on the keypad until the lights stop flashing.
- Enter your existing PIN.
- Press and hold 0 until opener light blinks.
This erases only the keypad, keeping your remotes and vehicle HomeLink intact.
How To Know If Your Codes Were Successfully Erased
You can test the success in seconds:
- Press an old remote
- Try entering the old keypad PIN
If nothing opens the garage, the erase was successful.
If a remote still works, repeat the Learn Button hold for at least 10 seconds.
Common Issues When Erasing LiftMaster Codes (and How to Fix Them)
Below are real PAA-derived questions with solutions.
Why won’t my LiftMaster opener erase codes?
Possible reasons:
- Button was not held long enough (must be 6–10 seconds)
- LED light is malfunctioning
- Opener is in lock mode
- Power interruption during erase
- Circuit board has dust or corrosion
Fix:
Hold the Learn Button again for 10 seconds.
If still not working, unplug the opener for 30 seconds and retry.
Can I erase one remote without erasing all?
No.
LiftMaster systems store remotes in a single memory bank.
You must erase all devices and re-add only the ones you want.
Do I need to reset opener limits after clearing codes?
No.
Travel limits and force settings are mechanical and not affected by wireless memory erase.
Will my myQ app still work after erasing codes?
Yes.
myQ operates through Wi-Fi/cloud and is independent from remote control codes.
Security Tips Before and After Erasing Codes
These tips follow recommendations from home security technicians:
✔ Replace remote & keypad batteries
Low batteries can cause pairing issues.
✔ Update to rolling-code remotes
Newer LiftMaster Security+ 2.0 units use strong encryption.
✔ Keep remotes out of cars parked outside
A common method of break-ins involves stealing remotes from vehicles.
✔ Disconnect power if inspecting wiring
Be safe when working near circuits.
✔ Change keypad PIN every 6–12 months
Reduces unauthorized access risk.
LiftMaster Models Supported by This Guide
This reset method works for:
- LiftMaster Security+
- LiftMaster Security+ 2.0
- LiftMaster myQ Smart Garage series
- LiftMaster contractor-grade series
- Chain-drive, belt-drive, and side-mount LiftMaster units
For general context about garage door openers, see the authoritative garage door opener page on Wikipedia.org.
Troubleshooting Table: Quick Reference
| Problem | Cause | Solution |
|---|---|---|
| Remote still opens door | Memory wasn’t cleared | Hold Learn Button 6–10 seconds |
| Keypad won’t reset | Low battery | Replace 9V battery |
| New remote won’t program | Wrong frequency | Use compatible LiftMaster remote |
| myQ app not syncing | Wi-Fi issue | Reset network or reconnect device |
| No LED activity | Power issue | Check outlet, circuit breaker |
Pros & Cons of Erasing Codes Frequently
Pros
- Improves security
- Clears old/unwanted access
- Fixes pairing issues
- Works on all models
Cons
- Requires reprogramming all remotes
- Inconvenient if many users need access
- Older units may be harder to reach
FAQ (Frequently Asked Questions)
Q1: How long does it take to erase LiftMaster opener codes?
Usually 6 to 10 seconds of holding the Learn Button.
Q2: Does erasing codes reset travel limits?
No.
Limits and force sensors remain unchanged.
Q3: Do I need a professional to erase codes?
Not at all.
Most homeowners handle this easily without tools.
Q4: Can erasing codes fix remote signal problems?
Yes—if caused by corrupted memory.
If caused by interference or dead batteries, you’ll need additional troubleshooting.
Q5: Will clearing codes affect my vehicle’s HomeLink?
Yes.
HomeLink needs to be reprogrammed after codes are erased.
Q6: Can old LiftMaster openers be hacked?
Pre-1997 models are vulnerable because they use fixed codes.
Modern units use rolling codes, which are far more secure.
Conclusion
Erasing codes on a LiftMaster garage door opener is a simple and highly effective way to improve your home’s security. With just a few button presses, you can wipe old remotes, remove unauthorized access, and start fresh with a secure system.
If this guide helped you, please share it on your social media so others can protect their homes too!


Leave a Reply