A noisy garage door or one that refuses to open smoothly can often point to one main culprit — a loose or misaligned chain. If you’ve noticed sagging, grinding noises, or jerky door movement, it may be time to learn how to fix the chain on a garage door opener.
In this comprehensive guide, you’ll learn the step-by-step process to inspect, tighten, realign, and maintain your garage door chain. Whether you’re dealing with a chain that’s off-track, too tight, or hanging loose, this DIY tutorial will help you solve the issue without having to call a professional.
Read too: How To Replace Garage Door Roller Like a Pro? Step-by-Step Guide
Why Is the Chain on Your Garage Door Opener Important?
The chain in a garage door opener is part of a drive system that connects the motor to the trolley, which moves the garage door up and down. When it’s working properly, the chain moves smoothly and silently.
However, over time, the chain may:
- Loosen due to vibration and usage
- Stretch from age or tension
- Fall off its rail due to misalignment
- Break if poorly maintained
That’s why it’s essential to understand how to fix the chain on a garage door opener — not only to keep your system functional but also to prevent further damage or safety issues.
Tools and Materials You’ll Need
Before getting started, gather these tools and safety gear:
- Adjustable wrench
- Socket wrench set
- Flathead screwdriver
- Ladder
- Garage door lubricant
- Safety glasses and gloves
- Owner’s manual (optional but helpful)
Now, let’s break down the process into easy-to-follow steps.
Step-by-Step Guide: How To Fix The Chain On A Garage Door Opener
Step 1: Disconnect the Power for Safety
Safety comes first. Unplug the garage door opener from the power outlet or turn off the breaker to avoid electrical hazards.
⚠️ Warning: Never work on a garage door opener while it’s powered. The system can engage suddenly and cause injury.
Step 2: Close the Garage Door Fully
Make sure the garage door is completely closed. If it’s stuck halfway or hanging unevenly, use the emergency release cord (usually a red rope) to disengage the opener from the trolley and lower it manually.
Step 3: Inspect the Chain Drive System
Climb the ladder and visually inspect the chain along the rail. Look for:
- Sagging or loose chain
- Chain slipping off the sprocket or rail
- Excessive rust or wear
- Damaged tension nuts or brackets
Understanding the issue will help determine how to fix the chain on a garage door opener in your particular case.
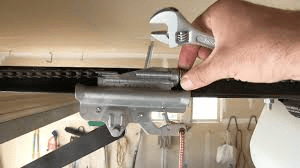
Step 4: Adjust Chain Tension
This is the most common fix and can be done easily:
- Locate the tension bolt (usually near the garage door opener motor).
- Use a wrench or socket set to tighten the chain by turning the bolt clockwise.
- Continue adjusting until there’s about 1/4 inch of sag at the midpoint of the chain when gently pressed.
✅ Tip: Don’t overtighten the chain! It should not be taut like a guitar string — too much tension can damage the motor or cause the chain to snap.
Step 5: Re-seat a Slipped Chain
If the chain has jumped off the sprocket or rail:
- Manually reposition it back onto the sprocket.
- Align the chain correctly along the rail track.
- Check if any chain links are twisted or damaged and replace them if necessary.
You might need to temporarily remove the chain tension to get it back on track, then tighten it again once it’s seated correctly.
Step 6: Lubricate the Chain and Moving Parts
Apply garage door lubricant or a silicone-based spray to:
- The chain (lightly)
- Sprockets
- Rail
- Hinges and rollers (optional)
Lubrication helps reduce wear, quiets the system, and improves overall performance.
Step 7: Reconnect Power and Test the Opener
Plug the opener back in and use the wall button or remote to open and close the door. Listen for unusual sounds and observe how the chain behaves.
- If the chain runs smoothly and quietly: success!
- If the chain is still noisy or jerky: recheck alignment and tension.
Repeat any necessary adjustments.
How To Fix The Chain On A Garage Door Opener If It’s Broken or Stretched
In some cases, tightening alone won’t solve the issue — especially if the chain is stretched or broken. Here’s what to do:
Option 1: Replace the Chain
- Purchase a compatible replacement chain (refer to your opener’s brand/model).
- Remove the old chain by loosening the master link.
- Install the new chain, following the original routing.
- Tighten the tension bolt and lubricate the new chain.
Option 2: Shorten an Overstretched Chain
If only slightly stretched:
- Use a master link to remove 1–2 excess chain links.
- Reconnect and tension accordingly.
- Always double-check chain alignment and tension afterward.
Common Causes of Chain Problems
Understanding what causes chain issues can help you prevent them in the future:
- Vibration: Over time, vibration can loosen tension nuts.
- Weather: Humidity and temperature changes cause expansion and contraction.
- Age: Older chains stretch or rust.
- Poor lubrication: Leads to friction, noise, and eventual failure.
- Improper installation: Misaligned rails or sprockets cause chain slippage.
Safety Tips When Fixing a Garage Door Chain
- Always disconnect power first
- Don’t overtighten the chain
- Use proper tools to avoid damaging bolts or sprockets
- Wear gloves to protect your hands from sharp links or components
- Test operation after every major adjustment
When to Call a Professional
While most DIYers can manage how to fix the chain on a garage door opener, there are times when expert help is best. Call a technician if:
- The chain repeatedly comes off the rail
- The opener makes grinding noises even after adjustment
- There’s damage to the sprocket, motor, or gear assembly
- You’re uncomfortable working with mechanical systems
Professionals can also perform a full opener tune-up and safety inspection.
How Often Should You Check the Chain?
Routine garage door maintenance helps prevent major issues. Inspect the chain:
- Every 3–6 months
- After extreme weather
- If the garage door becomes noisy or unresponsive
Regular lubrication and minor adjustments can extend the life of your entire opener system.
Final Thoughts: Keep Your Garage Door Running Smoothly
Learning how to fix the chain on a garage door opener is a useful skill that can save you money and frustration. Whether you’re tightening a loose chain, reseating it on the sprocket, or replacing it entirely, these DIY steps empower you to keep your system running efficiently.
Don’t ignore small problems — addressing chain tension or alignment early on can prevent expensive repairs down the road.


Leave a Reply