If you want a garage door opener that’s quiet, smooth, and ideal for attached garages, a belt drive model is often the best choice. Many homeowners search how to install a belt drive garage door opener because professional installation can be expensive, yet the process itself is very manageable with the right guidance. This article walks you through the entire installation safely, clearly, and step by step—even if you’re a first-time DIYer.
What Is a Belt Drive Garage Door Opener?
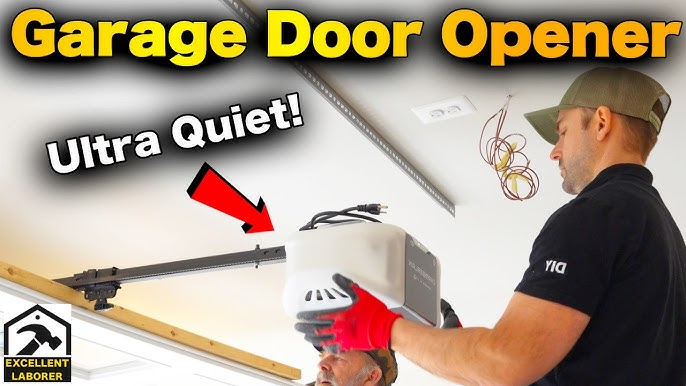
A belt drive garage door opener uses a reinforced rubber or polyurethane belt instead of a metal chain to move the garage door.
Read too: How to Perform a Chamberlain Garage Door Opener Code Change? Mastering Security
Why Belt Drive Openers Are Popular
- Much quieter than chain drive openers
- Smooth start-and-stop motion
- Ideal for garages attached to living spaces
- Minimal vibration
According to general garage door system principles explained on Wikipedia, belt drive openers are preferred when noise reduction and comfort are top priorities.
Before You Start: Safety First
Before learning how to install a belt drive garage door opener, it’s critical to confirm your garage door is safe to automate.
Important Safety Checks
- ⚠️ Garage door springs must be fully functional
- ⚠️ Door must move smoothly by hand
- ⚠️ Never install an opener on a damaged or unbalanced door
If the door is hard to lift manually, stop and call a professional.
Tools and Materials You’ll Need
Basic Tools
- Step ladder
- Power drill
- Socket wrench set
- Screwdrivers (Phillips & flat)
- Measuring tape
- Level
- Safety glasses
Included in Most Belt Drive Kits
- Motor unit
- Rail sections
- Trolley
- Belt and pulley
- Wall control
- Safety sensors
- Remote controls
⏱ Estimated time: 2–4 hours for beginners
How To Install A Belt Drive Garage Door Opener (Step-by-Step)
Step 1: Test Garage Door Balance
This step prevents motor damage and safety issues.
How to Test
- Pull the emergency release cord
- Lift the door halfway by hand
- Release it
✔ Door stays in place → safe to proceed
❌ Door drops or rises → spring issue (do not install opener)
Step 2: Assemble the Opener Rail
Most belt drive openers use sectional rails.
Assembly Steps
- Lay all rail sections on the floor
- Snap or bolt sections together
- Slide the trolley onto the rail
- Attach the belt around the pulley
📌 Ensure the belt is not twisted.
Step 3: Attach Rail to Motor Unit
- Align rail with motor output shaft
- Secure with provided bolts
- Tighten firmly (do not overtighten)
This creates the main drive system.
Step 4: Install the Header Bracket
The header bracket anchors the opener to the garage structure.
Correct Placement
- Centered above garage door
- Mounted into a solid beam or header
- Positioned 2–4 inches above the door’s highest travel point
⚠️ Never mount into drywall only.
Step 5: Mount the Motor Unit to the Ceiling
- Lift the motor unit (get help if needed)
- Use angle iron or mounting straps
- Secure into ceiling joists
- Use a level to confirm alignment
A level opener ensures smooth belt operation and reduces noise.
Step 6: Connect the Door Arm
- Attach the curved door arm to the trolley
- Attach straight arm to the door bracket
- Bolt arms together securely
This linkage allows the opener to lift and lower the door.
Step 7: Install Safety Sensors (Critical Step)
Modern openers will not function without properly aligned sensors.
Sensor Installation Guidelines
- Mount on both sides of the door
- Height: 5–6 inches above the floor
- Sensors must face each other directly
Wiring
- Run low-voltage wire neatly along wall and ceiling
- Connect to labeled terminals on motor unit
✔ Solid lights = correct alignment
❌ Blinking lights = adjust sensors
Step 8: Install the Wall Control
- Mount control at least 5 feet above floor
- Run wire securely along wall
- Connect to opener terminals
This provides reliable indoor control.
Step 9: Power Up the Opener
- Plug opener directly into ceiling outlet
- Avoid extension cords
- Optional: use a surge protector
Indicator lights should turn on.
Step 10: Program Travel Limits
This teaches the opener how far to open and close.
How to Set Limits
- Press the adjustment or “Learn” button
- Use arrow buttons to set open position
- Confirm
- Set closed position
📏 Accurate limits prevent door strain and premature wear.
Step 11: Set Force and Test Safety Reverse
This step ensures the door reverses if it hits an obstacle.
Safety Test
- Place a 2×4 board flat under the door
- Close the door
- Door must reverse on contact
If not, reduce force settings immediately.
Why Belt Drive Openers Are Easier to Install
Compared to chain drive systems, belt drive openers:
- Require less tension adjustment
- Produce less vibration
- Are more forgiving of minor alignment errors
This makes them ideal for DIY installation.
Common Installation Mistakes to Avoid
- ❌ Installing opener on an unbalanced door
- ❌ Mounting header bracket too low
- ❌ Ignoring sensor alignment
- ❌ Over-tightening the belt
- ❌ Skipping safety reverse test
Avoiding these mistakes saves time and prevents damage.
Pros and Cons of Belt Drive Garage Door Openers
Advantages
- ✔ Ultra-quiet operation
- ✔ Smooth performance
- ✔ Minimal maintenance
- ✔ Ideal for attached garages
Disadvantages
- ✖ Higher cost than chain drive
- ✖ Belt replacement may be needed after many years
Maintenance Tips After Installation
- Lubricate rollers and hinges every 6 months
- Inspect belt tension annually
- Test safety sensors monthly
- Replace remote batteries yearly
Routine care extends opener lifespan significantly.
When You Should Call a Professional
Stop DIY installation and call a technician if:
- Garage door springs are broken
- Door is off-track or crooked
- Ceiling framing is weak
- Door is extremely heavy
Safety should always come first.
FAQ: How To Install A Belt Drive Garage Door Opener
Q1: Can I install a belt drive garage door opener myself?
Yes, if your garage door is balanced and you follow instructions carefully.
Q2: How long does installation usually take?
Most DIY installations take 2–4 hours.
Q3: Are belt drive openers better than chain drive?
Yes for noise and smoothness; chain drives are cheaper but louder.
Q4: How tight should the belt be?
Snug but not overly tight—typically about ¼–½ inch of play.
Q5: Do belt drive openers require more maintenance?
No. They usually require less maintenance than chain drive models.
Conclusion
Learning how to install a belt drive garage door opener is a practical DIY project that can save money while giving you quieter, smoother garage operation. By following each step carefully—especially safety checks and sensor alignment—you can achieve professional-level results at home.
If this guide helped you complete your installation successfully, share it on social media so other homeowners can enjoy a quieter, smarter garage 🚪🔧✨


Leave a Reply