Are you tired of the bulky ceiling-mounted garage door opener taking up space in your garage? If so, it might be time to consider a sleeker, more efficient option. This article will guide you through how to install a side mount garage door opener, also known as a wall-mount or jackshaft opener. These openers provide better overhead clearance and are especially useful in garages with high or obstructed ceilings.
In this comprehensive guide, we’ll break down the tools you need, safety precautions to take, and a detailed installation process. By the end, you’ll have a clear understanding of how to complete the job confidently—whether you’re a DIY enthusiast or just exploring your options.
Read too: Door and Garage Door Companies: Choosing the Right Partner for Your Needs
Why Choose a Side Mount Garage Door Opener?
Before diving into how to install a side mount garage door opener, let’s explore why homeowners are making the switch:
- Space Efficiency: These units mount beside the garage door, freeing up ceiling space for storage or lighting.
- Quiet Operation: Many side-mount openers are belt-driven and quieter than traditional chain drives.
- Modern Features: Many models come with smart home integration, battery backup, and enhanced security features.
- Aesthetics: The sleek design creates a cleaner, less cluttered look in your garage.
This makes side mount openers a great choice for attached garages, workshops, and homeowners looking for smart home compatibility.
Tools and Materials You’ll Need
Before starting the installation, gather the following tools and materials:
Tools:
- Socket wrench set
- Power drill with bits
- Screwdrivers (flathead and Phillips)
- Level
- Stud finder
- Tape measure
- Ladder
- Safety glasses and gloves
Materials:
- Side mount garage door opener kit (such as LiftMaster 8500 or similar)
- Mounting brackets (included in the kit)
- Torque tube or torsion spring bar (required for compatibility)
- Power outlet nearby the mounting location
- Control panel and safety sensors
Make sure you thoroughly read the instruction manual provided with your opener kit.
Important Safety Precautions
When learning how to install a side mount garage door opener, safety should be your top priority:
- Disconnect power to your garage door opener before beginning any work.
- Do not remove or adjust the torsion spring unless you are trained. These springs are under extreme tension and can cause injury.
- Check door balance: Your garage door must be properly balanced to work with a side mount opener.
- Follow all manufacturer instructions and local building codes.
If you feel uncomfortable at any point, consult a professional installer.
How Side Mount Garage Door Openers Work
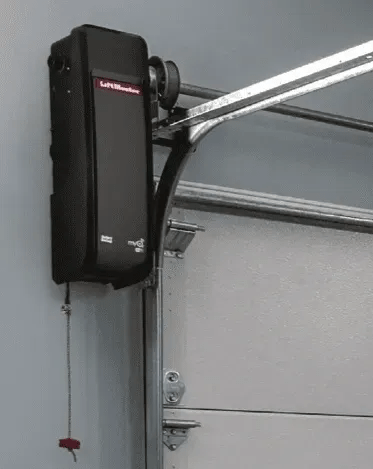
Unlike traditional openers that pull the door up with a rail and trolley system, side-mount openers rotate the torsion bar directly. This turns the cable drums, lifting the door smoothly from the side.
These units require:
- A torsion spring system
- A solid wall mounting area
- At least 8 inches of side clearance beside the door
- A standard 110-volt power outlet nearby
Now that we’ve covered the basics, let’s jump into the main steps of how to install a side mount garage door opener.
How To Install A Side Mount Garage Door Opener: Step-by-Step Instructions
Step 1: Check Door Compatibility
Not every garage door is compatible with a side-mount opener. Confirm that:
- You have a torsion spring system (not extension springs).
- The door is properly balanced—when lifted halfway, it should stay in place.
- There is enough space beside the garage door track for mounting.
Step 2: Install the Wall Bracket
Find the mounting location beside the torsion bar. Use a stud finder to locate a secure stud. Then:
- Position the mounting bracket level with the torsion bar.
- Use your power drill to fasten the bracket securely into the stud.
- Double-check the bracket is level and stable.
Step 3: Mount the Opener Unit
- Attach the opener to the bracket.
- Ensure the unit aligns with the torsion bar and cable drum.
- Tighten all mounting bolts securely.
Refer to the manufacturer’s diagram to ensure correct orientation.
Step 4: Connect the Opener to the Torsion Bar
Slide the drive coupler onto the torsion bar. Then:
- Align the drive shaft of the opener with the coupler.
- Secure it with the provided screws or clamps.
The connection should be snug with no wobble.
Step 5: Install the Control Panel and Safety Sensors
- Mount the wall control panel near the entrance to your garage.
- Run the included wires from the opener to the control panel.
- Mount safety sensors 6 inches from the floor on both sides of the door.
- Wire the sensors into the opener unit.
These sensors prevent the door from closing if something is in the way.
Step 6: Plug In and Power Up
Plug the unit into the nearby outlet. Then:
- Test the wall control panel.
- Use the remote or smart app (if applicable) to operate the door.
Step 7: Program and Test
- Program remote controls, keypad, or smart hub per instructions.
- Test the opener by opening and closing the door several times.
- Adjust force settings or travel limits if needed.
The door should open smoothly and stop gently at the top and bottom.
Troubleshooting Tips
If you encounter issues during or after installation, here are some common fixes:
- Door won’t open fully: Check for incorrect travel limits or a tight coupler.
- Opener hums but doesn’t move: Ensure proper alignment with the torsion bar.
- Safety sensors blinking: Check alignment and wiring.
- Remote not working: Reprogram the remote or check the battery.
Always consult the user manual for your specific model.
Maintenance Tips After Installation
Once you’ve learned how to install a side mount garage door opener, regular maintenance will ensure long-term reliability:
- Lubricate moving parts (rollers, hinges) every 6–12 months.
- Check sensor alignment and clean lenses periodically.
- Inspect the torsion spring and cables for signs of wear.
- Tighten bolts and connections annually.
Modern models often have diagnostic systems that alert you to issues—pay attention to flashing lights or error codes.
Professional Help vs. DIY Installation
Installing a side mount garage door opener is a manageable task for a skilled DIYer, but it’s not for everyone. Consider professional installation if:
- You’re unfamiliar with garage door mechanics.
- You’re not comfortable working with power tools.
- Your garage doesn’t meet the minimum space or power requirements.
Most garage door companies offer installation services and can ensure your system is optimized for safety and performance.
Conclusion: Upgrade Your Garage with a Side Mount Opener
Now that you know how to install a side mount garage door opener, you’re ready to enjoy a cleaner, quieter, and more efficient garage setup. Side mount openers not only save space but often include the latest smart technology and advanced safety features.
While installation takes some effort and care, the benefits make it well worth the investment. Whether you’re upgrading an old system or building a new garage, a side-mounted opener provides the functionality and flexibility modern homeowners demand.
Take your time, follow the steps carefully, and always prioritize safety. Once installed, you’ll appreciate the extra ceiling space and sleek design every time you open your garage door.


Leave a Reply