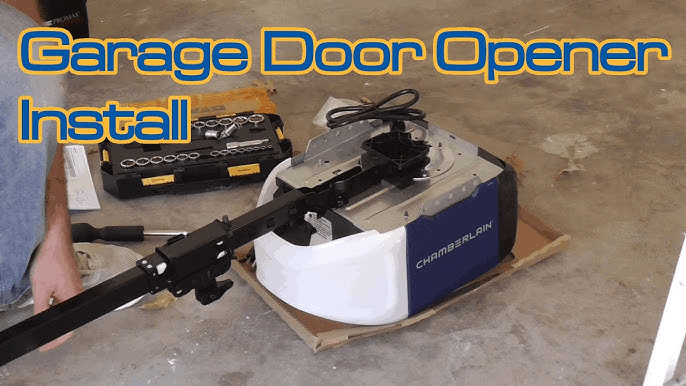
If you’ve recently purchased a Chamberlain 1/2 HP garage door opener and are wondering whether you can install it yourself—good news! Installing a garage door opener is a manageable DIY project, even for beginners. In this article, we’ll walk you through how to install Chamberlain 1 2 HP garage door opener step by step. We’ll cover everything from gathering tools, prepping the area, mounting the unit, wiring safety sensors, and fine-tuning your system. Whether you’re replacing an old opener or installing a new one, this guide is designed to help you do it right the first time.
Why Choose a Chamberlain 1/2 HP Garage Door Opener?
Before diving into the installation process, let’s take a moment to understand why Chamberlain is a trusted name in garage access systems. The Chamberlain 1/2 HP model is known for its reliability, quiet operation, and durability. It’s ideal for standard aluminum garage doors and comes with convenient features such as:
- Rolling code technology for security
- Remote control access
- Optional smart home integration
- Safety sensors to prevent injury
These features make it a top choice for homeowners looking to upgrade their home security and convenience.
Read too: How To Replace Garage Door Roller Like a Pro? Step-by-Step Guide
Tools and Materials You’ll Need
Before beginning the installation, gather the following tools and materials. Having everything on hand will make the process much smoother:
Tools:
- Power drill with screwdriver bits
- Wrenches and sockets
- Ladder (6 to 8 feet tall)
- Tape measure
- Pliers
- Level
- Stud finder
- Screwdrivers (flathead and Phillips)
- Wire cutters/strippers
Materials:
- Chamberlain 1/2 HP garage door opener kit
- Mounting brackets (usually included)
- Garage door opener rail and trolley
- Safety sensors
- Remote(s) and wall console
- Screws and anchors
- Light bulbs (for the motor unit)
Step-by-Step Guide: How To Install Chamberlain 1 2 Hp Garage Door Opener
Let’s break down the process of how to install Chamberlain 1 2 Hp garage door opener into manageable steps:
Step 1: Unbox and Identify Components
Open the packaging and lay out all the components. You should find:
- Motor unit
- Rail sections
- Trolley and pulley system
- Safety reversing sensors
- Remote controls and wall console
- Mounting hardware
- Instruction manual
Double-check that all pieces are included according to the manual. Familiarizing yourself with each part will make installation more intuitive.
Step 2: Assemble the Rail and Attach the Trolley
The rail usually comes in 3 to 5 sections. Connect them as directed in the manual. Then slide the trolley onto the rail. This component is essential because it connects to the garage door arm, moving the door open and closed.
Once assembled, attach the rail to the motor unit using the provided brackets and bolts.
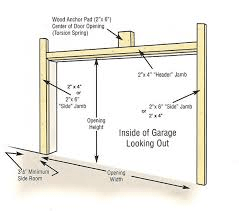
Step 3: Mount the Rail to the Garage Ceiling
Use a ladder to lift the rail and motor into position. The end of the rail should sit above the garage door. Anchor the motor to the ceiling joists using a mounting bracket and secure it with lag bolts.
Use a level to ensure the rail is straight and aligned with the door.
Pro Tip: Always locate a solid wood joist for ceiling support. Drywall alone won’t support the weight of the unit.
Step 4: Attach the Header Bracket Above the Door
Find the center of the garage door and mark the spot for the header bracket about 2 inches above the highest point the door reaches when opening. Use a stud finder to secure the bracket into a wall stud or add wood reinforcement if needed.
Connect the front of the rail to the header bracket with the included clevis pin and fasteners.
Step 5: Connect the Door Arm to the Trolley
Now attach the curved and straight door arms together to create a door arm assembly. Secure one end to the garage door and the other to the trolley. This connection is crucial for the opener to lift and lower the door.
Step 6: Install the Safety Sensors
Position the safety reversing sensors about 6 inches above the floor on either side of the garage door. They should face each other directly. Use the brackets and screws to attach them to the wall or to the track.
Run the wires along the wall and secure them with clips. Then connect the sensor wires to the motor unit terminals, usually marked white and black.
Step 7: Install the Wall Control and Run Wires
Mount the wall console near the interior garage door, at adult height. Route the control wire along the ceiling and wall to the motor unit. Strip the wire ends and insert them into the terminals on the motor.
Most units have a simple two-wire setup: red and white.
Step 8: Power Up and Test the System
Plug the motor unit into a GFCI-protected outlet. Insert the appropriate light bulbs into the unit if it has a built-in light.
Press the wall control button to test the opener. Watch the trolley move along the rail. If it functions, test the door arm to ensure the door opens and closes correctly.
Step 9: Program the Remote Controls
Follow the instructions in your manual to pair the remote(s) with your Chamberlain opener. Most models require you to press the “Learn” button on the motor unit, then press the remote button within 30 seconds.
Step 10: Adjust Force and Travel Limits
Use the dials or buttons on the opener to adjust the up and down travel limits (how far the door moves) and force settings (how hard it pushes). These adjustments help the opener perform smoothly and safely.
Make sure to test the safety sensors by placing an object in their path—the door should reverse when obstructed.
Maintenance Tips After Installation
Now that you’ve completed how to install Chamberlain 1 2 Hp garage door opener, let’s talk maintenance:
- Lubricate moving parts every 6 months
- Tighten loose bolts and hardware periodically
- Test sensors monthly
- Change remote batteries yearly
Routine maintenance extends the life of your opener and keeps your garage door functioning safely and efficiently.
Common Installation Mistakes to Avoid
Even a simple DIY job can go sideways if you’re not careful. Here are a few common mistakes:
- Skipping the manual: Always refer to the model-specific manual
- Improper sensor alignment: Leads to the door not closing
- Weak ceiling mounting: Risk of motor falling
- Forgetting backup battery: Some models require it to function during outages
Is Professional Installation a Better Option?
While this guide makes it easier to understand how to install Chamberlain 1 2 Hp garage door opener, some homeowners prefer hiring a pro—especially if the garage has unique structural challenges or if you’re uncomfortable with electrical work.
Professional installation usually costs between $150–$300, depending on your location and opener model.
Conclusion
Installing a Chamberlain 1/2 HP garage door opener is a rewarding DIY project that can be completed in a single afternoon with basic tools and a little patience. By following this detailed guide, you now know exactly how to install Chamberlain 1 2 Hp garage door opener safely and correctly.
Whether you’re upgrading from an older unit or installing a new system, this model offers the perfect blend of power, reliability, and smart features—making it a valuable addition to your home.
Leave a Reply