If you’re tired of carrying around a remote for your garage door or just want a more seamless entry experience, you’re in the right place. With modern vehicles now featuring built-in garage door opener systems—like HomeLink or Car2U—you can integrate your car directly with your garage door system. This article will guide you step-by-step on how to pair LiftMaster garage door opener to car, so you can enjoy the convenience of wireless access.
Whether you’re driving a brand-new vehicle with advanced tech or an older model with basic compatibility, this guide ensures that you can successfully complete the pairing process, avoid common errors, and troubleshoot any problems along the way.
Read too: How To Replace Garage Door Roller Like a Pro? Step-by-Step Guide
How To Pair Liftmaster Garage Door Opener To Car – Step-by-Step Instructions
Learning how to pair LiftMaster garage door opener to car is easier than it may seem, but the method can slightly vary depending on your car’s make/model and the type of garage opener system you have. Below are the most common and effective methods for a successful pairing.
Understanding the Basics: What You Need to Know Before You Begin
Before you start syncing your car with the LiftMaster opener, gather the following information and tools:
✅ What You’ll Need:
- A LiftMaster garage door opener (preferably with a yellow, orange, or purple learn button)
- Your vehicle’s owner’s manual (for garage door programming section)
- A step ladder (to access the opener motor)
- Knowledge of whether your car supports HomeLink or Car2U
✅ Confirm Compatibility:
Most newer cars support HomeLink, a widely used system that connects garage openers to vehicles. LiftMaster openers with Security+ 2.0 technology are compatible with HomeLink models produced after 2012.
If your vehicle is older, you may need a HomeLink Compatibility Bridge to enable pairing with newer openers.
Step 1: Clear Existing Programming (Optional But Recommended)
If your vehicle already has garage door settings saved or if you purchased it used, it’s smart to clear the previous pairing first.
To erase existing codes:
- Hold the first and third HomeLink buttons for about 20 seconds.
- The indicator light will begin to flash rapidly.
- Release the buttons—now your system is clear.
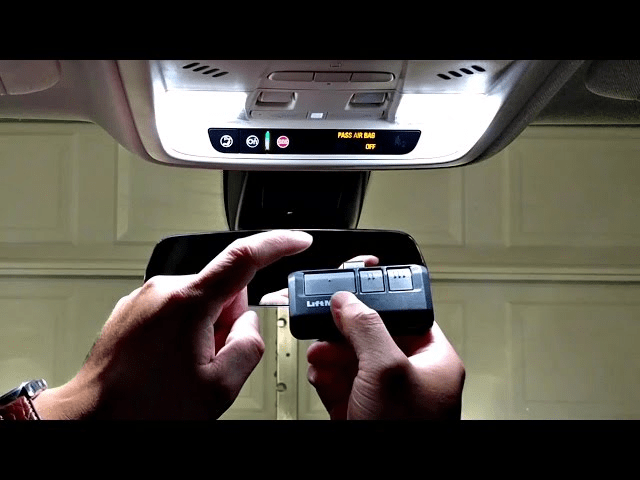
Step 2: Program Your Vehicle’s Built-In Buttons
Locate the three programmable buttons, usually located:
- On the rearview mirror
- On the driver-side visor
- Or built into the overhead console
Programming the Buttons:
- Press and hold the desired HomeLink button and your existing garage door remote simultaneously.
- Hold both buttons until the indicator light changes (usually 20–30 seconds).
- For some cars, the light will go from slow to fast blinking—this signals successful signal capture.
Step 3: Sync Your Vehicle to the LiftMaster Opener
Now that your vehicle is “trained” to your garage door remote signal, it’s time to sync it with the actual LiftMaster opener unit.
Access the LiftMaster Motor Unit:
- Use your ladder to locate the motor unit in your garage.
- Find the “Learn” button—commonly yellow, purple, or red/orange.
- Press and release the Learn button (DO NOT hold it).
You now have 30 seconds to finish programming the vehicle.
Final Pairing Step:
- Within those 30 seconds, return to your car and press the programmed HomeLink button for 2 seconds, then release.
- Repeat this press-and-release motion up to 3 times until the door activates.
Congratulations—you’ve now successfully paired your vehicle with your LiftMaster garage door opener.
Alternative Method: Using the Smart Control Panel (For Smart LiftMaster Models)
If you own a MyQ-enabled LiftMaster opener, you may also be able to use the Smart Control Panel inside your garage.
Steps:
- On the wall-mounted control panel, navigate to the Menu > Program > HomeLink.
- Follow the screen prompts and press the car’s HomeLink button to complete pairing.
This method simplifies programming, especially for newer LiftMaster openers.
Troubleshooting: Why Won’t My Car Pair With the LiftMaster?
If you’re struggling with how to pair LiftMaster garage door opener to car, try these fixes:
1. Check the Learn Button Color
- Yellow button = Security+ 2.0 (requires rolling code compatible vehicle)
- Purple button = Security+ (older rolling code system)
- Orange/Red button = Legacy system
2. Reset the Garage Opener
Sometimes clearing the opener’s memory helps:
- Press and hold the Learn button for 6–10 seconds until the LED turns off.
- Reattempt pairing process from Step 1.
3. Use a Compatibility Bridge
If your car’s HomeLink system is incompatible with Security+ 2.0, a HomeLink Repeater Kit (from LiftMaster) will bridge the gap.
4. Replace Batteries
Weak batteries in your handheld remote can affect signal quality when initially programming the car button.
Safety Precautions
- Always have someone assist you when climbing ladders or working near motorized doors.
- Never try to pair the vehicle while the car is running inside a closed garage—carbon monoxide poisoning risk.
- Keep remotes and wall controls away from children.
Benefits of Pairing Your Car to LiftMaster Opener
Now that you’ve learned how to pair LiftMaster garage door opener to car, you’re probably wondering: “Why didn’t I do this sooner?” Here’s why it’s a great decision:
- Convenience: No need to carry or replace remotes.
- Security: Prevents lost or stolen remotes from compromising access.
- Streamlined Entry: Just push a built-in button as you approach.
- Smart Home Integration: Some LiftMaster systems pair with Alexa, Google Assistant, and SmartThings via MyQ.
FAQs About Pairing LiftMaster to Car
Q: Can I pair multiple vehicles to the same LiftMaster opener?
A: Yes, as long as you follow the same process for each car. Most openers support up to five different codes.
Q: What if I got a new car—do I need to reset my LiftMaster opener?
A: No need to reset the whole opener—just program your new car. You can remove old codes if desired by holding the Learn button for 6+ seconds.
Q: Does this work with Car2U systems?
A: Yes, but Car2U programming may involve slightly different steps. Refer to your owner’s manual for specific instructions.
What If You Want to Unpair Your Vehicle?
To remove the vehicle’s garage opener memory:
- Press and hold the programmed button until the light blinks rapidly (20–30 sec).
- This erases that button’s memory.
To erase ALL garage door opener memory from the car:
- Press and hold buttons 1 and 3 until all lights flash (HomeLink reset).
Final Thoughts
Learning how to pair LiftMaster garage door opener to car is one of the most convenient tech upgrades you can make as a homeowner or driver. The process is straightforward, takes just a few minutes, and once complete, provides seamless, secure garage access without juggling remotes or worrying about dead batteries.
Whether you’re integrating an older model or the latest smart LiftMaster unit, this guide ensures you’re covered from start to finish. Now you can confidently drive up to your garage, press a button in your car, and roll right in—powerfully connected and effortlessly smooth.


Leave a Reply