If you’re looking to maintain your Chamberlain garage door opener and ensure its smooth functioning during power outages, understanding how to replace backup battery in Chamberlain garage door opener is essential. The backup battery in your garage door opener is critical for operation during power failures, so it’s important to know when and how to replace it.
In this guide, we will walk you through the process of replacing the backup battery in your Chamberlain garage door opener, including troubleshooting tips, maintenance advice, and why it’s important to keep your opener’s battery in top shape.
Read too: Why Are My Garage Doors Opening By Themselves? Troubleshooting Guide
Why Is It Important To Replace The Backup Battery?
Before diving into the details of how to replace backup battery in Chamberlain garage door opener, let’s first understand why it’s so important to maintain this component.
The backup battery in your Chamberlain garage door opener ensures that the door continues to function even when there’s a power outage. This feature is particularly useful for those who live in areas prone to frequent power interruptions or for people who need access to their garage during emergency situations. If the backup battery is not working properly or has expired, your garage door may not operate as expected when the power goes out, causing inconvenience and frustration.
Replacing the backup battery ensures that your garage door opener remains reliable, especially when you need it the most.
How To Identify When Your Chamberlain Backup Battery Needs Replacing
Before we go over the steps on how to replace backup battery in Chamberlain garage door opener, let’s take a look at some signs that indicate it’s time for a new battery:
- Warning Light On Your Opener: Most Chamberlain garage door openers have a warning light on the opener unit that illuminates when the backup battery is low or has failed.
- Garage Door Not Operating During Power Outage: If the door fails to open or close during a power failure, this is a clear indication that the backup battery isn’t working.
- Shorter Operation Time: If your garage door operates only for a brief period after a power outage before stopping, the backup battery may need replacing.
If you experience any of these issues, it’s a good idea to replace the backup battery to ensure your garage door opener continues to perform optimally.
How To Replace Backup Battery In Chamberlain Garage Door Opener: Step-by-Step
Now that you know when it’s time to replace the backup battery, let’s go over how to replace backup battery in Chamberlain garage door opener. Follow these easy-to-follow steps:
Step 1: Gather The Necessary Tools
Before you start, make sure you have the following tools ready:
- Replacement backup battery (Make sure it is compatible with your model)
- Screwdriver (usually Phillips-head)
- Ladder (to reach the opener if necessary)
Step 2: Turn Off Power to the Opener
Safety first! Always disconnect the power to the garage door opener before performing any maintenance. You can do this by either unplugging the unit from the wall socket or switching off the circuit breaker that powers the opener.
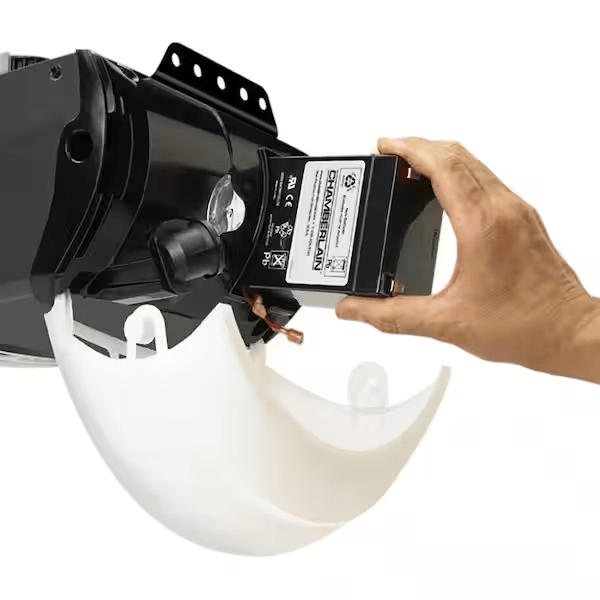
Step 3: Locate the Backup Battery Compartment
On most Chamberlain models, the backup battery is located on the back or side of the motor unit. The exact location of the battery compartment may vary depending on the model, so check your garage door opener’s manual if you’re unsure.
Step 4: Open the Backup Battery Compartment
Once you’ve located the battery compartment, use a screwdriver to remove any screws holding the compartment cover in place. This will expose the backup battery. In some cases, the cover may just snap open without the need for screws.
Step 5: Disconnect the Old Backup Battery
Carefully disconnect the old battery by removing the battery terminals. Make sure you note which terminal (positive and negative) connects to which side, as this will be important when installing the new battery.
Step 6: Remove the Old Battery
Once the terminals are disconnected, carefully remove the old backup battery from the compartment. Make sure to dispose of the old battery properly according to local recycling regulations.
Step 7: Install the New Backup Battery
Place the new battery into the compartment, ensuring it fits securely. Connect the terminals to the new battery, making sure the positive and negative connections are correct. Tighten the screws if necessary to ensure the terminals are connected securely.
Step 8: Close the Battery Compartment
Once the new battery is installed and connected, replace the battery compartment cover and secure it with screws if needed.
Step 9: Reconnect the Power
Once the backup battery is replaced and the compartment is sealed, reconnect the power to the garage door opener. Plug the unit back in or switch on the circuit breaker.
Step 10: Test the Opener
Test the opener by pressing the wall button or using your remote control to open and close the garage door. Make sure the door functions properly, and that the opener operates smoothly. If you have had a power outage recently, try to simulate a power failure by disconnecting the opener from the electrical source, and see if the backup battery is operating as it should.
Troubleshooting Tips After Replacing the Backup Battery
While replacing the backup battery in your Chamberlain garage door opener is a straightforward process, there might be some hiccups along the way. Here are a few troubleshooting tips:
1. The Door Isn’t Responding After Replacing the Battery
If your garage door doesn’t respond after replacing the battery, make sure the new battery is correctly installed. Double-check that the terminals are securely connected, and the polarity is correct (positive to positive and negative to negative).
2. Battery Light is Still Flashing After Replacement
If the backup battery light is still flashing after you’ve replaced the battery, it could indicate that the new battery is defective or not properly installed. In some cases, you might need to reset the system by unplugging the opener for 30 seconds and then plugging it back in.
3. Power Interruption While Testing
Sometimes, during testing, if the power to the opener is interrupted, the backup battery may not kick in properly. Ensure that you’ve fully disconnected the opener from the power source before testing the backup battery.
Maintenance Tips To Extend The Life of Your Chamberlain Garage Door Opener Battery
To avoid frequent replacements and ensure your Chamberlain garage door opener remains in good working order, here are a few maintenance tips:
- Check Battery Status Regularly: Periodically inspect the backup battery for signs of wear or damage.
- Test the Battery During Power Outages: Ensure the backup battery operates during a power failure to keep it in working condition.
- Keep the Opener Clean: Dust and dirt can affect the performance of your opener. Clean the opener and surrounding area regularly.
- Replace the Battery as Needed: Most backup batteries last between 1-3 years. Keep track of the battery’s age and replace it when necessary.
Conclusion
Knowing how to replace backup battery in Chamberlain garage door opener is an essential skill for maintaining your garage door opener’s reliability, especially in case of power outages. By following the step-by-step process outlined above, you can ensure that your backup battery is functioning correctly and your opener remains reliable when you need it the most.
Regular maintenance and timely battery replacements will extend the life of your opener and ensure that it continues to operate smoothly for years to come. Don’t wait until the power goes out to realize your backup battery is no longer working – make it a habit to check and replace the battery as needed.


Leave a Reply