Having a functional garage door opener remote is essential for easy access to your garage. Over time, however, the battery in your Craftsman garage door opener remote will eventually need to be replaced. This is a simple maintenance task that can be done at home, saving you the hassle and cost of a professional service. In this article, we will walk you through how to replace battery in Craftsman garage door opener remote, providing you with a clear, easy-to-follow guide to get your remote working again.
Why You Need to Replace the Battery in Your Craftsman Garage Door Opener Remote
Before jumping into the how to replace battery in Craftsman garage door opener remote process, it’s essential to understand why it’s necessary. The battery in your remote controls the signal sent to the garage door opener, allowing you to open and close your garage door without manually lifting it. Over time, batteries in remotes wear down and lose their ability to transmit signals effectively.
Read too: Why Are My Garage Doors Opening By Themselves? Troubleshooting Guide
A few signs that the battery in your Craftsman garage door opener remote may need replacing include:
- The remote stops working or only works intermittently.
- The range is reduced, and you need to be closer to the opener to operate the door.
- You press the buttons, but nothing happens.
These are all signs that your remote’s battery is weakening and should be replaced as soon as possible.
How To Replace Battery In Craftsman Garage Door Opener Remote: Step-by-Step Guide
Now that we understand why replacing the battery is important, let’s dive into the step-by-step process of how to replace battery in Craftsman garage door opener remote. The process is straightforward and requires minimal tools.
Step 1: Gather the Necessary Tools
Before starting the battery replacement, make sure you have the following tools:
- A small flathead screwdriver or coin: This will help you pry open the remote.
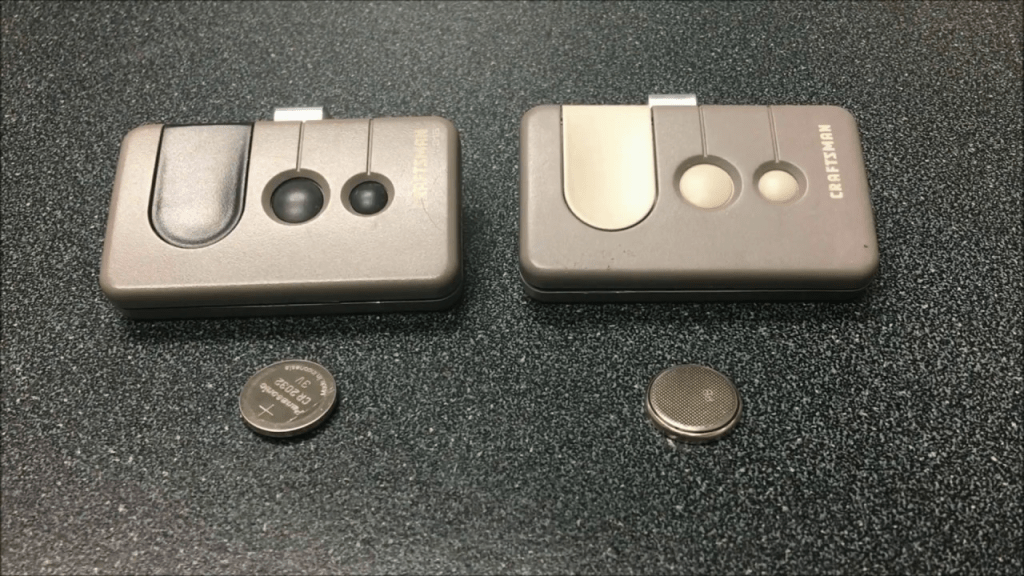
- Replacement battery: Craftsman garage door opener remotes typically use a 3V coin cell battery like the CR2032 or CR2025, but always double-check your remote’s model to confirm the correct battery.
- A clean workspace: It’s important to work in a clean, flat area to avoid losing any small parts.
Step 2: Open the Battery Compartment of the Remote
The first task is to access the battery compartment in your Craftsman garage door opener remote. The remote is usually held together with a snap-fit closure, and you can gently open it by following these steps:
- Locate the small seam: Look for a seam along the side of the remote, which is typically where the two halves of the remote are joined together.
- Use a small flathead screwdriver or a coin: Insert the edge of the tool into the seam and gently twist to pry the remote open. Be careful not to force it, as you don’t want to damage the plastic casing.
If your remote uses screws to hold it together, you may need a tiny screwdriver to remove them.
Step 3: Remove the Old Battery
Once you’ve opened the remote, you should see the old battery sitting in its compartment. Carefully remove it by gently lifting it out with your fingers or the flathead screwdriver. Take note of the battery’s orientation. Most remotes use a battery with a positive (+) side facing up, but be sure to confirm this by checking the remote’s battery compartment or the battery itself.
Dispose of the old battery responsibly by recycling it at an appropriate facility. Don’t simply throw it in the trash, as batteries can be harmful to the environment.
Step 4: Insert the New Battery
Now it’s time to insert the new battery. Make sure that you match the positive (+) and negative (-) terminals correctly, ensuring the battery is inserted in the correct orientation.
If you’re unsure, check the inside of the battery compartment for markings indicating the correct placement. This is important, as inserting the battery incorrectly could prevent the remote from working.
Once the new battery is in place, ensure it fits snugly and doesn’t move around.
Step 5: Reassemble the Remote
With the new battery in place, it’s time to reassemble the remote. If your remote uses screws, screw the two halves back together. If it uses a snap-fit closure, carefully press the two halves of the remote together until they snap back into place.
Make sure the remote is securely closed to avoid any dust or dirt entering the compartment, which could interfere with its function.
Step 6: Test the Remote
Now that the new battery is installed and the remote is reassembled, it’s time to test it. Stand a few feet away from your Craftsman garage door opener and press the button on the remote. The door should open or close without any issues. If it works smoothly, you’ve successfully replaced the battery!
If the remote doesn’t work, double-check the battery’s orientation and ensure the battery is properly seated in the compartment. Also, ensure you’ve closed the remote properly.
Troubleshooting After Replacing the Battery
While replacing the battery in your Craftsman garage door opener remote is usually a straightforward task, you might encounter a few issues. Here are some common problems and their solutions:
1. Remote Not Working After Replacing the Battery
- Check the battery orientation: Ensure the new battery is installed in the correct orientation, as inserting it upside down can prevent it from working.
- Use a fresh battery: Sometimes, the replacement battery might be dead or defective. Try using a different battery from a reliable brand.
- Reprogram the remote: If the remote still isn’t working, it might need to be reprogrammed to sync with your garage door opener. Check your Craftsman manual for instructions on how to reprogram the remote.
2. Remote Works Intermittently
- Replace the battery again: If your remote works intermittently, the battery may not be making a proper connection, or the battery could be defective. Try a new battery and ensure it’s seated properly.
- Check for interference: If the remote works intermittently, it might be due to interference from other electronic devices. Move away from any potential sources of interference (e.g., Wi-Fi routers, large electronics) and test again.
How To Extend the Life of Your Craftsman Garage Door Opener Remote Battery
Replacing the battery in your Craftsman garage door opener remote is a simple task, but you’ll want to ensure the battery lasts as long as possible. Here are some tips for extending battery life:
- Avoid excessive use: Using the remote unnecessarily can drain the battery quickly. Try to only use the remote when necessary.
- Store the remote in a cool place: Extreme temperatures can affect battery performance. Store your remote in a cool, dry place when not in use.
- Regular maintenance: Periodically check the remote and replace the battery every 1 to 2 years, depending on usage, to prevent sudden failures.
Conclusion
Knowing how to replace battery in Craftsman garage door opener remote is a simple yet important task that every homeowner with a Craftsman garage door opener should be familiar with. By following the steps outlined in this guide, you can easily replace the battery yourself and get your remote working again in no time.
Regular maintenance and timely battery replacements will ensure that your garage door opener remote works whenever you need it. If you encounter any issues after replacing the battery, don’t hesitate to consult the troubleshooting tips above or contact customer support for further assistance.


Leave a Reply