A Chamberlain garage door opener is a crucial piece of equipment for your home. It provides the convenience of opening and closing your garage door with the press of a button, adding security, and saving you time. However, like any mechanical device, parts of the garage door opener can wear out over time. One such part is the drive belt.
The drive belt is a critical component of the system, responsible for moving the trolley that opens and closes your garage door. Over time, it can wear out, snap, or become damaged, which can cause the garage door to malfunction. If your Chamberlain garage door opener is no longer functioning smoothly, the issue could be a faulty drive belt. Replacing it is a straightforward task, and with the right tools and a little know-how, you can perform the replacement yourself.
Read too: Mastering Quantum Garage Door Opener Programming: A Comprehensive Guide
In this guide, we’ll walk you through how to replace the drive belt on a Chamberlain garage door opener and provide tips on maintaining your opener for long-lasting performance.
What is the Drive Belt on a Chamberlain Garage Door Opener?
Before diving into the replacement process, it’s essential to understand the role of the drive belt. In a Chamberlain garage door opener, the drive belt is responsible for driving the door mechanism by connecting the motor to the trolley. It is typically made of durable rubber or reinforced materials to handle the weight and movement of the door.
A functioning drive belt ensures that the door moves up and down smoothly and quietly. If the belt becomes worn out or damaged, you may notice symptoms like:
- The garage door moving slower than usual.
- Unusual noises during operation.
- The door failing to move entirely.
- Visible wear, cracks, or breakage of the belt.
If you notice any of these signs, it’s time to replace the drive belt. Let’s go over the steps to replace the belt and get your garage door opener running smoothly again.
Tools You Will Need
Before starting the replacement, gather the following tools:
- A replacement drive belt compatible with your Chamberlain garage door opener.
- A ladder to reach the garage door opener motor.
- A screwdriver (Phillips and flathead) for removing screws.
- A wrench or socket set to remove bolts.
- A pair of pliers to disconnect any pins or cables.
- A torque wrench for reassembling the system correctly.
- Safety gloves to protect your hands.
- Safety goggles to protect your eyes.
How To Replace Drive Belt On Chamberlain Garage Door Opener: Step-by-Step Guide
Follow these steps carefully to replace the drive belt on your Chamberlain garage door opener.
Step 1: Disconnect the Power Supply
Before starting any repair work, always ensure that the power is turned off to prevent accidents. Unplug the Chamberlain garage door opener from the electrical outlet. If your model is wired to a circuit, turn off the corresponding breaker in the electrical panel.
Step 2: Remove the Light Bulbs and Any Obstructions
Take out the light bulbs from the motor unit of the garage door opener. This will give you more space to work and prevent breaking the bulbs during the repair. If there are any other obstructions near the opener, clear them out so you have a clean workspace.
Step 3: Locate the Drive Belt and Assess the Damage
Climb up a ladder to access the motor unit of the opener. The drive belt should be visible, running along the rail and connecting the motor to the trolley. Check for any obvious damage, wear, or breakage. It should be relatively easy to see if the belt is the problem, especially if it is cracked, frayed, or snapped.
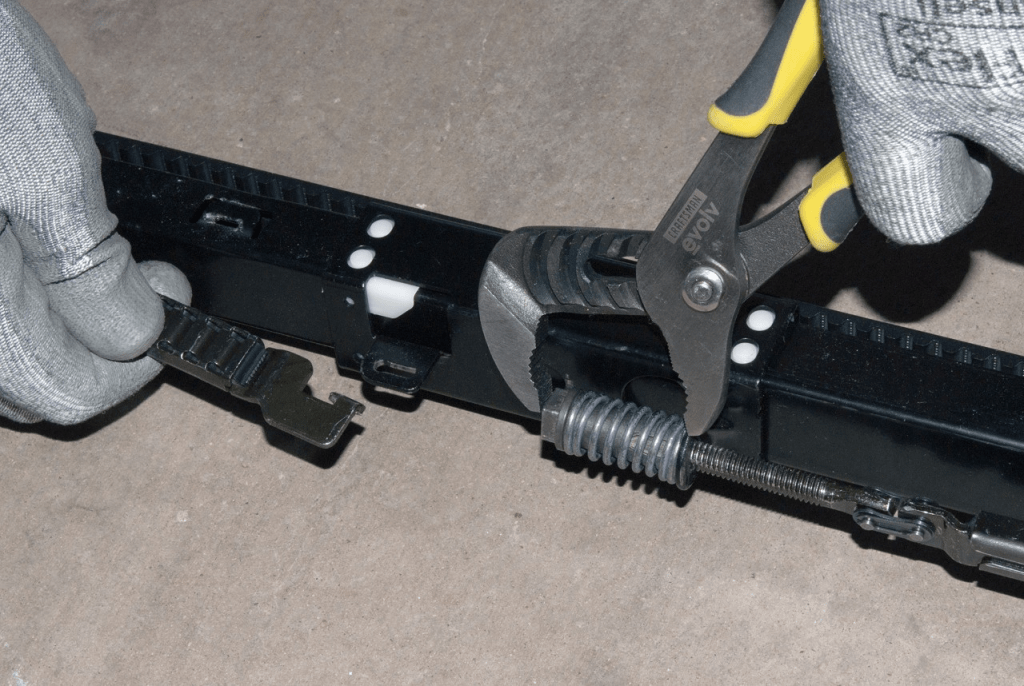
Step 4: Detach the Existing Drive Belt
Before you can replace the belt, you need to detach it from the motor and trolley. Use a screwdriver to remove any screws or bolts that are holding the drive belt in place. You might need to use a socket wrench or pliers to loosen the tension on the belt.
There are usually two key areas where the belt is attached:
- Motor Side: Remove the bolts or screws securing the belt at the motor side of the unit.
- Trolley Side: Detach the belt from the trolley mechanism.
Make sure to carefully remove the old belt without damaging any other components, as this could affect the installation of the new one.
Step 5: Install the New Drive Belt
Take the replacement drive belt and start by securing it to the motor. Position it in the groove of the motor’s drive sprocket and tighten the screws or bolts. Once that’s done, move on to securing the belt on the trolley side.
When you are placing the new belt, ensure it fits properly into the grooves of both the motor and the trolley. If the belt is not aligned correctly, it may cause the door to operate unevenly.
Step 6: Adjust the Tension on the New Drive Belt
One of the most important parts of replacing the drive belt is adjusting the tension. If the belt is too loose, the door may not operate properly. If the belt is too tight, it could wear out quickly.
To adjust the tension, locate the tension adjustment screw on the motor unit. Turn the screw slightly to tighten or loosen the belt as needed. Test the tension by manually moving the trolley along the rail. The belt should be tight enough to allow smooth operation but not so tight that it causes strain on the motor.
Step 7: Reassemble the Motor Unit
Once the drive belt is properly installed and the tension is adjusted, reassemble the motor unit by securing any screws, bolts, or covers that you may have removed earlier. Double-check all connections to make sure nothing is loose or out of place.
Step 8: Test the Garage Door Opener
Plug the garage door opener back into the power source and turn it on. Test the operation of the garage door by using the remote or wall switch. Watch the door as it opens and closes to make sure the drive belt is functioning correctly. The door should move smoothly and quietly.
If you notice any issues with movement, it could mean that the tension needs further adjustment or that the belt is not aligned properly. Fine-tune the setup as necessary.
Step 9: Reinstall the Light Bulbs and Final Cleanup
Once the door is working properly, reinstall the light bulbs and perform a final check on the opener. Make sure everything is functioning smoothly, and store any tools and leftover parts. Clear away any debris or parts that may have accumulated during the process.
Common Mistakes to Avoid When Replacing the Drive Belt
While replacing the drive belt is a manageable DIY task, there are some common mistakes that should be avoided to ensure a successful replacement:
- Not Adjusting Tension Properly: Incorrect tension can cause poor door operation. Always test and adjust the belt tension until the door operates smoothly.
- Forgetting to Turn Off the Power: Working on an electrical appliance without disconnecting the power can result in electrical shocks or damage.
- Improper Alignment: The drive belt must be properly aligned on both the motor and trolley sides. Misalignment can cause uneven movement and wear.
- Overtightening the Belt: An overly tight belt can cause strain on the motor and lead to premature wear of the belt. Ensure the belt is neither too tight nor too loose.
Conclusion: Maintain Your Chamberlain Garage Door Opener for Longevity
Replacing the drive belt on your Chamberlain garage door opener is an important part of regular maintenance. A worn-out belt can lead to malfunctioning doors, so performing this task ensures the continued smooth operation of your garage door. With the right tools and this step-by-step guide, you can replace the belt yourself, saving time and money on professional repairs.
Regularly inspect your drive belt and other components of your garage door opener to avoid future issues. Proper maintenance can extend the lifespan of your opener and keep your garage functioning efficiently for years to come.


Leave a Reply