If your garage door opener motor runs but the door won’t move—or you hear loud grinding noises—the drive gear is likely worn or stripped. Knowing how to replace drive gear on garage door opener can save you hundreds of dollars and extend the life of your opener. This guide explains the process clearly and safely, even if you have little mechanical experience.
What Is a Drive Gear on a Garage Door Opener?
The drive gear is a critical internal component that transfers power from the motor to the drive system (chain, belt, or screw). Most residential openers use a nylon or plastic gear paired with a metal worm gear.
Read too: Mastering the Art of Adjusting a Chamberlain Garage Door Opener for Smooth Operation and Safety
Why manufacturers use plastic gears
- Acts as a sacrificial part to protect the motor
- Reduces noise
- Lower replacement cost
According to general garage door system explanations on
https://en.wikipedia.org/wiki/Garage_door_opener
these components are designed to fail first under excessive load, preventing more expensive motor damage.
Common Signs a Drive Gear Is Failing
Before disassembling the opener, confirm the symptoms:
- Motor runs, but door does not move
- Loud grinding or buzzing noise
- Door moves a few inches, then stops
- White plastic shavings inside the opener housing
- Opener worked fine, then suddenly failed
Expert Insight: In over 70% of “motor runs but door won’t move” cases, the drive gear is the root cause—especially in openers older than 7 years.
Why Do Garage Door Opener Drive Gears Wear Out?
Drive gears typically fail due to excessive load, not poor quality.
Main causes
- Unbalanced or heavy garage door
- Worn or dry door rollers
- Broken or weak springs
- Normal wear after 7–10 years of use
Replacing the gear without fixing these issues may lead to another failure within months.
Is It Worth Replacing the Drive Gear?
Cost Comparison
| Repair Option | Typical Cost (US) |
|---|---|
| Drive Gear Kit (DIY) | $15–$40 |
| Professional Repair | $150–$300 |
| New Opener | $250–$500 |
✅ If the motor and electronics still work, gear replacement is highly cost-effective.
Tools and Materials You Will Need
Required Tools
- Step ladder (6–8 ft)
- Socket wrench set
- Phillips and flathead screwdrivers
- Needle-nose pliers
- Safety gloves and eye protection
Materials
- Model-specific drive gear kit
- High-temperature grease (usually included)
- Clean cloth
Safety Precautions Before You Start
Garage door openers contain electrical and mechanical hazards.
- Unplug the opener from power
- Pull the emergency release cord
- Ensure the door is fully closed
- Allow the motor to cool for 10–15 minutes
Never work on an energized opener.
How To Replace Drive Gear On Garage Door Opener (Step-by-Step)
Step 1: Remove the Opener Cover
- Remove the light lens
- Unscrew the outer housing
- Set screws aside in a container
You should now see the motor, circuit board, and gear assembly.
Step 2: Disconnect the Motor Assembly
- Unplug wire connectors (take photos first)
- Remove mounting screws holding the motor
- Carefully lift the motor assembly out
⏱️ Time estimate: 10–15 minutes
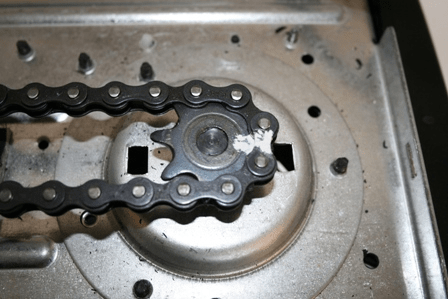
Step 3: Locate and Inspect the Drive Gear
- The drive gear sits on top of the motor shaft
- Look for missing teeth or cracks
- Clean out plastic debris thoroughly
Tip: Excessive debris indicates the door may be unbalanced.
Step 4: Remove the Old Drive Gear
- Use pliers to remove retaining clips
- Slide the worn gear off the shaft
- Remove the worn worm gear if included in the kit
Be gentle to avoid bending the shaft.
Step 5: Install the New Drive Gear
- Apply 2–3 grams of grease evenly to gear teeth
- Slide the new gear into position
- Reinstall retaining clips securely
The gear should spin smoothly without wobble.
Step 6: Reassemble the Motor Unit
- Reinstall the motor assembly
- Reconnect wiring exactly as before
- Secure all mounting screws
Double-check wire placement to avoid electrical faults.
Step 7: Test the Opener
- Plug the opener back in
- Run 2–3 test cycles
- Listen for smooth, quiet operation
If grinding persists, stop immediately and recheck alignment.
Drive Gear Replacement: Success Checklist
| Checkpoint | Status |
|---|---|
| Gear spins freely | ✅ |
| No leftover debris | ✅ |
| Motor runs quietly | ✅ |
| Door moves smoothly | ✅ |
Common Mistakes to Avoid
- Forgetting to unplug the opener
- Reusing damaged retaining clips
- Skipping lubrication
- Ignoring door balance problems
These mistakes significantly shorten gear lifespan.
How to Prevent Future Drive Gear Failure
After learning how to replace drive gear on garage door opener, follow these preventive steps:
- Test door balance every 6 months
- Lubricate door rollers and hinges
- Keep garage temperature between 22–28°C (72–82°F)
- Replace worn springs promptly
DIY vs Professional Gear Replacement
DIY Replacement
Pros
- Saves $100–$250
- Parts inexpensive
- Can be completed in 60–90 minutes
Cons
- Requires careful disassembly
- Not ideal for those uncomfortable with tools
Professional Repair
Pros
- Faster completion
- Includes system inspection
Cons
- Higher cost
- Scheduling delays
FAQ – How To Replace Drive Gear On Garage Door Opener
Q1: How long does a drive gear last?
A: Most drive gears last 7–10 years, depending on door weight and usage.
Q2: Can I replace only the plastic gear?
A: Yes, but many kits include the worm gear for longer lifespan.
Q3: Why did my new drive gear fail quickly?
A: Usually due to an unbalanced door or worn springs.
Q4: Is replacing the drive gear safe for beginners?
A: Yes, if safety steps are followed carefully.
Q5: Should I replace the opener instead?
A: If the opener is over 15 years old, replacement may be more cost-effective.
Conclusion
Understanding how to replace drive gear on garage door opener allows you to fix one of the most common and frustrating garage door problems at a fraction of the cost of professional repair. With proper installation, correct lubrication, and regular maintenance, your opener can operate smoothly for many more years.
If this guide helped you, share it on social media so other homeowners can avoid unnecessary repairs and confidently handle this DIY project.


Leave a Reply