How To Replace Garage Door Opener Gear And Sprocket Assembly? Your garage door opener is an essential part of your home’s infrastructure, offering convenience, security, and ease of access. It relies on a complex system of gears, motors, and tracks to operate smoothly. Over time, components in the opener can wear out, especially the gear and sprocket assembly, which is a critical part of the opener’s operation.
The gear and sprocket assembly is responsible for transferring the motor’s power to the door’s lifting mechanism. If the gear or sprocket becomes worn or damaged, it can result in a malfunctioning garage door. The door might become stuck, move slowly, or fail to open altogether. Fortunately, replacing the gear and sprocket assembly is a task you can handle on your own with the right tools and some guidance.
Read too: Mastering Quantum Garage Door Opener Programming: A Comprehensive Guide
In this detailed guide, we will walk you through how to replace garage door opener gear and sprocket assembly, ensuring your garage door operates smoothly again.
Common Symptoms of a Worn or Damaged Gear and Sprocket Assembly
Before diving into the replacement process, it’s important to know when the gear and sprocket assembly needs attention. Here are some common signs that indicate the need for a replacement:
- No Movement or Struggling Door: If the door struggles to move, or doesn’t move at all when you activate the opener, the gear and sprocket could be the culprit.
- Grinding or Straining Noises: A worn-out gear or sprocket may cause grinding sounds when the opener motor is running. This is often a sign that the teeth of the gears are stripped or worn down.
- Slower Door Movement: If the garage door moves more slowly than usual, it might be due to a damaged gear or sprocket causing inefficient operation.
- Loose or Broken Sprocket: A loose or broken sprocket can cause the chain or belt to jump off the track, leading to misalignment and improper operation.
- Visible Damage: Inspecting the gear and sprocket assembly might reveal visible wear or cracks that indicate it’s time for a replacement.
If you’ve noticed any of these issues, it’s a good idea to replace the garage door opener gear and sprocket assembly to restore the functionality of your garage door.
Tools You Will Need
Before starting the replacement, ensure you have the following tools and materials on hand:
- Replacement gear and sprocket assembly (make sure it’s compatible with your opener model).
- Screwdrivers (both flathead and Phillips).
- Socket wrench set.
- Ladder to reach the opener unit.
- Pliers for removing any pins or clips.
- Rubber mallet (optional for loosening stubborn parts).
- Safety gloves and safety goggles to protect yourself during the repair process.
How To Replace Garage Door Opener Gear And Sprocket Assembly: A Step-by-Step Guide
Follow this step-by-step guide to replace the garage door opener gear and sprocket assembly safely and efficiently.
Step 1: Disconnect the Power Supply
Before you begin working on your garage door opener, it’s crucial to disconnect the power supply to avoid electrical accidents. Unplug the opener from the electrical outlet or turn off the power at the breaker panel.
Step 2: Remove the Garage Door Opener Cover
Once the power is off, use a ladder to access the garage door opener motor unit. Begin by removing the cover of the opener. Most covers are secured with screws that can be removed with a screwdriver. Carefully remove the cover and set it aside.
Step 3: Disconnect the Door from the Opener
In order to prevent damage to the door while working on the opener, it’s important to disconnect the garage door from the opener mechanism. Pull the emergency release cord to disconnect the door from the trolley. This will allow you to manually lift or lower the door if needed.
Step 4: Remove the Chain or Belt (If Applicable)
If your garage door opener uses a chain or belt, remove it from the sprocket. You may need to remove the tension from the chain or belt by loosening the tension screw. Once loose, slide the chain or belt off the sprocket and set it aside.
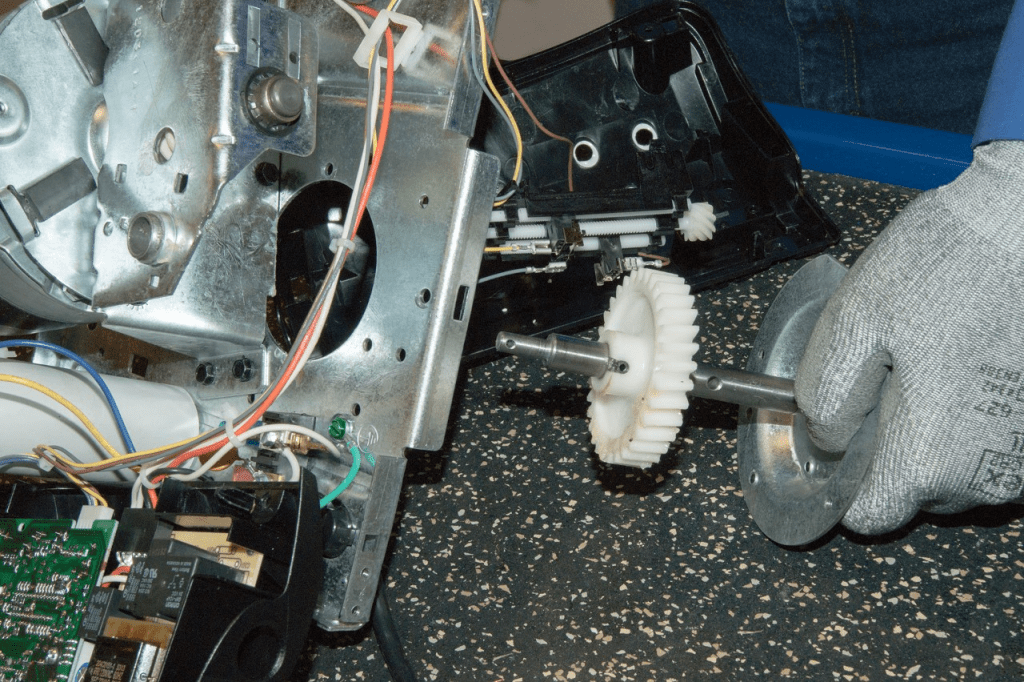
Step 5: Disassemble the Gear and Sprocket Assembly
Now it’s time to remove the old gear and sprocket assembly. Start by removing the screws or bolts that hold the assembly in place. Depending on your model, you may need to use a socket wrench to remove bolts or pliers to disconnect any pins or clips.
Once the screws or bolts are removed, you should be able to pull the gear and sprocket assembly out of the motor unit. Take note of how the assembly is positioned so you can properly install the new one.
Step 6: Install the New Gear and Sprocket Assembly
Place the new gear and sprocket assembly into the motor unit, making sure it aligns correctly with the drive shaft and other components. Ensure that the teeth of the gear are properly meshed with the sprocket and that everything is secured in place.
Once the new assembly is positioned correctly, tighten the screws or bolts to secure it to the motor unit. Be sure not to overtighten, as this could damage the components.
Step 7: Reattach the Chain or Belt (If Applicable)
If your garage door opener uses a chain or belt, you will now need to reattach it to the sprocket. Place the chain or belt back on the sprocket, ensuring it is properly aligned. If necessary, adjust the tension using the tension screw to ensure the chain or belt has the correct amount of tightness.
Step 8: Reassemble the Opener and Test the Door
Once the new gear and sprocket assembly is securely in place and the chain or belt is reattached, reassemble the rest of the opener. This includes replacing the cover and securing any other parts that were removed during the process.
After everything is reassembled, plug the opener back into the power source. Test the operation of the garage door by using the wall switch or remote. The door should now open and close smoothly without any grinding or struggling.
If the door is not functioning correctly, check the alignment and tension of the chain or belt. You may need to make small adjustments to ensure everything is working properly.
Step 9: Reconnect the Door to the Opener
Once you confirm the opener is functioning smoothly, reconnect the garage door to the trolley using the emergency release cord. This will allow the door to be powered by the opener once again.
Troubleshooting Common Issues After Replacing the Gear and Sprocket Assembly
While replacing the gear and sprocket assembly should solve many common garage door problems, some issues might still arise. Here are a few common problems and how to troubleshoot them:
- The door is not moving properly: Double-check that the gear and sprocket are properly aligned and that the chain or belt is tight enough. If the door is still not moving, inspect the motor and other components for any additional damage.
- Noisy operation: If the garage door opener is making excessive noise, ensure the new gear and sprocket assembly is correctly lubricated. Apply lubricant to the gears and other moving parts to reduce friction and noise.
- The door is moving too slowly: If the door is slow to open or close, it could be due to improper belt or chain tension. Make sure the tension is adjusted correctly according to the manufacturer’s instructions.
Conclusion: Keep Your Garage Door Opener in Top Condition
Replacing the gear and sprocket assembly of your garage door opener is a relatively straightforward process that can save you money on professional repairs. By following the steps outlined above, you can restore your opener’s functionality and ensure smooth operation for years to come.
Regular maintenance, including checking the gear and sprocket assembly, lubricating moving parts, and replacing worn components, will help extend the life of your garage door opener. With the right tools and a little knowledge, you can keep your garage door running smoothly and efficiently.


Leave a Reply