How To Replace Garage Door Rollers Like a Pro? Are you tired of the annoying squeaks and jerks every time you open or close your garage door? Worn-out rollers could be the culprit. Don’t worry; replacing them is easier than you think. In this comprehensive guide, we’ll walk you through the process of replacing garage door rollers, helping you restore smooth and quiet operation to your garage door.
How To Replace Garage Door Rollers: A Step-by-Step Guide
Is your garage door making noise or moving unevenly? It might be time to replace the rollers. Follow these steps to do it yourself:
- Gather Your Supplies: Before you begin, make sure you have all the necessary tools and materials. You’ll need a pair of pliers, a flathead screwdriver, a socket wrench, new garage door rollers (make sure they match the size and type of your existing rollers), and some lubricant.
- Safety First: Before you start working on your garage door, ensure your safety. Disconnect the power to the garage door opener to prevent any accidents. It’s also a good idea to wear gloves and safety goggles to protect your hands and eyes.
- Release the Tension: Use the release mechanism on your garage door opener to disengage the door from the opener. This will allow you to manually open and close the door without the assistance of the opener.
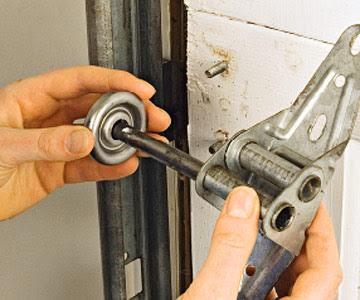
- Remove the Old Rollers: Use your pliers to remove the roller brackets from the door track. Once the brackets are loose, slide the old rollers out of the brackets and discard them. Be sure to inspect the brackets for any signs of damage or wear.
- Install the New Rollers: Insert the new rollers into the roller brackets, making sure they are properly aligned. Use your flathead screwdriver to tighten the brackets and secure the rollers in place.
- Lubricate the Rollers: Once the new rollers are installed, apply lubricant to the rollers and the tracks to ensure smooth operation. Be sure to use a lubricant specifically designed for garage doors to prevent damage to the rollers and tracks.
- Test the Door: With the new rollers installed and lubricated, manually open and close the garage door to ensure it moves smoothly and quietly. If everything looks good, reengage the door with the opener and test it again using the opener.
Congratulations! You’ve successfully replaced your garage door rollers and restored smooth and quiet operation to your garage door.
Tips for Maintaining Your Garage Door
To extend the life of your new rollers and keep your garage door operating smoothly, consider the following maintenance tips:
- Inspect the rollers and tracks regularly for signs of wear or damage.
- Keep the tracks clean and free of debris to prevent friction and ensure smooth operation.
- Lubricate the rollers and tracks every six months to reduce friction and extend the life of your garage door.
Conclusion
Replacing garage door rollers is a simple yet effective way to improve the performance of your garage door and eliminate annoying noises. By following the step-by-step guide outlined above and performing regular maintenance, you can keep your garage door operating smoothly for years to come.
Read too: Mastering the Art of How to Open a Garage Door Safely and Efficiently

Leave a Reply