Are you facing issues with your Liftmaster garage door opener? Don’t worry; you’re not alone. Sometimes, a simple reset can solve the problem and get your garage door opener back in working order. In this comprehensive guide, we’ll walk you through the process of resetting a Liftmaster garage door opener, ensuring smooth operation and peace of mind.
Understanding the Need for Resetting A Liftmaster Garage Door Opener
Liftmaster garage door openers are renowned for their reliability and durability. However, like any electronic device, they may encounter issues from time to time. Common reasons for resetting a Liftmaster garage door opener include:
- Power Surges: Electrical fluctuations or power surges can disrupt the normal operation of your garage door opener, necessitating a reset to restore functionality.
- Programming Errors: Incorrect programming or settings adjustments may cause the garage door opener to malfunction, requiring a reset to revert to factory defaults.
- Interference: External factors such as radio frequency interference or signal disruption can interfere with the communication between the garage door opener and the remote control, prompting a reset to reestablish connection.
Step-by-Step Guide to Resetting A Liftmaster Garage Door Opener
Follow these simple steps to reset your Liftmaster garage door opener and troubleshoot any issues you may be experiencing:
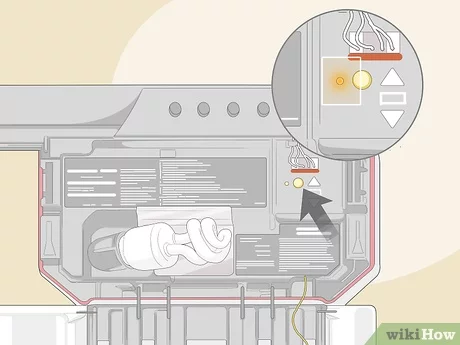
- Identify the Reset Button: Locate the “Learn” or “Program” button on your Liftmaster garage door opener. This button is typically found on the motor unit, near the antenna wire.
- Press and Hold the Button: Press and hold the “Learn” or “Program” button for approximately 10-15 seconds until the indicator light on the motor unit blinks, indicating that the reset process has begun.
- Release the Button: Once the indicator light starts blinking, release the “Learn” or “Program” button. The blinking light indicates that the garage door opener has successfully reset to factory settings.
- Reprogram Remotes: After resetting the garage door opener, you’ll need to reprogram any remote controls or keypads that were previously synced with the opener. Follow the manufacturer’s instructions for programming remotes to ensure proper operation.
- Test the Opener: Once you’ve completed the reset and reprogramming process, test the garage door opener to ensure that it’s functioning correctly. Use the remote control to open and close the garage door, checking for any irregularities or issues.
Tips for Preventing Future Issues
To avoid frequent resetting of your Liftmaster garage door opener, consider the following preventive measures:
- Regular Maintenance: Perform routine maintenance tasks such as lubricating moving parts, tightening hardware, and inspecting for wear and tear to keep your garage door opener in optimal condition.
- Surge Protection: Install a surge protector to safeguard your garage door opener from power surges and voltage spikes, reducing the risk of electrical damage and the need for frequent resets.
- Update Firmware: Check for firmware updates for your Liftmaster garage door opener regularly and install any available updates to ensure compatibility with the latest technology and minimize potential issues.
Conclusion: Keep Your Garage Door Opener Running Smoothly with a Reset
Resetting a Liftmaster garage door opener is a simple yet effective solution for troubleshooting common issues and restoring functionality. By following the step-by-step guide outlined in this article and implementing preventive measures, you can ensure that your garage door opener operates smoothly and reliably for years to come.
Read too: Mastering the Art of How to Open a Garage Door Safely and Efficiently



Leave a Reply