If your Ryobi garage door isn’t closing completely, leaves a gap at the bottom, or stops before reaching the fully open position, it’s time to adjust the travel limits. Learning how to set travel limits on Ryobi garage door opener ensures your door operates smoothly, seals properly, and prevents strain on the motor.
This detailed guide will walk you through what travel limits are, why they matter, and how to adjust them correctly—whether you own an older Ryobi model or the latest smart-enabled version.
Read too: How To Replace Garage Door Roller Like a Pro? Step-by-Step Guide
Why Travel Limits Are Important for Your Ryobi Garage Door Opener
Travel limits tell your garage door opener exactly how far the door should move when opening and closing. If these limits are not set correctly, you may experience:
- Door not closing all the way – allowing drafts, pests, and security risks.
- Door hitting the floor too hard – causing unnecessary wear on the opener and door panels.
- Door not opening fully – restricting vehicle clearance and convenience.
- Premature stopping or reversal – caused by incorrect settings triggering safety features.
By learning how to set travel limits on Ryobi garage door opener, you ensure optimal performance, safety, and longevity of your system.
How Ryobi Garage Door Opener Travel Limits Work
Ryobi garage door openers use an electronic adjustment system, typically with up and down arrow buttons on the main control panel. These buttons adjust the points where the motor stops the door’s travel.
Key components involved in travel limit adjustment:
- Up travel limit – determines how far the door opens.
- Down travel limit – determines how far the door closes.
- Motor control board – stores your limit settings.
- Safety sensors – work alongside travel limits to prevent accidents.
Tools and Preparation Before Adjusting Travel Limits
You don’t need many tools to adjust travel limits on a Ryobi opener, but preparation is key:
- Step ladder – to safely reach the control panel.
- Ryobi garage door opener manual – for model-specific details.
- Clean cloth – to wipe dust from controls.
- Safety gloves – for better grip and protection.
How To Set Travel Limits On Ryobi Garage Door Opener – Step-by-Step Guide
Ryobi models have a straightforward adjustment process thanks to their electronic controls. Here’s how to do it:
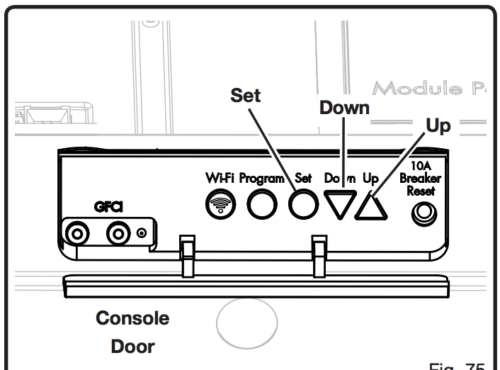
1. Access the Control Panel
- Place your ladder under the motor unit.
- Locate the Up and Down adjustment buttons, usually near the display screen.
2. Test the Current Settings
- Press the wall control or remote to open and close the door.
- Note if the door stops too soon, hits the floor too hard, or leaves a gap.
3. Adjust the Up Travel Limit
- Press and hold the Up button until the door reaches the fully open position you want.
- Release the button when the height is correct.
- Press the Set or Program button (depending on your model) to save the new open limit.
4. Adjust the Down Travel Limit
- Press and hold the Down button until the door stops just at the floor, ensuring it’s sealed without pushing too hard.
- Release the button once the desired closed position is reached.
- Press Set again to store this limit.
5. Test the Door
- Open and close the door several times to confirm it stops exactly where you want in both directions.
- If necessary, repeat the adjustment process for fine-tuning.
Safety Precautions When Adjusting Ryobi Garage Door Opener Limits
Even though the process is simple, keep safety in mind:
- Disconnect power if you need to work near moving parts.
- Keep children and pets away from the garage during adjustments.
- Never bypass safety sensors when setting travel limits.
- Always ensure the door is balanced before adjusting limits.
Troubleshooting Common Issues After Adjustment
Sometimes, even after following the correct steps, you might encounter problems:
- Door reverses before fully closing – Check the safety sensors for alignment or obstructions.
- Door still leaves a gap – Increase the down travel limit slightly.
- Motor runs but door doesn’t move properly – Check for track obstructions or binding.
- Door opens too high and hits stops – Reduce the up travel limit.
Maintaining Your Ryobi Garage Door Opener for Accurate Limits
To keep your travel limits accurate over time:
- Check settings twice a year – Vibrations can cause minor shifts.
- Lubricate hinges and rollers – Reduces strain on the opener.
- Inspect the tracks for debris – Prevents obstruction and misalignment.
- Test safety sensors monthly – Ensures the system reverses properly if needed.
When to Call a Professional
While most homeowners can handle adjusting Ryobi travel limits, you should hire a technician if:
- The door feels heavy or unbalanced.
- The opener makes grinding or loud noises.
- The door frequently binds or sticks despite correct limit settings.
Cost to Have Travel Limits Professionally Adjusted
A professional adjustment for a Ryobi garage door opener typically costs between $75 and $125. This usually includes safety checks, lubrication, and inspection for wear.
How Ryobi Travel Limit Adjustment Compares to Other Brands
Ryobi’s system is designed for ease of use, with clearly labeled buttons and digital programming, unlike older screw-drive openers that require manual turning of adjustment screws. This makes learning how to set travel limits on Ryobi garage door opener more beginner-friendly than many competitors.
Final Thoughts
Knowing how to set travel limits on Ryobi garage door opener is a valuable skill that can save you time, money, and frustration. Properly adjusted limits keep your door operating safely, reduce wear on the opener, and ensure your garage is secure.
By following this guide, you can handle the process in under 15 minutes. Just remember to test thoroughly and recheck limits periodically for optimal performance.


Leave a Reply