Your garage door is more than just an entryway for your vehicles; it’s a crucial element in the security, insulation, and aesthetics of your home. When it comes to installing a new 9×7 garage door, one of the essential initial steps is creating the rough opening. In this article, we’ll guide you through the process of preparing the perfect rough opening for your 9×7 garage door, ensuring a seamless installation.
Understanding the Rough Opening
The Foundation of a Solid Installation
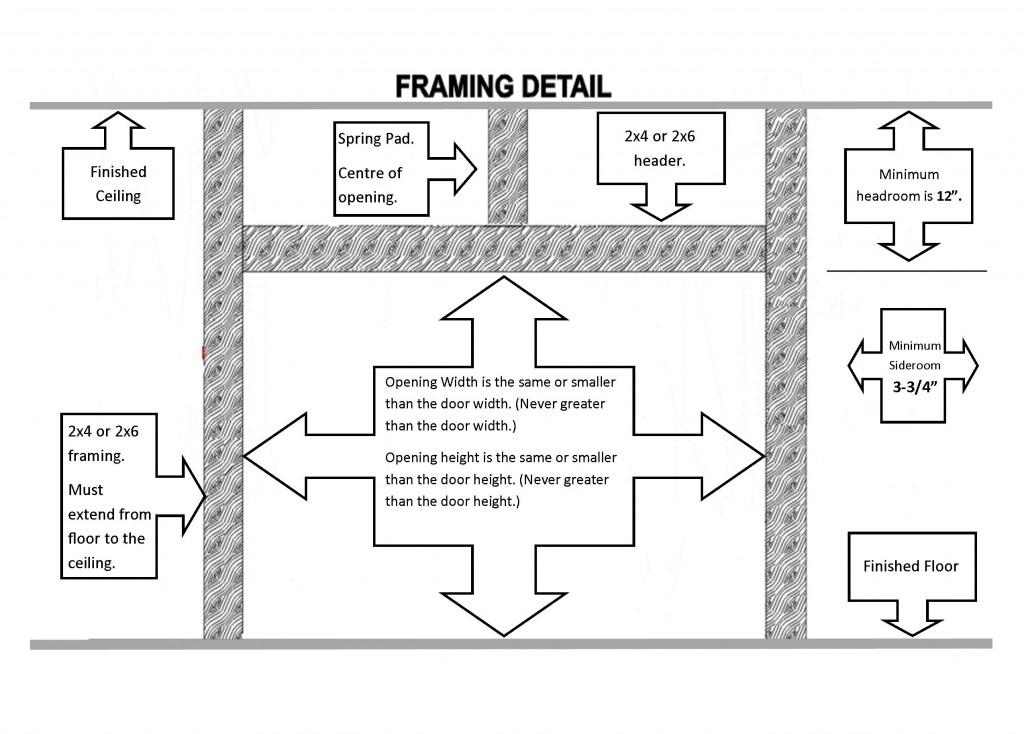
A rough opening is essentially a frame that holds the garage door and allows it to operate smoothly. It consists of the door frame, space for the tracks, and headroom for the door to move up and down. The goal is to create a structurally sound, level, and plumb rough opening that provides the door with the necessary space to function correctly.
Measuring for Your 9×7 Garage Door
Before you begin, you’ll need precise measurements to ensure your rough opening is the right size for your 9×7 garage door. Here’s how to measure:
- Width: Measure the width between the side jambs (the vertical components of the door frame) at the widest point of the opening. For a 9×7 garage door, this measurement should be 9 feet.
- Height: Measure the height from the top of the header (the horizontal component of the door frame) to the floor. For a 9×7 door, this measurement should be 7 feet.
- Headroom: Measure the distance from the top of the door opening to the ceiling or any obstruction, such as a beam or duct. Your garage door system requires a specific amount of headroom to operate correctly. Typically, a residential garage door requires about 12 inches of headroom.
Creating the Rough Opening
Step-by-Step Guide
Now that you have your measurements, it’s time to create the rough opening for your 9×7 garage door. Here’s a step-by-step guide:
- Mark the Opening: Use a chalk line or pencil to mark the top of the door opening on the header. This line represents the top edge of the door.
- Measure and Mark the Sides: Measure and mark the sides of the rough opening on the side jambs. Ensure the marks are level with the header line.
- Cut the Header: Using a saw, carefully cut along the header line. This will create the top of the rough opening.
- Cut the Side Jambs: Next, cut along the marked lines on the side jambs to create the sides of the rough opening.
- Install the Trimmers: The trimmers are vertical pieces that support the header. Secure them to the side jambs using nails or screws.
- Install the Header: Lift and align the header with the side jambs, then secure it to the trimmers.
- Check for Level and Plumb: Use a level and a plumb bob to ensure that the rough opening is both level and plumb.
- Create Space for Tracks: The tracks are essential for the door’s operation. Follow the manufacturer’s instructions to install the tracks, ensuring they have the necessary space within the rough opening.
- Add Backer Framing: Depending on the type of wall you have, you may need to add backer framing to attach the tracks securely.
- Finish the Opening: The final step is adding necessary finishing touches like trim or weather stripping to the rough opening.
Conclusion
Creating a perfect 9×7 garage door rough opening is crucial for smooth installation and operation. Precise measurements and attention to detail create a solid foundation, enhancing door functionality, appearance, and home security and convenience. If you’re not confident in your DIY skills, consider consulting a professional to ensure a flawless installation.


Leave a Reply