Garage door openers have become an essential part of modern home convenience and security. Among the popular brands in the market, Chamberlain stands out for its reliability, innovative features, and user-friendly designs. However, homeowners and DIY installers often find themselves puzzled by one specific question during installation or troubleshooting:
“What is the yellow wire on Chamberlain garage door opener?”
This article provides a complete and easy-to-understand explanation of the yellow wire’s role, where it’s located, how to handle it during setup, and why it’s crucial for the functionality and safety of your garage door system.
Read too: Door and Garage Door Companies: Choosing the Right Partner for Your Needs
What Is The Yellow Wire On Chamberlain Garage Door Opener?
The yellow wire on a Chamberlain garage door opener is a significant component of the system, often associated with the Learn button and used in the programming of remote controls, keypads, and safety sensors. Understanding its function is crucial for proper installation, troubleshooting, or replacing certain parts of your garage door opener.
Function of the Yellow Wire
In most Chamberlain garage door openers, the yellow wire is part of the control wiring system connected to the logic board. It serves several purposes:
- Remote Programming: It is tied to the circuit responsible for learning new remote controls or keypads.
- Safety Sensor Integration: The yellow wire may also be involved in communicating signals between safety reversing sensors and the opener.
- Control Panel Communication: It helps connect wall control panels, ensuring that commands (like open, close, or light control) are properly relayed.
In newer Chamberlain openers, especially models that use the yellow Learn button, the yellow wire signifies Security+ 2.0 systems, which use advanced encryption and frequency-hopping technologies for better protection against hacking and interference.
The Yellow Wire and the Learn Button System
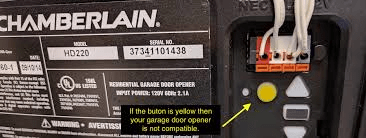
Chamberlain uses different colored Learn buttons to differentiate between remote control systems. The yellow Learn button, usually located on the back or side of the opener, signifies compatibility with Security+ 2.0 remotes.
Yellow Wire and Yellow Learn Button – What’s the Connection?
- The yellow wire is connected to the circuit board that communicates with the yellow Learn button.
- When you press the yellow Learn button, the opener enters pairing mode and uses the yellow wire’s circuit to receive remote signals.
- Any damage or disconnection of this wire can cause remote pairing or safety sensors to malfunction.
This connection is crucial in understanding what the yellow wire on Chamberlain garage door opener does and why it’s necessary to treat it with care during installation or repair.
Why Understanding the Yellow Wire Matters
Ensuring Safety
The yellow wire is often part of the safety reversing sensor system, which prevents the garage door from closing if an obstruction is detected. If this system fails or the yellow wire is disconnected, the door may not function properly, putting people and property at risk.
Avoiding Malfunctions
If you’re installing a new wall control panel or a wireless keypad and ignore the yellow wire’s role, you might face connection issues, unresponsive remotes, or non-working lights. Understanding the wiring scheme helps avoid hours of frustration.
Enhancing Compatibility
For those upgrading from older Chamberlain models or integrating smart garage systems, the yellow wire plays a vital role in ensuring new components communicate effectively with the opener’s logic board.
Where to Locate the Yellow Wire
In most residential Chamberlain garage door opener units:
- The yellow wire is part of the low-voltage wiring system, usually bundled with white, red, or black wires.
- It runs from the motor unit’s logic board to the wall control panel or safety sensor terminals.
- Often, it’s routed alongside other wires inside the opener’s casing or along the garage ceiling.
During installation or troubleshooting, always refer to the Chamberlain user manual for your specific model to locate and identify the yellow wire accurately.
How to Properly Handle the Yellow Wire
Installation Tips
- Turn Off Power First – Always disconnect power before handling any garage door opener wires to prevent electric shock or system damage.
- Follow Color Coding – Use the user manual to verify the purpose of each wire. Yellow usually relates to the learn circuit or control panel in Chamberlain models.
- Use Wire Nuts or Clips – Ensure secure connections using wire nuts or approved clips to prevent shorts or loose wires.
- Keep It Separate from High Voltage – Do not run yellow or other low-voltage wires next to high-voltage wires to prevent signal interference.
Maintenance and Troubleshooting
- Check for Corrosion or Damage – Over time, wires can corrode, especially in garages exposed to humidity. A damaged yellow wire can lead to failure in remote or keypad operation.
- Ensure Proper Connection – If the wire is loose or improperly connected, it can interrupt communication with safety sensors or the control panel.
- Use Multimeter for Testing – If the yellow wire circuit isn’t functioning, use a multimeter to check for continuity or voltage. This helps identify if the issue is with the wire, logic board, or control accessory.
Common Questions About the Yellow Wire on Chamberlain Garage Door Opener
Is It Safe to Replace the Yellow Wire?
Yes, as long as the opener is powered off and you’re using compatible gauge wire, you can replace a damaged yellow wire. Always follow Chamberlain’s wiring recommendations.
Can I Ignore the Yellow Wire During Installation?
No. Ignoring the yellow wire can result in a loss of control panel functionality or remote pairing issues. It’s a key part of the control system.
Does Every Chamberlain Model Use a Yellow Wire?
No, not all models use a yellow wire visibly. However, those with the yellow Learn button or Security+ 2.0 technology typically include it as part of the internal circuit.
How Does It Differ From Red or White Wires?
- Red wires often power the motor or accessories.
- White wires typically serve as ground or neutral.
- Yellow wires are signal or control-related, specifically for remotes and safety features.
Final Thoughts: What Is The Yellow Wire On Chamberlain Garage Door Opener?
In summary, the yellow wire on a Chamberlain garage door opener plays an essential role in the system’s functionality. It is closely associated with the Learn button system, enabling remote control programming, and often works as part of the safety sensor and control panel circuit.
Whether you’re installing a new system, troubleshooting connection issues, or upgrading to smart control, knowing what the yellow wire on Chamberlain garage door opener does ensures your system runs safely and smoothly.
Treat the yellow wire with care, follow the proper installation guidelines, and refer to your model’s manual for accurate wiring instructions. This understanding not only makes your setup more efficient but also prolongs the life and reliability of your garage door opener.


Leave a Reply