Genie garage door openers provide convenience and security for homeowners, allowing for easy access to their garages. Proper wiring is crucial for the functionality of these openers, ensuring smooth operation and safety. In this article, we will guide you through the wiring diagram for a Genie garage door opener, helping you understand the basics, installation process, and troubleshooting common issues.
Understanding Genie Garage Door Opener Wiring Basics
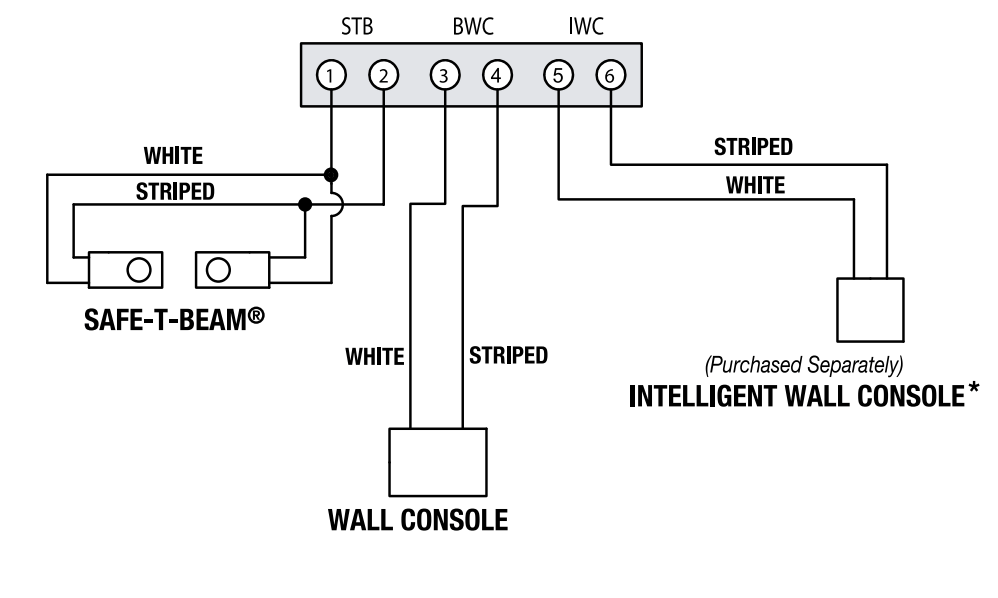
Before delving into the wiring diagram, let’s familiarize ourselves with the Genie garage door opener system. The Genie opener consists of several components, including the motor, wall control unit, safety sensors, wall console, keypad, and optional accessories. Each of these components requires proper wiring for seamless operation.
Wiring serves a vital role in the Genie garage door opener, transmitting power and signals between different parts of the system. It ensures that the motor receives the necessary power to lift and lower the garage door, and that the control units and safety sensors communicate effectively.
Preparing for Wiring Installation
Before you start the wiring installation, gather the necessary tools and materials. You will typically need a screwdriver, wire cutters, wire strippers, electrical tape, and wire nuts. Additionally, ensure your safety by wearing protective gloves and eyewear.
Refer to the user manual and wiring instructions provided by Genie. These resources are specific to your Genie garage door opener model and will guide you through the installation process. Familiarize yourself with the wiring diagram and take note of any specific instructions or color-coded wires.
Step-by-Step Wiring Installation Process
- Identifying and labeling the wires: Begin by identifying the wires that correspond to different components of the Genie opener. Label each wire according to its purpose to avoid confusion during the installation process.
- Locating the power source and connecting the power cord: Determine the power source for the opener and connect the power cord to it. Follow the wiring diagram to ensure proper connections and use wire nuts to secure the wires.
- Connecting the wall control unit to the opener: Wire the wall control unit by connecting the corresponding wires according to the diagram. Ensure a snug connection and use electrical tape or wire nuts to secure them.
- Wiring the safety sensors and connecting them to the opener: Install the safety sensors on each side of the garage door, following the manufacturer’s instructions. Connect the sensor wires to the opener using the designated terminals.
- Wiring the wall console and keypad: If your Genie opener includes a wall console or keypad, wire them according to the provided instructions. Make sure to match the correct wires to their corresponding terminals.
- Connecting additional accessories: If you have additional accessories such as remote controls or keyless entry pads, wire them as specified in the wiring diagram. This step may require additional wiring and programming, so carefully follow the instructions.
Troubleshooting Common Wiring Issues
Despite careful installation, wiring issues can occasionally arise. Here are some common problems you may encounter and how to troubleshoot them:
- Loose or disconnected wires: Inspect all connections and ensure they are secure. Reconnect any loose or disconnected wires and use wire nuts or electrical tape to secure them.
- Issues with the wall control unit: If the wall control unit is not functioning correctly, double-check the wiring connections. Ensure the wires are connected to the appropriate terminals and the unit is properly programmed.
- Troubles with the safety sensors: If the garage door does not close or the safety sensors are not working correctly, check the sensor wiring. Make sure the wires are properly connected and aligned with the sensor’s indicators.
- Problems with remotes and keyless entry: If the remotes or keyless entry pads are not functioning, verify the wiring connections and check the batteries. Reprogram the accessories if necessary, following the provided instructions.
Frequently Asked Questions (FAQs)
- How do I find the wiring diagram for my specific Genie garage door opener model?
- Can I install a Genie garage door opener without professional help?
- What should I do if I accidentally cut a wire during installation?
- Are there any alternative wiring methods for Genie garage door openers?
- Can I extend the wiring length for my Genie garage door opener?
Conclusion
Proper wiring is essential for the optimal functionality and safety of your Genie garage door opener. By understanding the basics, following the wiring diagram, and troubleshooting common issues, you can ensure a smooth installation process. Remember to consult the user manual, seek professional help if needed, and enjoy the convenience and security provided by your Genie garage door opener.


Leave a Reply