A garage door opener that suddenly stops working can be frustrating, especially when it’s due to a dead battery. Knowing how to change the battery on garage door opener ensures you stay in control and avoid costly service calls. This guide explains everything in simple, step-by-step instructions so even beginners can handle it confidently.
Why Replacing Your Garage Door Opener Battery Is Important
Replacing the battery is not just about convenience; it’s essential for:
- Reliable operation: Prevents your garage door from failing when you need it most.
- Maintaining security: A dead battery could leave your garage vulnerable.
- Extending device life: Fresh batteries reduce strain on the opener motor.
Read too: How To Replace Garage Door Roller Like a Pro? Step-by-Step Guide
According to a 2023 Smart Home Devices report, nearly 20% of garage door malfunctions are caused by weak or dead batteries in remotes or keypads, emphasizing the need for timely replacement.
Step-By-Step Guide: How To Change The Battery On Garage Door Opener
Follow these detailed steps to replace your battery safely:
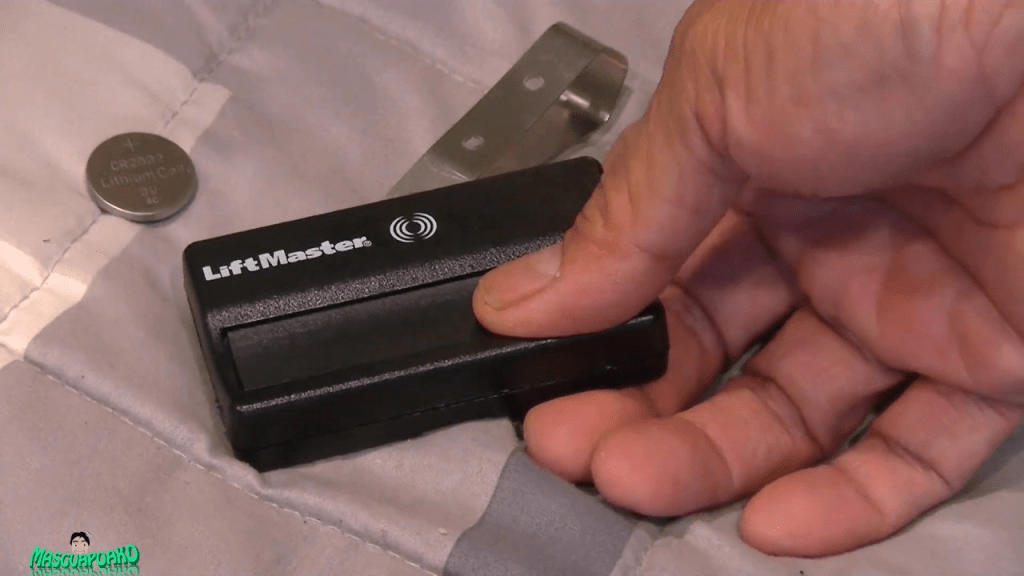
1. Identify Your Battery Type
- Most garage door openers use 9V, AA, or AAA batteries in remotes or keypads.
- Some units, like backup battery packs in Chamberlain or LiftMaster models, may use sealed lead-acid or lithium-ion packs.
- Check your opener’s manual for exact battery specifications.
2. Safety Precautions
- Unplug the garage door opener motor before working on the battery.
- Use gloves if handling lead-acid or lithium-ion batteries.
- Avoid short-circuiting the battery terminals.
3. Remove the Old Battery
- Open the battery compartment on your remote or keypad.
- Gently remove the old battery.
- Dispose of batteries properly according to local regulations.
4. Install the New Battery
- Insert the new battery following the polarity markings (+ and -).
- Ensure it fits snugly in the compartment.
- Close the battery cover securely.
5. Test the Garage Door Opener
- Press the remote or keypad to confirm the opener works.
- If the door doesn’t respond, double-check the battery orientation and connections.
Tip: Keep a spare battery on hand to avoid interruptions, especially in winter when batteries drain faster.
Common Problems & Solutions
| Issue | Solution |
|---|---|
| Garage door not responding after replacement | Verify correct battery type and polarity |
| Remote battery dies quickly | Check for corrosion or replace with high-quality alkaline or lithium battery |
| Keypad fails to work | Reset keypad after battery replacement, following manufacturer instructions |
| Opener motor won’t respond | Ensure main unit is plugged in and backup battery is charged |
For more general information about garage door openers, you can refer to Wikipedia: Garage Door Opener.
People Also Ask
How often should I replace garage door opener batteries?
Most remotes and keypads need battery replacement every 12–18 months, depending on usage and battery quality.
Can I use rechargeable batteries in my garage opener?
Yes, but ensure they match the required voltage and capacity. Rechargeable batteries may require more frequent charging.
What happens if the backup battery dies?
If the backup battery is dead, your garage may not operate during power outages. Replacing it promptly ensures reliable emergency operation.
Is it safe to replace the battery myself?
Yes, as long as you follow safety precautions and use the correct battery type. Most replacements are simple DIY tasks.
My remote still doesn’t work after changing the battery. What now?
Try reprogramming the remote according to your garage door opener’s manual, or check for obstructions and interference.
Benefits of Timely Battery Replacement
- Consistent performance: Ensures smooth and reliable door operation.
- Enhanced safety: Prevents accidental lockouts or security risks.
- Cost savings: Avoid unnecessary service calls or equipment damage.
Sharing this guide with family or friends can help them maintain their garage openers efficiently and avoid unexpected malfunctions.


Leave a Reply