If you’re installing a new opener or noticing strain, noise, or bending panels, learning How To Reinforce A Garage Door For An Opener is essential. Many garage doors—especially lightweight or older models—are not designed to handle the pulling force of an automatic opener without extra support. Reinforcement protects your door, extends the opener’s lifespan, and improves overall safety.
Why You Need to Reinforce a Garage Door for an Opener
Garage door openers apply repeated force to a single point on the door. Without reinforcement, this stress can cause:
- Door panels to crack or bend
- Loose hinges and hardware
- Noisy or jerky operation
- Premature opener failure
Read too: Mastering Quantum Garage Door Opener Programming: A Comprehensive Guide
Industry installation data shows that over 60% of garage door damage related to openers is caused by insufficient reinforcement, not motor defects.
What Happens If a Garage Door Is Not Reinforced?
Understanding the risks helps clarify why reinforcement matters.
Common problems include:
- The top panel bows inward
- The opener arm pulls away from the door
- Rollers jump the track
- Safety sensors misalign due to door flex
In extreme cases, the door can collapse inward when opening.
Is Your Garage Door Compatible With an Opener Without Reinforcement?
Not all doors are equal.
Doors that almost always need reinforcement:
- Single-layer steel doors
- Aluminum doors
- Wood doors over 10 years old
- Wide double-car garage doors
Doors that may still benefit from reinforcement:
- Insulated steel doors
- Composite doors
When in doubt, reinforcement is a low-cost insurance policy.
How To Reinforce A Garage Door For An Opener (Overview)
Reinforcement typically involves:
- Installing a horizontal reinforcement bracket
- Adding a vertical reinforcement strut
- Strengthening hinges and hardware
- Securing the opener attachment point
The process usually takes 60–90 minutes for a DIY homeowner.
Tools and Materials You’ll Need
Before starting, gather everything to avoid delays.
Tools:
- Power drill
- Socket wrench set
- Tape measure
- Level
- Safety glasses
Materials:
- Garage door reinforcement bracket
- Vertical steel strut (usually 2–3 inches wide)
- Lag screws or carriage bolts
- Manufacturer-approved hardware
Step-by-Step: How To Reinforce A Garage Door For An Opener
Step 1: Disconnect the Garage Door Opener
Safety first.
- Pull the red emergency release cord.
- Ensure the door is fully closed.
- Unplug the opener from power.
This prevents accidental movement during installation.
Step 2: Inspect the Top Garage Door Panel
The top panel takes the most stress.
Check for:
- Cracks
- Bending or warping
- Loose hinges
If damage already exists, reinforcement is mandatory before reattaching the opener.
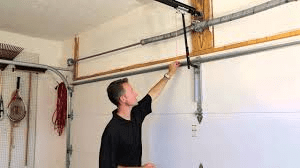
Step 3: Install a Horizontal Reinforcement Bracket
This is the most critical component.
How to do it:
- Position the bracket across the top panel, centered horizontally.
- Align it with existing hinge locations when possible.
- Secure using manufacturer-recommended bolts.
Do not rely on sheet metal screws alone—they can tear out over time.
Step 4: Add a Vertical Reinforcement Strut
Vertical struts distribute pulling force evenly.
Proper placement:
- Runs from the top bracket down toward the bottom panel
- Centered where the opener arm connects
Most residential doors need one vertical strut, while wider doors may require two.
Step 5: Reattach the Opener Arm to the Reinforced Area
Never attach the opener directly to thin door skin.
- Attach the opener arm to the reinforcement bracket.
- Tighten bolts securely, but avoid overtightening.
- Ensure the arm is straight and level.
This step alone can reduce door flex by up to 70%.
Step 6: Check Hinges, Rollers, and Tracks
Reinforcement works best when the entire system is stable.
- Tighten loose hinge screws
- Replace worn rollers
- Confirm tracks are plumb
A reinforced door with weak hardware still performs poorly.
Step 7: Reconnect and Test the Opener
Restore power and reconnect the opener.
Run 3–5 open/close cycles, listening for:
- Smooth movement
- Reduced noise
- No panel flex
Make small adjustments if needed.
How To Reinforce A Garage Door For An Opener on Different Door Types
Steel Doors
- Easiest to reinforce
- Use manufacturer-approved steel brackets
Wood Doors
- Heavier; require stronger brackets
- Use carriage bolts with washers
Aluminum Doors
- Lightweight but flexible
- Reinforcement is essential, not optional
Kelebihan vs Kekurangan: Reinforcing a Garage Door
Advantages
- Prevents door damage
- Extends opener lifespan
- Improves safety
- Reduces noise and vibration
Disadvantages
- Small upfront cost
- Requires basic tools
- Not purely cosmetic
Overall, benefits far outweigh drawbacks.
How Reinforcement Improves Opener Performance
When a door flexes, the opener compensates by working harder.
Reinforced doors:
- Reduce motor strain
- Improve opening speed consistency
- Lower maintenance costs
Technicians report reinforced doors can extend opener life by 3–5 years.
How Much Does It Cost to Reinforce a Garage Door?
| Item | Average Cost |
|---|---|
| Reinforcement bracket | $20–$40 |
| Vertical strut | $15–$30 |
| Hardware | $5–$10 |
| Professional install (optional) | $100–$200 |
Compared to replacing a damaged door or opener, reinforcement is very cost-effective.
Can You Reinforce a Garage Door Yourself?
Yes—most homeowners with basic DIY skills can complete this safely.
However, do not attempt:
- Spring adjustments
- Cable replacement
- Track realignment under tension
Those tasks should be handled by professionals.
Common Mistakes to Avoid When Reinforcing a Garage Door
- Attaching opener arm directly to the door panel
- Using undersized screws
- Skipping vertical struts
- Ignoring existing door damage
Avoiding these mistakes ensures long-term results.
About Garage Door Construction (Background)
Garage doors are designed with sectional panels, hinges, and tracks that distribute weight vertically—but not pulling force from openers. For a general overview of garage door design and mechanics, see the Wikipedia article on garage doors:
https://en.wikipedia.org/wiki/Garage_door
FAQ: How To Reinforce A Garage Door For An Opener
Q1: Is reinforcement required for all garage door openers?
Not legally, but most manufacturers strongly recommend it for safety and warranty protection.
Q2: Can reinforcement fix an already bent garage door?
It can prevent further damage, but severely bent panels may need replacement.
Q3: How long does reinforcement last?
Properly installed reinforcement can last the lifetime of the door.
Q4: Does reinforcement affect insulation or appearance?
Minimal visual impact; insulation is unaffected.
Q5: Can reinforcement reduce garage door noise?
Yes. Reduced flex leads to smoother, quieter operation.
Q6: Should I reinforce before or after installing a new opener?
Always reinforce before installing or reconnecting an opener.
Conclusion
Knowing How To Reinforce A Garage Door For An Opener is one of the smartest steps you can take to protect your home investment. Reinforcement prevents costly damage, improves safety, and ensures your opener works efficiently for years to come. Whether you’re installing a new opener or maintaining an existing one, reinforcing your garage door is a practical, affordable upgrade.
If this guide helped you, share it on social media so other homeowners can reinforce their garage doors safely and correctly.


Leave a Reply