If you need to repair, inspect, or troubleshoot your opener, knowing how to remove cover from LiftMaster garage door opener is essential. Many homeowners feel unsure about opening the unit, worried they might damage something or void a warranty. This guide walks you through the process safely, clearly, and step by step—no technical background required.
What Is a LiftMaster Garage Door Opener Cover?
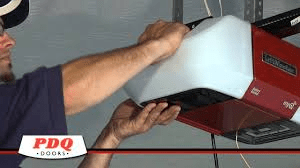
The outer cover (also called the housing) protects the internal components of your opener.
Read too: How To Replace Garage Door Roller Like a Pro? Step-by-Step Guide
What’s inside the cover:
- Motor assembly
- Logic/control board
- Wiring and terminals
- Safety sensors connections
- Light sockets
The cover is designed for service access, so removing it is normal during maintenance or repairs.
About LiftMaster Garage Door Openers
LiftMaster is one of the most widely used garage door opener brands in the U.S., known for reliability and professional-grade components.
Common LiftMaster opener types:
- Chain-drive
- Belt-drive
- Screw-drive
- Wall-mounted (jackshaft) models
While designs vary slightly, the cover removal process is very similar across most ceiling-mounted models.
Is It Safe to Remove the Cover Yourself?
Yes—if you follow basic safety precautions.
When it’s safe:
- Power is disconnected
- You’re not touching high-voltage terminals
- You’re performing inspection, cleaning, or minor repairs
When to call a professional:
- Burnt wiring
- Motor replacement
- Severe logic board damage
Removing the cover alone does not void warranties or cause damage when done correctly.
Tools You’ll Need
Before you start, gather these basic tools:
- Phillips-head screwdriver
- Flat-head screwdriver (optional)
- Step ladder (6–8 feet recommended)
- Safety gloves
- Flashlight
No specialty tools are required.
Step-by-Step: How To Remove Cover From LiftMaster Garage Door Opener
Step 1: Disconnect Power
This is the most important step.
- Unplug the opener from the ceiling outlet
- If hardwired, turn off the breaker
- Wait 30–60 seconds for residual power to dissipate
⚠️ Never work on a powered opener.
Step 2: Secure the Garage Door
Ensure the door is fully closed.
- Prevents accidental movement
- Reduces strain on internal components
If needed, disengage the emergency release (red cord).
Step 3: Locate the Cover Screws
Most LiftMaster units use 2–4 screws to secure the cover.
Common screw locations:
- Rear of the motor housing
- Side panels near the light lenses
- Under the opener body
Some newer models use snap tabs instead of screws.
Step 4: Remove the Screws
Using a Phillips screwdriver:
- Support the cover with one hand
- Remove screws slowly
- Place screws in a container (do not lose them)
Screws are usually 1–1.5 inches long.
Step 5: Release the Cover Tabs
After screws are removed:
- Gently pull the cover downward
- Slide it slightly backward if needed
- Use a flat-head screwdriver to release tabs (light pressure only)
Do not force the cover—LiftMaster housings are durable but can crack.
Step 6: Lower and Remove the Cover
Once loose:
- Tilt the cover downward
- Clear the light sockets
- Set it aside on a flat surface
You now have full access to the opener’s internal components.
What You Can Safely Do With the Cover Removed
With the cover off, homeowners commonly:
- Replace light bulbs
- Inspect wiring connections
- Check the logic board LEDs
- Clean dust with dry air
- Identify error codes
Avoid touching capacitors or exposed terminals.
What NOT to Touch Inside the Opener
Even when unplugged, avoid:
- Motor capacitor
- Transformer terminals
- Circuit board solder points
- Limit adjustment screws (unless instructed)
These areas can cause damage or require recalibration.
How to Put the Cover Back On
Reinstallation is simple.
Reverse steps:
- Align cover with housing
- Slide into place gently
- Engage tabs
- Reinstall screws (hand-tight only)
- Restore power
Do not overtighten screws—this can crack the plastic housing.
Common Problems and Solutions
Cover Won’t Come Off
- Hidden screws near light lens
- Tabs still engaged
- Slight rearward slide required
Cover Feels Stuck
- Check for missed screws
- Gently wiggle—never pry hard
Lights Fall Out
- Normal when cover is removed
- Re-seat bulbs during reassembly
Differences Between LiftMaster Models
While the process is similar, small differences exist.
| Model Type | Cover Style | Difficulty |
|---|---|---|
| Chain Drive | Two-piece plastic | Easy |
| Belt Drive | One-piece shell | Easy |
| Screw Drive | Rear-slide cover | Moderate |
| Wall Mount | Front panel | Easy |
Always support the cover to prevent drops.
Why Homeowners Remove the Cover
Most common reasons include:
- Light bulb replacement
- Troubleshooting blinking LEDs
- Wi-Fi or logic board resets
- Cleaning debris or insects
- Identifying part numbers
Understanding how to access the interior saves time and service costs.
Helpful Safety Tip
Garage door openers use rolling code technology for security, which is controlled by the internal logic board. For general background on how openers work, see Wikipedia:
https://en.wikipedia.org/wiki/Garage_door_opener
FAQ: How To Remove Cover From LiftMaster Garage Door Opener
Q1: Do I need to remove the garage door to open the cover?
No. The door can remain closed and attached.
Q2: Can removing the cover damage the opener?
Not if you follow proper steps and avoid forcing the housing.
Q3: How long does cover removal take?
Typically 5–10 minutes for most homeowners.
Q4: Are LiftMaster covers interchangeable?
No. Covers are model-specific.
Q5: Should I unplug sensors before removing the cover?
No. Sensor wires do not need to be disconnected.
Conclusion
Learning how to remove cover from LiftMaster garage door opener is a simple but valuable skill for any homeowner. With basic tools and careful steps, you can safely access internal components for inspection, cleaning, or minor repairs—saving time and avoiding unnecessary service calls.
If this guide helped you, share it on social media so other homeowners can handle basic garage door maintenance with confidence. 🚪🔧
Leave a Reply