If your garage door suddenly stops lifting, makes loud grinding noises, or only opens halfway, you may be asking: How To Replace Gear On LiftMaster Garage Door Opener? This is a common problem for homeowners, especially with older units that have seen years of daily use.
The good news is that replacing a worn or stripped gear is a manageable DIY repair for many homeowners. This guide walks you through the process step by step—clearly, safely, and correctly.
What Is the Gear in a LiftMaster Garage Door Opener?
The gear inside a LiftMaster opener is part of the drive system that transfers power from the motor to the chain or belt that moves the door.
Read too: How To Replace Garage Door Roller Like a Pro? Step-by-Step Guide
Most LiftMaster units use:
- A plastic main drive gear
- A metal worm gear connected to the motor shaft
Over time, the plastic gear wears down faster by design—it acts as a sacrificial component to protect the motor.
LiftMaster is a well-known brand manufactured by LiftMaster, a division of Chamberlain Group, and their gear systems are designed to be serviceable.
Why Do LiftMaster Gears Fail? (People Also Ask)
Common Causes of Gear Failure
- Normal wear and tear (typically after 7–10 years)
- Lack of lubrication inside the gear housing
- Heavy or unbalanced garage doors
- Broken garage door springs forcing the opener to work harder
Industry service data shows that over 60% of LiftMaster opener failures are caused by stripped gears—not motor failure.
Signs You Need to Replace the Gear
Before learning how to replace gear on LiftMaster garage door opener, confirm the symptoms.
Clear Warning Signs
- Loud grinding or buzzing noise
- Motor runs but door doesn’t move
- White plastic shavings inside the opener
- Door reverses or stalls midway
If you see white dust or shavings, that’s almost always a stripped plastic gear.
Is It Safe to Replace the Gear Yourself?
Yes—if you follow safety steps carefully.
DIY vs Professional Repair
| Option | Cost | Skill Level | Risk |
|---|---|---|---|
| DIY gear replacement | $20–$40 | Moderate | Low (with care) |
| Professional service | $150–$300 | None | Very low |
For homeowners comfortable with basic tools, DIY replacement is cost-effective.
Tools and Materials You’ll Need
Before starting, gather everything to avoid interruptions.
Required Tools
- Flathead screwdriver
- Phillips screwdriver
- 7/16″ and 1/2″ socket or wrench
- Needle-nose pliers
- Clean rags
Materials
- LiftMaster-compatible gear and sprocket kit
- White lithium grease (or manufacturer-approved lubricant)
Safety First: What to Do Before You Start
⚠️ Important Safety Steps
- Unplug the garage door opener
- Pull the emergency release cord to disconnect the door
- Ensure the door is fully closed
- Wear gloves and safety glasses
Never work on a powered opener.
How To Replace Gear On LiftMaster Garage Door Opener (Step-by-Step)
Step 1: Remove the Opener Cover
- Use a screwdriver to remove the outer housing
- Set screws aside in a container
You’ll now see the motor and gear assembly.
Step 2: Disconnect the Chain or Belt
- Loosen the tension adjustment
- Slide the chain or belt off the sprocket
This reduces strain during disassembly.
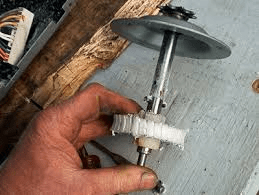
Step 3: Remove the Gear Assembly
- Locate the retaining clip or bolt holding the gear shaft
- Carefully pull out the gear shaft
- Lift out the worn plastic gear
👉 You’ll often see missing or rounded teeth—clear proof of failure.
Step 4: Clean the Housing Thoroughly
This step is often skipped—but it’s critical.
- Remove all old grease
- Wipe away plastic debris
- Inspect bearings for damage
Clean surfaces ensure longer gear life.
Step 5: Install the New Gear
- Insert the new plastic gear into position
- Reinstall the shaft and retaining clip
- Ensure smooth rotation by hand
Apply white lithium grease generously to:
- Gear teeth
- Shaft bearings
Use about 1–2 tablespoons of grease—do not overpack.
Step 6: Reinstall the Chain or Belt
- Align the sprocket correctly
- Re-tension according to manufacturer specs
- Chain should sag about 1/4 inch
Too tight = premature wear.
Step 7: Reassemble and Test
- Replace the opener cover
- Plug the unit back in
- Reconnect the emergency release
- Run a test cycle
Listen for smooth, quiet operation.
Common Mistakes to Avoid
- ❌ Forgetting to unplug the opener
- ❌ Not cleaning old grease
- ❌ Over-tightening the chain
- ❌ Using incorrect gear kits
These mistakes shorten gear lifespan significantly.
How Long Does a New LiftMaster Gear Last?
With proper conditions:
- 7–15 years is common
To extend life:
- Keep door springs balanced
- Lubricate annually
- Avoid forcing the opener
Gear Replacement vs Full Opener Replacement
When Gear Replacement Makes Sense
- Opener is under 15 years old
- Motor runs smoothly
- Electronics work properly
When Replacement Is Better
- Burnt motor smell
- Multiple electronic failures
- Unit older than 20 years
Maintenance Tips After Replacing the Gear
- Lubricate gears once per year
- Inspect springs every 6 months
- Listen for unusual noises
- Keep rails clean
Preventive care saves hundreds in repairs.
What If the Door Still Doesn’t Work?
If issues persist:
- Check safety sensors
- Inspect door springs
- Confirm travel limits
For background on garage door mechanisms, general principles are explained well on Wikipedia’s page about garage door openers, a trusted external reference.
FAQ: LiftMaster Gear Replacement
Q1: How do I know if my LiftMaster gear is stripped?
Grinding noises, motor running without door movement, and white plastic shavings are strong indicators.
Q2: Can I replace the gear without removing the opener from the ceiling?
Yes. Most gear replacements are done while the unit is mounted.
Q3: How long does the repair take?
Typically 60–90 minutes for a first-time DIYer.
Q4: Do all LiftMaster models use the same gear kit?
No. Always match the kit to your specific model number.
Q5: Should I replace the sprocket too?
If included in the kit or visibly worn, yes—it ensures smooth operation.
Conclusion
Learning how to replace gear on LiftMaster garage door opener can save you significant money and extend the life of your opener by many years. With the right tools, proper safety steps, and careful installation, this repair is well within reach for most homeowners.
Instead of replacing the entire unit, a simple gear replacement restores performance, reduces noise, and improves reliability.
👉 If this guide helped you, share it on social media so other homeowners can fix their garage doors with confidence.
Leave a Reply