Introduction
Is your garage door refusing to open when you press the remote? You are not alone. Many homeowners face the frustration of a disconnected remote after a power outage, battery change, or simply due to age. Knowing how to program a Sears Craftsman garage door opener can save you the cost of a service call and restore convenience to your daily routine. In this guide, we will walk you through the process clearly and safely, ensuring you get back on track quickly.
Identifying Your Craftsman Model
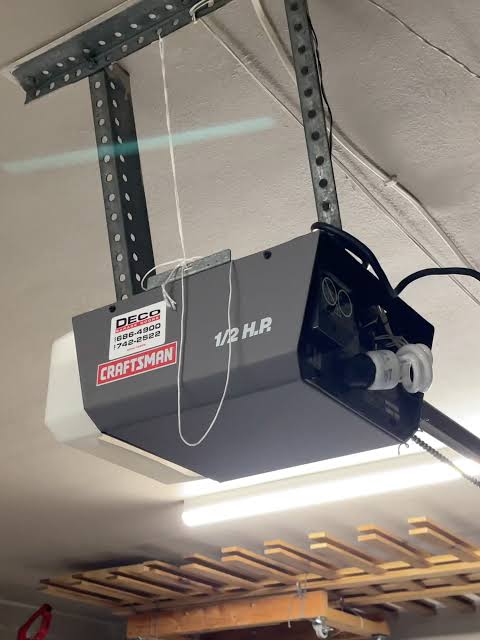
Before pressing any buttons, it is crucial to identify which type of Craftsman opener you have. Sears has manufactured these units for decades, and the programming method varies significantly between older analog models and newer digital smart openers.
Look for the model number on the motor unit hanging from your garage ceiling. It is usually located on the back or side panel. Common series include:
- 139 Series: Older models with DIP switches.
- 315 MHz / 390 MHz: Mid-range models with a “Learn” button.
- MyQ Enabled: Modern smart openers that connect to Wi-Fi.
If you cannot find the model number, look at the color of the “Learn” button on the motor unit. This is often the quickest way to determine the programming protocol.
Step-by-Step: Programming Using the “Learn” Button
For most Craftsman openers manufactured after 1997, the process involves a specific “Learn” button located on the back panel of the motor unit. This method applies to models using security+ rolling code technology.
Step 1: Locate the Learn Button
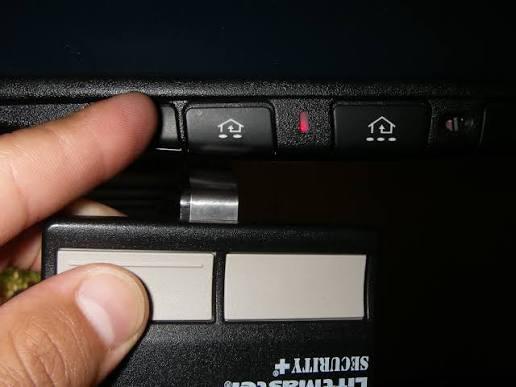
Climb a sturdy ladder to access the motor unit. Look for a small button, typically colored purple, yellow, orange, or red. It may be labeled “Learn,” “Program,” or have a small icon next to it.
Step 2: Clear Old Codes (Optional but Recommended)
If you are reprogramming because the remote was lost or stolen, you should clear the memory first. Press and hold the Learn button for about 6–10 seconds until the indicator light blinks or turns off. This erases all previously paired remotes and keypads. Note: You will need to reprogram all existing devices after this step.
Step 3: Initiate Programming Mode
Press and release the Learn button once. The indicator light will illuminate or blink, signaling that the opener is ready to receive a new signal. You typically have 30 seconds to complete the next step.
Step 4: Sync the Remote
While the light is active, press and hold the button on your handheld remote that you wish to use. Hold it for 2–3 seconds. You should see the lights on the motor unit flash or hear a click, confirming the code has been accepted.
Step 5: Test the Connection
Press the remote button again. The garage door should activate. If it does not, repeat the process, ensuring you are within range and the remote batteries are fresh.
Programming Without a Remote: Using the Wall Console
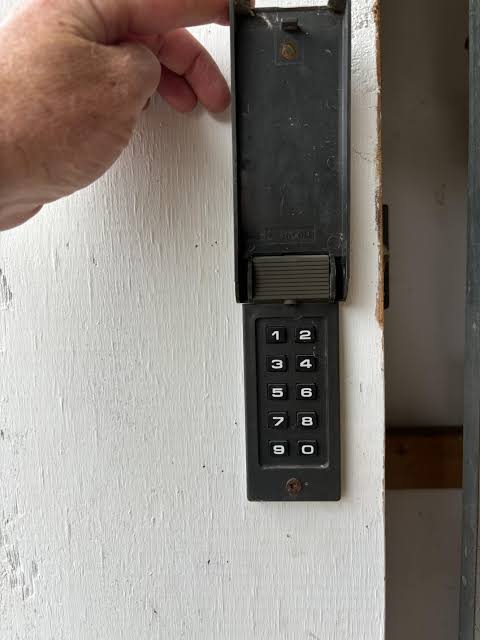
If you do not have a handheld remote, you can still program the system using the wall-mounted control panel inside your garage. This is particularly useful if you are setting up a keypad entry system.
- Press the Learn button on the motor unit.
- Within 30 seconds, enter your desired PIN on the wireless keypad.
- Press and hold the Enter or Send button on the keypad.
- Release the button when the motor unit lights flash.
This method ensures that even without a car remote, you can secure entry to your home. For more technical details on frequency standards used in garage door openers, you can refer to Wikipedia’s article on Garage Door Openers, which provides historical context on radio frequency evolution in home automation.
Troubleshooting Common Programming Issues
Even with careful following of instructions, things can go wrong. Here are the most common hurdles and how to overcome them.
| Issue | Possible Cause | Solution |
|---|---|---|
| Light Does Not Blink | Dead battery in remote | Replace the CR2032 or AA batteries. |
| Remote Pairs But Door Doesn’t Move | Safety sensors blocked | Check the photo-eye sensors near the floor for obstructions. |
| Learn Button Unresponsive | Logic board freeze | Unplug the opener for 5 minutes, then plug it back in. |
| Interference | LED bulbs nearby | Replace standard LED bulbs with shielded ones designed for garage openers. |
Expert Tip: LED light bulbs can emit radio frequency interference that disrupts the signal between your remote and the opener. If you recently changed your garage lights, try switching back to incandescent bulbs temporarily to test if this resolves the issue.
Understanding DIP Switches (Older Models)
If your Craftsman opener is an older model (pre-1997), it likely uses DIP switches instead of a Learn button. These are tiny toggle switches located inside the remote and on the motor unit.
- Open the battery compartment of your remote.
- Locate the row of small switches (usually 8–12).
- Match the position of these switches exactly to the DIP switches on the motor unit.
- Ensure every switch is in the same “Up” or “Down” position on both devices.
This mechanical matching method is less secure than rolling codes but remains effective for vintage systems. Note that Sears no longer produces new DIP switch models, so replacement parts may be harder to find.
Enhancing Security With MyQ Technology
Modern Craftsman openers come equipped with MyQ technology, allowing you to control your garage door via a smartphone app. This adds a layer of convenience and security.
To set up MyQ:
- Download the MyQ App from the Apple App Store or Google Play Store.
- Create an account and follow the in-app instructions to add a device.
- Ensure your opener is connected to Wi-Fi. You may need a MyQ Smart Gateway if your model is not Wi-Fi enabled natively.
Using the app allows you to monitor who opens your garage and receive alerts if the door is left open. This feature is increasingly popular among US homeowners concerned with package theft and home security.
When to Call a Professional
While programming a remote is a DIY-friendly task, certain situations require professional assistance. If the motor unit makes grinding noises, the door moves unevenly, or the springs appear damaged, do not attempt repairs yourself. Garage door springs are under high tension and can cause severe injury if mishandled.
Additionally, if you have tried all troubleshooting steps and the opener still fails to respond, the internal logic board may be faulty. In such cases, contacting a certified Sears technician or a local garage door specialist is the safest option.
FAQ Section
Q: Can I program a universal remote to my Craftsman opener? A: Yes, most universal remotes are compatible with Craftsman openers. You will need to follow the specific code-setting instructions provided with the universal remote, usually involving entering a manufacturer code (e.g., 0777 for Craftsman) before syncing.
Q: Why does my remote only work when I am very close to the garage? A: This is typically a sign of weak batteries or radio frequency interference. Try replacing the batteries first. If the issue persists, check for LED bulbs or other electronic devices causing signal noise.
Q: How many remotes can I program to one Craftsman opener? A: Most modern Craftsman openers can store up to 8–10 unique remote codes. However, consult your specific model’s manual for exact limits, as older models may support fewer devices.
Q: What should I do if I lose my only remote? A: You can purchase a replacement remote compatible with your model. If you have a wireless keypad, you can use it to open the door until the new remote arrives. You will need to program the new remote using the Learn button method described above.
Q: Is it safe to leave the garage door opener plugged in during a thunderstorm? A: It is generally recommended to unplug electronic devices during severe storms to protect against power surges. However, frequent unplugging can reset some settings. Consider using a surge protector specifically designed for garage door openers.
Conclusion
Learning how to program a Sears Craftsman garage door opener is a valuable skill that empowers you to maintain your home’s accessibility and security. Whether you have a vintage DIP switch model or a modern MyQ-enabled smart opener, the steps outlined above provide a clear path to resolution. By understanding your specific model and following safety guidelines, you can avoid unnecessary service costs and enjoy seamless operation.
Did this guide help you get your garage door working again? Share this article with friends and family on social media who might be struggling with their own garage door remotes. Your share could save someone else from a frustrating day!
Leave a Reply