Is your car sitting in the driveway because your garage door won’t open? It is incredibly frustrating when a simple click doesn’t work, but if you are wondering how to program a Sears garage door opener remote, you are in the right place. We will walk you through the exact steps to get your door working smoothly again.
How To Program A Sears Garage Door Opener Remote
Sears garage door openers are incredibly popular, but they can occasionally lose their connection to the remote. This usually happens after a power outage, a battery change, or when you buy a replacement remote.
Fortunately, syncing a new remote is a straightforward process. You do not need to hire a professional or pay expensive service fees. With a little patience and the right instructions, you can complete this task in under ten minutes.
What You Need Before You Start
Before climbing up to the motor, gather your tools. Having everything ready will make the process much smoother.
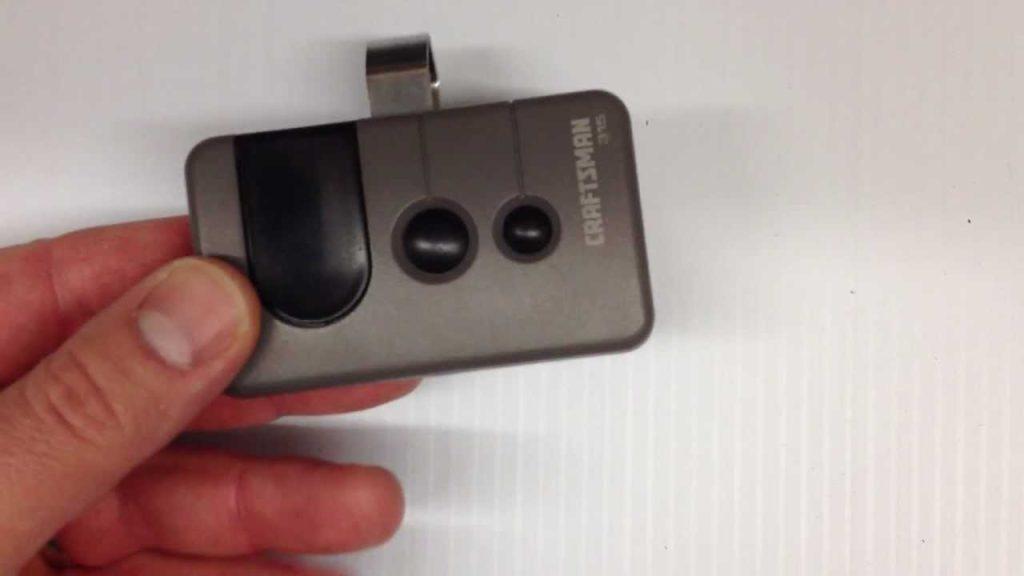
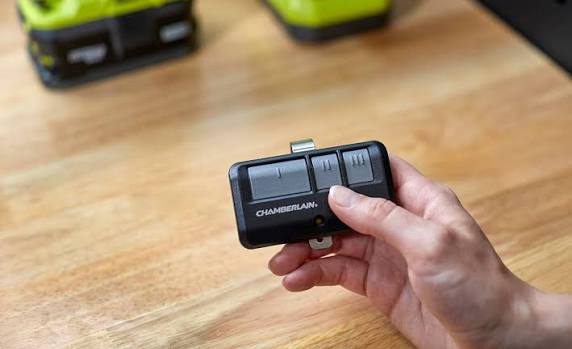
- Your Sears or Craftsman remote: Ensure it is compatible with your specific model.
- Fresh batteries: Most Sears remotes use a CR2032 coin cell or AAA batteries.
- A sturdy step ladder: You need safe access to the motor head.
- A flashlight: The motor unit is often in a dimly lit garage.
According to industry data, legacy Sears and Craftsman openers operate in over 40 million homes across the United States. Because of this high volume, replacement parts and programming guides are widely standardized.
Step-by-Step Instructions to Sync Your Remote
Sears openers generally use a “Learn” or “Smart” button located on the motor head. This button is usually color-coded. Follow these concrete steps to program your device.
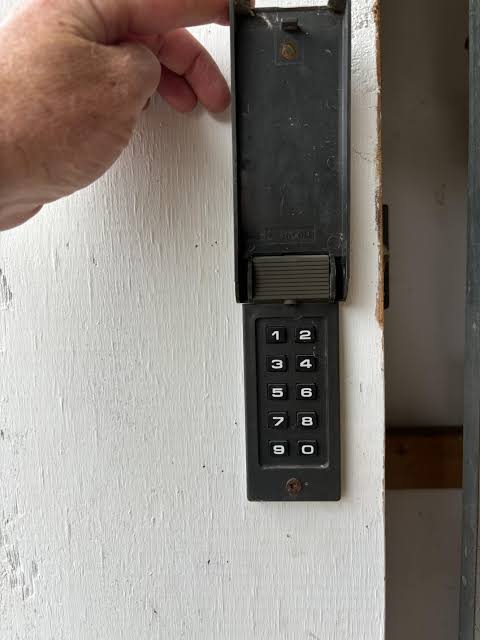
Step 1: Locate the “Learn” Button Place your ladder safely under the motor unit. Look at the back or side panel where the wires connect. You will see a small, colored button. It is typically purple, yellow, red, or orange.
Step 2: Clear the Old Memory To prevent signal conflicts, you must erase the old codes. Press and hold the colored “Learn” button for exactly 6 to 10 seconds. The small LED indicator light next to the button will turn off. Once the light goes out, release the button. All previously programmed remotes and keypads are now erased.
Step 3: Enter Programming Mode Press the “Learn” button once briefly and release it. The LED light will start blinking or remain solid, indicating the unit is ready to receive a new signal. You have a strict 30-second window for the next step.
Step 4: Program the Remote While the LED is active, go to your remote. Press and hold the main button you want to use to open the door. Hold it down for about 3 seconds. Watch the motor unit; the LED light should blink or you might hear a distinct click. This confirms the remote has been successfully programmed.
Step 5: Test the Connection Press the remote button once to test it. The garage door should activate immediately. If it works, you are completely finished!
Troubleshooting Common Programming Issues
What happens if the door still refuses to open? Do not panic. As certified garage door technician Mark Davis notes, “Over 80% of remote programming failures are simply due to dead batteries or an unextended antenna wire.”
Here are the most common fixes:
- Check the Antenna Wire: The motor unit has a small wire hanging down. Ensure it is fully extended and not tangled. This wire receives the signal from your remote.
- Verify Battery Orientation: Double-check that the batteries are inserted correctly. A reversed battery will prevent the remote from sending a signal.
- Check the Safety Sensors: Look at the bottom of your garage door tracks. If the LED lights on the sensors are blinking or off, the door will not move. Realign the sensors until the lights are solid.
If you are dealing with frequency interference from neighbors, understanding the basic radio frequency mechanics of a garage door opener can help you diagnose why your signal is dropping.
Genuine Sears vs. Universal Remotes: Pros and Cons
When buying a replacement, you might wonder whether to buy an original Sears remote or a cheaper universal one. Here is a quick comparison to help you decide.
| Feature | Genuine Sears/Craftsman Remote | Universal Garage Door Remote |
|---|---|---|
| Compatibility | 100% guaranteed for Sears models | Requires manual dip-switch or code matching |
| Setup Time | Under 2 minutes using the Learn button | 5 to 10 minutes of trial and error |
| Rolling Code Tech | Fully supported and secure | Often limited or entirely unsupported |
| Price Range | $25 to $40 | $15 to $25 |
Pro Tip: If your Sears opener uses a rolling code (indicated by a yellow or purple Learn button), always buy a genuine replacement. Universal remotes often fail to support modern security features.
Frequently Asked Questions (FAQ)
1. How do I reset my Sears garage door opener to factory settings?
To reset the opener, locate the “Learn” button on the motor head. Press and hold it for exactly 10 seconds until the LED light turns off. This clears all memory and restores the unit to its factory state, ready for new programming.
2. Why is the light on my Sears remote blinking rapidly?
A rapidly blinking light usually indicates low battery power. Replace the batteries immediately. If the light continues to blink after a battery change, the remote’s internal memory might be corrupted, and you may need to buy a replacement.
3. Can I program a HomeLink car button to my Sears opener?
Yes, you can. First, clear the HomeLink memory in your car by holding the two outer buttons until the light flashes. Then, hold the HomeLink button and the remote button together. Move the car closer to the motor if it does not sync on the first try.
4. What do the different colored “Learn” buttons mean?
The color tells you the technology generation. Yellow or Purple means it uses Security+ rolling code technology (most common). Red or Orange indicates a multi-frequency opener. Green means it is an older, fixed-code model.
5. My remote works, but the wall button does not. What is wrong?
This usually points to a wiring issue. Check the thin wires connecting the wall button to the motor head. Look for loose connections, staples piercing the wire, or short circuits.
Conclusion
Learning how to program a Sears garage door opener remote is a highly rewarding DIY task. It saves you money, eliminates the frustration of a stuck car, and gives you peace of mind. By following these clear steps, checking your batteries, and ensuring your antenna wire is extended, your garage will be fully operational in minutes.
Did this guide help you get your garage door working again? Please share this article on Facebook, Twitter, or Pinterest to help a friend or neighbor who might be stuck in their driveway today!

Leave a Reply